Tag Archives: commentary

USASOC’s URG-I for the M4

Thanks to SHOT Show and the good folks at Brownells, we can see what the US Army’s Special Operations Command is doing to improve their M4s. Let’s take a look. First, the product page.

Now, there are a bunch of things to note here. The upper receiver is unchanged. Still has that forward assist and that dust cover. The 14.5″ barrel is made by Daniel Defense, who have some excellent cold hammer forges for such things. The barrel has some unspecified improvements to work better with M855A1 ammunition, which has an exposed, hardened steel tip. I would expect these changes to be to the geometry of the feed ramp in the barrel extension, but I can’t confirm this yet. And I don’t know if there are other changes. The rest of the barrel is pretty boring. 1:7 twist rate, that government profile,1 and a midlength gas system. The midlength gas system is a noticeable difference, being somewhat longer than the standard carbine length. A midlength gas system is somewhat softer recoiling, and probably leads to improved reliability when using a suppressor (which increases the gas pressure in the system). Note that they did not specify the medium-weight “Socom” profile barrel. Overkill for expected uses? Not proven? Weight Conscious? I’m honestly not sure.

The handguard is Geissele’s Mk 16, and is 13″ long and free floated. It has a picatinny rail at the top and Mlok slots all around2. This is a big improvement over the usual plastic handguard or the KAC RAS system, which has picatinny rails and isn’t free floated. Plus a longer rail means more room for one’s hand as well as accessories. The older handguards had room for lights and lasers or your hand, but not both. Geissele handguards are very nice, and have a well-designed attachment system.

The full length handguard means the standard triangular front sight block has to go. It’s been replaced by the Geissele Super Gas Block, which is low profile, and held in place by two setscrews and a taper pin. I like pinned gasblocks. They’re sturdier. Good choice here.

Geissele also makes the charging handle. It’s bigger, sturdier, and better suited to just grabbing or pulling at one side, like lots of modern guys do. It’s a fine choice.

The other difference in play is the muzzle device. The Brownells version (for civvies) has the Surefire S3F, which is a three-pronged flash hider that also serves as an adapter for the quick-detach mechanism used in Surefire’s silencers. The military is probably getting the S4F (with four prongs). I don’t know why the difference there. It’s still a suppressor adapter, and remember, Surefire’s silencers won the SOCOM testing.

Overall, I’d say it’s a pretty solid set of improvements, and results in a gun better than the previous PIP proposal. I would like to see more if it were up to me, namely a better barrel profile and some bolt carrier group improvements. Both Lewis Machine and Tool and Knights Armament have some available improvements there, and I’d like to see some evaluations. Especially if suppressors are going to be used a lot.

Will I buy one? No. I don’t have much use for factory uppers these days. Building my own isn’t hard, and then I get to make all of the parts choices, and get things suited for me and my uses. And I don’t do clone builds. But it’s a solid upper if you’re in the market for one.

Finally, let’s do a quick weight comparison with the upper for a standard M4. The lower is separate, and needs no changing provided it has the safe/semi-/full-auto trigger group. Some of these weights are approximate because of what is and isn’t available on the market yet, but I wouldn’t expect them to change too much. I’ll update these as I get better numbers.

PartM4Weight (lbs)URG-IWeight (lbs)
Barrel14.5″ gov’t. carbine gas1.614.5 gov’t. mid gas1.5
Upper receiverA30.6A30.6
Handguarddouble shield0.72Geissele Mk 16 (13″)0.92
Gas BlockFSB0.33Geissele sgb0.1
Gas Tubecarbine0.04midlength0.05
BCGstandard0.72standard0.72
Muzzle DeviceA2 Birdcage0.14SF4P0.28
Charging Handlestandard0.08geissele sch0.09
TOTALM44.23URG-I4.26

Notes: Upper receiver weight includes the dust cover and forward assist. Listed handguard weights include all mounting hardware. The Mk. 14 only has Mlok slots at 3:00, 6:00, and 9:00.

Not bad. Despite the stupid government profile barrel, only a little weight was gained. At least according to my back of the envelope calculations, and that’s a win More capability without a lot more weight.

Edited 09/12/18 to use correct weights for the Daniel Defense 14.5″ CHF Government profile midlength gas barrel, Geissele Mk 16 handguard, and Surefire SF4P flash hider.


  1. Which I hate. A lot. It’s profoundly stupid, but that’s probably why it’s called the “government” profile. I guess we can’t expect them to fix everything at once. 
  2. “All around” being 1:30, 3:00, 4:30, 6:00, 7:30, 9:00, and 10:30. Also, Mlok is lighter than picatinny rails, woo. And some study found it tougher than the rival keymod. 

On Glock Safeties

A few weeks ago, Fishbreath and I were looking at another striker-fired pistol1 being found to be not drop safe. Fishbreath commented that he’d really like to see these barrel-up-at-30-degrees drop tests done to the Glock 43 and the M&P Shield. I promptly obliged him with a video. Glocks have three safeties designed to work together to prevent firing when dropped at any angle. Let’s take a look at how they work. An understanding of the trigger mechanism and the safeties it employs is also useful when attempting to modify that trigger system.
Continue reading

SIG P365

The market for small single stack (and staggered-single stack) pistols for concealed carry is huge. In my eyes, they’ve neatly usurped the old S&W J-Frame in the small concealment weapon space. Perfect for NPEs and the backup gun role. For my money, I’d much prefer striker fired triggers to heavy double action revolver triggers. Plus, the sights on the Glock 43 and M&P Shield are easily interchanged. Sights on most J-Frames aren’t. And what comes on the gun are atrocious.

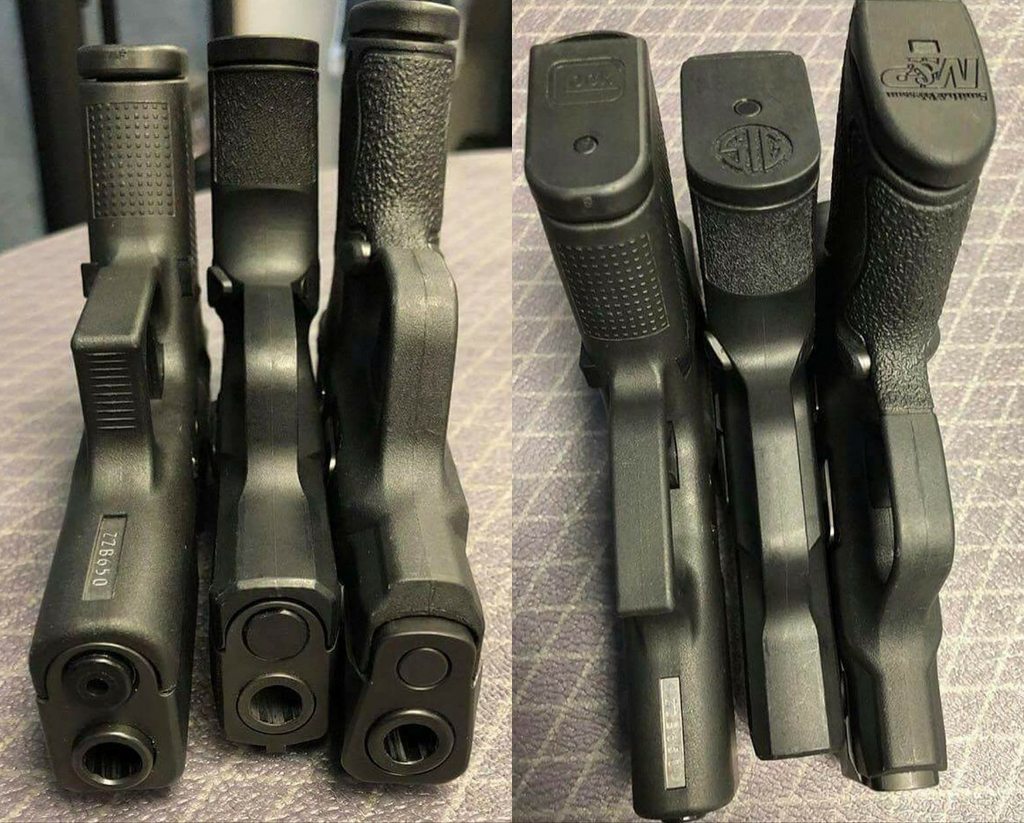
So it makes sense that SIG would try to get in on this market. Using the same sort of striker-fired action as in their P320, they’ve come out with the P365. It’s sized in between the Glock 43 and the M&P Shield, as seen below

Glock 43, P365, M&P Shield
From left to right: Glock 43, P365, M&P Shield.

What makes the P365 special is the capacity. Where the Glock 43 holds six rounds with the standard, nonextended basepad, and the Shield holds seven rounds with the standard, nonextended basepad, the P365 holds ten rounds with the standard, nonextended basepad. It’s still thin and small, so it will still conceal very well. But more bullets. More bullets is better. Otherwise, ergos are very much a slimmed down P320. I’d expect the trigger to be like the P320 as well, so short and heavy and doing its best to resemble the single action trigger of something like a P226 or P229. Eminently shootable to be sure, and way better than the trigger on a J-Frame.

This idea sounds like a winner. And it probably will be. I have my reservations, at least as of when this goes to press. First, I don’t like to buy first generation anything for firearms. I am not a beta tester. I am not a member of anyone’s QC department. And I don’t do that work for free. So I’ll wait a little, just to make sure the bugs are gone. And that goes double for anything that says SIG on the side. Between the P320 drop-safety recall and their history of QC problems with their traditional P22X guns since setting up the plant in Exeter, they get an even longer wait. I do not like the current management either.

All that said, I would like this gun to work well, because I’d love a small backup gun with more bullets.

On the Glock 19X

Glock has released their MHS entrant to the civilian market: the Glock 19X.

It’s got all the Gen 5 improvements: no finger grooves, an improved trigger, and ambidextrous slide stop, plus the texture and replaceable backstraps from the Gen 4 models. By all accounts, the Gen 5 models are awesome. I’m most excited about the improved trigger. It’s better than previous factory models and very competitive with the aftermarket options.

Of course, there are Gen 5 options available for the Glock 19, the Glock 17, Glock 34 MOS, and Glock 26 out there already. The Glock 19X is different. It pairs the full-size frame of a Glock 17 with the compact slide and barrel of a Glock 19.

Glock made this design to fit the “box” of the MHS size specifications. It will probably do well on the civilian market, as short-slide, full-size grip 1911s, snubnosed K-Frames, and subcompact pistols with grip-extending magazines are very popular.

I’m not a fan of the 19X from a concealment perspective, because the height is more annoying to conceal than the length. If I’m going to carry a full-size grip, I might as well get the sight radius of a full-size gun. Plus, those tend to recoil a little softer. I’d be a little more interested in a Glock 19 frame with a Glock 17 slide and barrel for concealment, but that’s just me.

However, if you wanted to build an Open Glock, the Glock 19X is a great base gun. It just needs an MOS model or some milling for an optic. The shorter slide means that if you opt for a smaller compensator like the KKM or Black Rifle units, your pistol will fit in a Glock 34 holster. So you’ll be able to find a holster quickly and cheaply. With a bigger compensator like the SJC, you’ll still have a shorter overall pistol to help transitions, plus a lighter slide that improves recoil characteristics.

You also get the longer, Glock 17 grip. This is nice partially because I prefer the grip on the Glock 17. Your mileage may vary. What doesn’t vary are the magwell options. There are a wide variety of large, competition magwells available for the Glock 17 size frame. Small differences make these not viable for Glock 19s. Bigger magwells are more forgiving than small ones. Plus, there are a wide variety of materials (and therefore weights) available.

There you have it. A concept with plenty of admirers, albeit for different reasons. It’s good to see more options.

M1 TTB

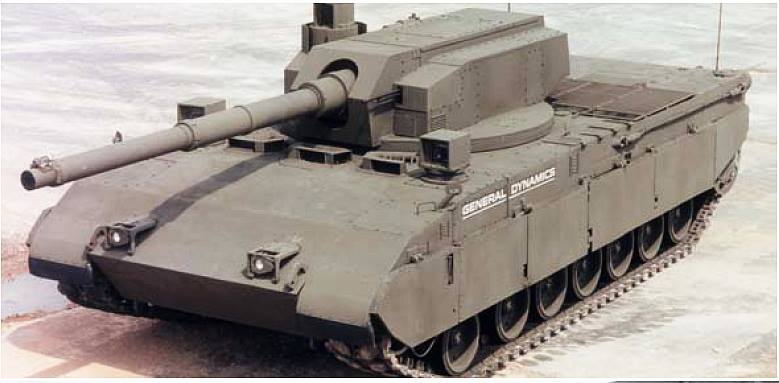
The M1 Tank Test Bed (TTB) was a late-80s prototype to test unmanned turret design concepts and compare them to a modern, manned-turret design: the then-state-of-the-art M1A1. The TTB was not necessarily intended to be what the next MBT would look like, but it was intended to shake out some design concepts and see if they were worth considering in the future. So let’s take a look.

m1 ttb

Some of you may notice a resemblance to the T-14. Both use similar unmanned turret design concepts. Such designs have been kicked around since the 1950s by many different groups of tank designers, and all for similar reasons of being able to reduce protected volume (and hence reduce design weight for a given standard of protection). The M1A1 weighs about 57 tonnes. The TTB, with a similar protective standard and the same 120mm gun (and a similar ammunition capacity) was reckoned to weigh about 15% less, for an approximate TTB weight of 48.45 tonnes. Interestingly, this is very close to the published weight for the T-14.

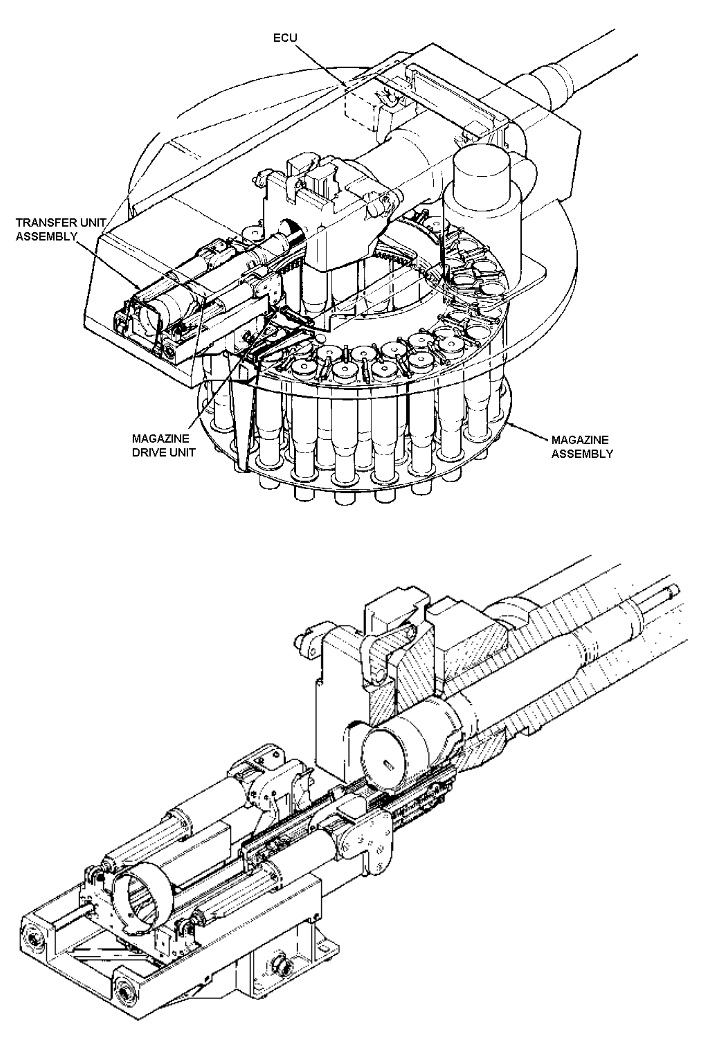
TTB also, of course, reduced crew to three men and put in an autoloader for ammunition handling. The design was intended to improve crew safety by completely isolating the crew from the ammunition. The autoloader itself was a large carousel, holding all ammunition below the turret ring. Let’s look at some pictures.

ttb autoloader

It’s sort of like the autoloader on the T-80, though NATO 120mm ammunition is one-piece, and is therefore a little more annoying to design an autoloader for. The autoloader built for the TTB held 44 rounds and this could be expanded to 48 or even 60 rounds with minor design changes. All of the ammo was stored in a ready configuration because the crew would be unable to move ammunition from a reserve magazine to the autoloader’s ready magazine (as on the Leclerc for example). The TTB autoloader was extensively tested, and could manage a rate of fire of one round every 12 seconds. Spent case bases or misfired rounds were ejected out a small hatch the back. The autoloader could be supplied through the rear hatch, and also had an unloading mode where it could slowly present rounds for removal. The autoloader weighed about 1,400 lbs. empty.

Some might question the vulnerability of such a design. However, statistically the vast majority of tank hits occur to the turret. Tanks like the T-72, for example, ran into trouble because of the ignition of their unprotected reserve ammunition stowage in the turret, not hits that set off ammunition in their autoloaders. And again, complete isolation from the ammunition should keep the crew relatively safe.

The TTB program was dialed back with the end of the cold war and was finally cancelled in the mid 90s. The autoloader design was used in the M1128 Mobile Gun System version of the Stryker.

As for the TTB prototype, it’s at the National Armor and Cavalry Museum at Fort Benning, and has recently been restored and repainted.

(Snarky) Confessions of a Recovering Tactical Timmy

I’ve gone to a bunch of “defensive”/”tactical” training classes1. And I’ve enjoyed them, and I have a lot of good friends who teach such things. That said, I’ve noticed a few quirks, and there are a few little things that annoy me. Maybe this is just me becoming more of a “gamer”. Whatever. I don’t care. Since I’m snarky, I’m going to point some of them out here.

  1. “It’s not a stage!”
    Continue reading

Fishbreath Hefts: ALICE (large) Hellcat Pack Review Part II

The year is 2017. Your correspondent recently purchased and reviewed an ALICE large field pack and frame, plus some modifications, to make a package sometimes known as the ALICE Hellcat1. Or rather, reviewed in part: no review of field gear can be considered complete without some actual field time, and that’s what this article addresses.

If you, like me, do not live under a rock, you may have heard that there was recently (at time of writing) a total solar eclipse. You can be sure I wasn’t going to miss my chance at seeing one, and you can be similarly sure that I wasn’t going to spend the money on a hotel. Some college friends decided a camping trip was in order, and I decided to tag along. The destination: Shawnee National Forest. The plan: unimproved camping near the Garden of the Gods2.

That brings me to the first part of this review: how roomy is the pack? Well, it’s complicated. The ALICE pack is shorter than your average backpacking pack from top to bottom, but wider and deeper. This has its upsides and its downsides. In the bottom of the pack, I could fit things next to my sleeping bag in both directions—both toward the front face of the pack3 and to the sides. I packed my ground cloth in front of my sleeping bag, and used the space to the side for the base of my tent.

On that note, my gear generally is not backpacking gear—although I grew up camping, I mostly grew up camping out of cars. The family two-man tent comes in a bag twenty-seven inches tall, and weighs something like eight or ten pounds4. My sleeping bag is a backpacking model, I suppose, but it’s also a three-season bag, and as such doesn’t pack down as small as a summer model might. In general, I made no particular effort to bring lightweight or compact gear, and overpacked generally for the sake of the experiment5. I ended up with a pack which weighed about thirty-five or forty pounds and filled most of the available volume of the pack. As the packing list in the footnote there suggests, this was not an ultralight or even an efficient trip. Packing as luxuriously as I did, an overnight or weekend trip is plausible. I expect I would have very little trouble packing for a longer stay if I had more appropriate gear—with access to water on-site, compact dehydrated food, and no extra-fancy mess equipment, I suspect I could pack a good week’s worth of summer clothing.

Now that we’ve loaded the pack, we can talk about how it fits and how well it carries weight. As far as fit goes, I don’t know if I could recommend it to someone very much taller than me. As I said in the previous article, I’m USGI-standard height, a hair over 5’9″. The MOLLE straps on my frame can be adjusted to ride lower on it (thereby moving the hip pad nearer to the shoulder straps for a shorter person), but they’re already at the upper limit of their adjustment. On my back, the pack fits perfectly, with the MOLLE hip belt extending from about belly-button height to my hip bones. I had a few taller people give it a try, and it didn’t fit them nearly as well. I suspect there is some further room for adjustment—by lengthening the bottom of the shoulder straps, the pack could be made to ride lower, and likely fit long torsos better—but the primary adjustment, that effected by moving the entire yoke up and down, is only really useful for average-to-short men and short-to-tall women.

We’ve established it fits people my size and smaller well. How does the ALICE Hellcat carry weight, though? As described above, the ALICE pack is short and squat relative to modern backpacking gear. Taller, flatter packs, such as the latter, put the center of gravity higher and closer to your back. Well-packed, they’ll primarily press down on your hips; the shoulder straps are primarily to stabilize the load and keep it close to your body. The load on the shoulders tends to be a downward load. The ALICE pack is a little different. It is, once again, short. Even with a sleeping roll lashed to the top, it only comes up to about the middle of my head. It doesn’t exert a downward force exclusively; rather, it exerts a sort of pivoting torque in addition to downward pressure. It’s as though the waist belt is an axle, and the pack is trying to fall away from your back.

I wouldn’t characterize this as bad, though. It’s just different. The weight on the shoulder straps, is on your upper chest just below the shoulders. The pivoting movement helps to hold the pack onto the hip pad. My forty-pound pack was no less comfortable than I would expect out of a more traditional pack. Some adjustment of the shoulder straps is necessary; there’s a middle ground I had to find between, “Too tight up top, weighing on my shoulders,” and, “Too loose up top, pulling me backwards.” Once I found it, though, I found myself able to carry it neither bent forward nor pulled backward, and as an added bonus, the smaller top-to-bottom height made for easier crouching under obstacles.

As far as hiking goes, we only had to walk a few hundred yards in total with our packs. I can’t speak to the Hellcat’s comfort over the course of a long hike. I have no reason to think it would be significantly worse than it was with my static testing and light hiking. The MOLLE straps are excellently padded and provided good comfort, even when loaded heavily by backpacking standards.

So, we got to the campsite. How is the pack to live with? Again, not bad, if perhaps not up to the same standard as present-day backpacking gear. One of the bigger things to note (again) is that the ALICE rucksack has no bottom access. It’s traditional to pack a sleeping bag at the bottom of the pack: something bulky but not terribly heavy. Many modern packs have a zipper or some other means by which items at the very bottom of the pack may be gotten at without having to unpack everything on top of them. With the Hellcat, you have to pack a little more carefully. Follow the two cardinal rules of packing (rarely accessed things go at the bottom, heavy things go closer to the frame) and you’ll be fine.

All convenience is not lost, though. The ALICE large pack has six exterior pockets, plus one pocket in the top flap. The six pockets come in three different sizes: three small (up top), two medium (on the sides down below), and one large (bottom center). The large pocket fits a mess kit and notebook with room to spare. The medium pockets are roughly three-espresso-cup moka pot-sized. The small pockets are large enough to fit a hard-sided glasses case, or an alcohol burner, pot rack, and folded aluminum foil windbreak. All are easily accessible without opening the pack or even loosening the compression straps. The top flap pocket was originally designated a map pocket and is not rated for heavy items, but it is very roomy. It easily held my maps, flashlight, phone, charger, cables, and earbuds, and could have fit much more.

The lashing points, too, are a wonderful piece of old-time fun. Putting the MOLLE straps onto the ALICE frame yielded a pair of straps used to secure the ALICE shoulder straps to the frame; I borrowed those, ran them through the buckles on my British P37 canteen carrier, and attached it to the outside of my pack. There are a good dozen or so lashing points spread out over the pack. The full Hellcat pack uses some of them to attach the MOLLE sleep system carrier, and potentially uses others to attach the MOLLE sustainment pouches, but even that would leave a number of them open for other gear. The compression straps are also very generous in length, and can readily be used both to hold gear to the top of the pack (I had a fire kit, a sleeping pad, and a spare water bottle up there) and to tie it to the bottom of the pack. If you want more strappage, you can find MOLLE accessory straps on Amazon which should serve just fine for lashing items to the pack.

Speaking of lashing and straps, the pack has exactly zero zippers. All the external pockets close with snaps. The main compartment has a drawstring closure, and the compression straps hold the top flap down on top of it. Despite that lack, I didn’t find opening the pack to be all that inconvenient. A little on the slow side, perhaps, since you generally have to loosen both compression straps, but certainly livable.

Lastly, the ALICE pack is definitively not waterproof, or even water resistant, and doesn’t come with a pack cover or dry bags6. You’ll have to work out your own solution for keeping things dry. For myself, it was lots of ziploc bags, some garbage bags, and one garbage bag big enough to serve as a pack cover. The lack of waterproofing out of the box is freeing, in a sense; it doesn’t lock you into any one solution.

So, the bottom line. Is it worth the buy? Provided it fits you, I say it is. My pack cost $70, including shipping, and if you have a nearby surplus store you can probably find one for a similar price. (That is, the pack and the frame together.) The MOLLE straps and belt came to about $30, again including shipping, and again with the similar caveat about brick-and-mortar storefronts. For the money, you get more pack, and more durable pack, than you might shopping for a traditional backpacking pack on the same budget. That said, I wouldn’t pay much more than $100 for the whole setup unless you’re very into the Hellcat’s modularity7. Once you get to, say, $150, you’re in the range where you can get a used or discounted pack from REI. $200 will buy you a new one. The quality of life there is, admittedly, better, and you have a warranty to go with it.

All told, though, I’m happy with my purchase. For my very occasional backpacking trips, a proper pack makes little financial sense. For a solid discount over even cheap hiking packs, I have something which works very nearly as well. Who can argue with that?


  1. Well, kind of. As I say in the previous article, one of the characteristics of the Hellcat is the MOLLE sleep system carrier attached to the bottom of the ALICE medium pack; I just went for a large pack right off the bat, which yields approximately the same capacity. 
  2. The one in Illinois, obviously, not the one in Colorado. 
  3. That is, the side opposite the straps. 
  4. It’s an excellent tent. It’s been bone-dry inside after taking a full day of rain on the fly. It just isn’t small or light. 
  5. For reference, I brought the following: sleeping bag and pad, tent, large cooking pot, mess kit, dinner for the whole group (three cans of chunk chicken, two boxes of rice and beans), an alcohol-burning stove, pot stand, and foil windbreak, a moka pot for coffee, coffee and stove fuel, a hoodie, cargo pants and cargo shorts, pajama pants, three t-shirts, three pairs each of underwear and socks, my trusty P37 canteen, a separate 20-oz. water bottle, maps, phone charger, sunglasses, various plastic bags to hold things and serve as pack covers, a pad for sitting on, and earbuds. 
  6. At least mine didn’t. It was issued with dry bags, though, and the full kit list did include a pack cover. 
  7. Which is to say, you like the idea of bringing the sleep system carrier and sustainment pouches as necessary, or leaving them behind when you don’t need them. 

Fishbreath Hefts: ALICE (large) Hellcat Pack Review Part I

The year is 1975. The brand-new ALICE load-carrying equipment has been released, and it brings relief for American soldiers worldwide from a system of equipment which has its roots in the mid-1950s. Improved webbing, nylon for everyone, not just the men in Vietnam, better pouches, suspenders, and belts, and at last, a proper frame pack as part of the general issue kit1, with both a medium and large rucksack available.

ALICE generally, though it’s an interesting system and what I would call the first truly modern American load-carrying equipment pattern2, is not our topic for today. Our topic for today is, instead, the ALICE pack frame, its associated belts and straps, and the large ALICE rucksack.

First, the frame. Primarily constructed of tubular aluminum, it also has some flat aluminum crossmembers for rigidity. Some D-rings at the top provide a place for shoulder straps to attach, and the waist pad attaches through larger D-rings at the bottom. Some holes in the waist pad bracing provide bottom attachment points for the shoulder straps. The ALICE straps need no further attachment points, and accordingly, the frame doesn’t provide them.

Next, the rucksack itself. As packs go, it’s very large, but not quite as large as your average expedition pack. I’ve seen figures from 3800 to 5000 cubic inches cited (about 65L to 80L, for you metric fans/backpackers), which ranges from ‘enough for long trips with smart packing’ to ‘enough for long trips’. Curiously, given American experience in Vietnam, the pack itself is not waterproof3. There is a waterproof compartment in the lid, but it isn’t large enough to fit much or rated for heavy weights. The pockets and main compartment all feature drain holes to let out any water that gets in.

Speaking of external pockets, it has six: three large ones at the bottom, and three smaller ones nearer the top of the pack. The bottom pockets close by means of straps, as does the main pack; the top pockets, at least, feature snaps for quick-opening goodness4. The main compartment is divided in two; a smaller, secondary compartment on the frame side has inside compression straps. (It might also be a place to put a water bladder, if you have such a thing.) This compartment is absurdly spacious by backpacking standards; although it isn’t especially large in the absolute sense, the maximum cross-sectional area of the pack is significantly greater than your average modern backpacking pack5 of the same size. The outside of the pack is festooned with gear attachment points, loops of fabric through which you can tie, lash, or otherwise secure equipment to the pack. Of course, being a 1970s-vintage pack, it has none of the modern conveniences like bottom access, vertically separated internal compartments, a built-in rain cover, a dedicated hydration bladder compartment, zippers, a water bottle pocket… In the interests of saving space, let me say this instead. It is a large sack with pockets. That’s about all there is to it.

The large pack fits onto the frame by means of a large padded envelope at its top edge, as well as some retaining straps which attach to the frame near the bottom. The padded envelope at the top does double duty as the padding on the pack side of a more modern yoke. And, to be honest, it doesn’t do a very good job.

Let’s back up a bit first. I ordered an ALICE pack from an eBay surplus outlet because I wanted something I could take on backpacking trips (in particular, a camping trip for the upcoming eclipse) that I couldn’t break, and something which wouldn’t break the bank. Military surplus fits the bill on both accounts, and ALICE is cheaper and yes, more hipster than the current state-of-the-American-art, MOLLE6. Then I put it on, and realized that, although the frame and pack are solid, the parts you actually have to wear are not.

First: the shoulder straps. That’s literally all they are. Very little padding and no sternum strap. Nobody ever told the GI of the day that soldiering would be easy, but for a pack designed to carry a load of seventy pounds7, adding an extra eight ounces of softness in the straps seems like a no-brainer that the Army managed to brainlessly miss. The waist belt is a similar case: the padding reaches more or less from kidney to kidney; the official name for the padded piece is the ‘kidney pad’. It’s maybe three inches from top to bottom and eight across, and remember, behind the kidney pad there are two D-rings to hold it and nothing else. The pad has to isolate the wearer from a lot of force applied over a very small area. It doesn’t pay to skimp. Lastly, the padded envelope at the top of the pack does not do a very good job at keeping the frame off of the wearer’s back. I wore it for five minutes unloaded, and there was very little comfort to speak of. Something would have to change.

Fortunately, there is a solution. The ALICE pack is still popular among some ex-military who liked it during their days in the service, and also has a following among the prepper crowd8, as well as in the cheap-outdoorsman crowd (to which yours truly belongs). Someone from one or another crowd worked out how to attach the MOLLE yoke and waist belt to the ALICE frame, making what the internet calls the ALICE Hellcat9. Since I had foreseen the problems with the raw ALICE gear, I ordered some surplus MOLLE items at the same time. The MOLLE pack straps are a proper yoke, with padding for the upper back; the MOLLE waist pad is gigantic—it wraps around nearly to the front of my hips—and both stiffer and softer than the ALICE equivalent.

I won’t repeat the build instructions here; you can find them pretty easily by searching for ‘ALICE Hellcat’. After some time spent in assembly10, and some time spent with a kitchen lighter melting a frayed strap end back to something approaching integrity, I was ready to try it out. Most of my camping gear lives away from my apartment, so I had to improvise. A pillow on the bottom of the pack simulated a sleeping bag. A pair of ammo cans and a bunch of 7.62×39 simulated my heavy kit—rations, tent, mess and cooking equipment. Those ended up pushed against the frame by ‘clothes’, another pillow stuffed in the front and top of the pack. I cinched everything down, put the pack on, and tightened up up the straps. All told, the load was about 35 pounds, and the pack weighs five or six pounds itself.

And it was surprisingly comfortable. I’ve heard bad things about ALICE, even with the MOLLE upgrades, but in ten minutes of wearing the pack around my apartment11 with a fairly heavy load by backpacking standards12, I experienced neither the bounce and wobble people talk about (the MOLLE waist belt doesn’t quite fit the ALICE frame perfectly; it’s a touch loose) nor the frame digging into my back at any point. I should note that I’m very nearly ALICE-sized: the frame was designed with a 5’10” man in mind, and I am a 5’9″ man. Larger or smaller people may have different experiences. The MOLLE straps in particular are a worthwhile investment. Proper padding at the top of the pack is payoff enough for the price of admission. Beyond that, they also have a sternum strap and load-adjustment straps, so you can change the weight balance between hips and shoulders on the fly. Beyond the serious ergonomic gains, I now have some spare ALICE attachment straps I intend to loop through some of the lashing points for utility purposes. For instance, they may carry my Pattern 37 British canteen, so I have some water on the outside of the pack. In a similar vein, I expect I could use them to secure other parts of my Pattern 37 webbing to the pack if I need extra capacity.

That’s all the testing I did—or at least all the testing I’m going to report before the inaugural trip. “It works in my apartment” is not a ringing endorsement of outdoors gear, and there are some outstanding questions about this setup. Will my frame attachment straps hold? Does the pack provide adequate access to supplies on the march? Will the lack of waterproofing be a serious problem? The trip is in about two weeks, and although it’s only an overnight, it should provide a much better indication of how the Hellcat Light works in actual practice. Expect Part II after I return.


  1. It’s my understanding that frame packs were issued starting in about 1965, but they were issued alongside the 1956 and 1967-pattern load-carrying gear, rather than being part of either set. 
  2. I think a reasonable marker for modern load-carrying gear is, “Has an associated frame pack.” By that measure, the British didn’t have modern load-carrying gear until the Pattern of 1985 PLCE. 
  3. It may be that American experience in Vietnam suggested that making something with as much stitching as a pack waterproof was doomed from the start. Troops were issued waterproof liners of various sizes instead. 
  4. Not as quick as a zipper, obviously. 
  5. The ALICE packs had to fit above a pistol belt, so rather than build tall, they built wide and deep instead. 
  6. It’s a shame we didn’t name our other web kit so creatively. BETTY in WW2, say. I suppose acroynm-sanity is a modern phenomenon. 
  7. S.L.A. Marshall wasn’t even dead yet, and he still would have been rolling in his grave. 
  8. Because it’s surplus, and preppers love them some surplus. 
  9. Technically, the standard Hellcat is a medium ALICE ruck on the ALICE frame. The medium pack rides high enough to put a MOLLE sleep system carrier beneath it, attaching to some of the pack lashing points. This makes for a pack about as large as the unmodified large ALICE rucksack in volume terms, with extra compartmentalization, which substitutes for bottom access. If ever I’m interested in a serious backpacking trip, though, I can still add the sleep system carrier and/or MOLLE sustainment pouches; doing both with the large rucksack makes a pack with something like 8000 cubic inches/130L of volume, which is more gear than I could carry for very far. 
  10. When connecting the MOLLE straps to the ALICE frame, the attachment straps make two laps. Once around the frame, once through the buckle, then repeat around the frame and through the buckle again. Otherwise they slip. 
  11. To my wife’s amusement. 
  12. I’m not an experienced backpacker by any means, but it’s my understanding that packs north of thirty pounds are out of vogue among the lightweight backpacking set nowadays. 

Some Thoughts On DCS: Part I

Eagle Dynamics’ flight sim DCS World is, on its surface, an impressive achievement. It’s the most beautiful game in its genre of the modern era, and one of the most exhaustive. Only the big players in civilian flight sims surpass it in terms of aircraft and theater variety, and nothing beats the complexity of its flight dynamics and systems modeling.

And yet, it remains a niche title. Why? I have three reasons: the engine, the ecosystem, and the community. Today, let’s look at the first.

Wait, wasn’t the engine a big pro? You’ll note I said it was pretty, and nothing more. I will grant it’s also fairly easy on performance for what it is, provided you haven’t added too many planes.

It falls down on the job in four crucial areas, though. First, it has no ‘bubble’ system a la Falcon 4, and can’t handle especially large numbers of units. There’s no good way to build and populate an entire front with opposing forces, and the lack of a true front line makes large-scale war scenarios very hard to do. It also means that the enormous bomber boxes from Battle of Britain 2 are still contained solely to Battle of Britain 2. Lacking the capability for large numbers of units makes even excellent innovations like MBot’s lua-script dynamic campaign engine less enjoyable than the pushing-20-year-old competition.

Second, there are currently two versions of DCS. DCS 2.1 is the new branch, which supports the payware Nevada and Normandy maps. DCS 1.5 is the legacy branch, which only has the Caucasus/Georgia map, but is also more reliably stable. This is a terrible state of affairs. Third-party developers have to keep their code up to date against two highly distinct versions of DCS, and these third-party developers are to a man small indie-style shops. They don’t have the developer resources to support two branches and build new products, and it shows. (More on this later.)

Third, developers can’t release standalone module updates. Module updates, as far as I can tell, require a full DCS recompilation. If a show-stopping bug makes it out of testing, players are pretty much out of luck until Eagle Dynamics can scrape together a hotfix. I have no idea why this should be the case, in this age of dynamic loading and so on. I suspect one of two things: either limitations in the engine, which does date back in some places to the Lock-On Modern Air Combat days, or a misguided attempt to prevent unauthorized third parties from accessing the high-end flight modeling features. The first issue could be fixed by a little work, and the second is a bad solution in search of a solved problem. Code signing is a thing. No need to reinvent the wheel.

Fourth, the simulation engine is extremely creaky. We’ll start with the scripting system. Not only is it difficult to use (fortunately, there are some scripting frameworks which wrap the inscrutable API), the API occasionally changes with no notice, breaking old missions. The mission editor, which is a key piece of any game that doesn’t have a dynamic campaign, is clunky and poorly integrated with the simulation engine. Its support for scripting is basically nil, to the point that it’s dramatically better to edit mission scripts in Notepad than in the mission editor itself. It may be a bit much to ask for a proper lua development environment in a flight simulator, but a full-screen text editing window would be nice, at the very least.

The simulation engine also lacks some crucial features for the sort of game Eagle Dynamics is trying to make. Most of the major omissions center on radar and electronic warfare. A third party, Heatblur Simulations, fields the current state of the art in DCS radar technology with the Viggen’s ground-mapping setup. Eagle Dynamics is scheduled to come back to the forefront with the DCS Hornet, but that still leaves all their other planes using a lightweight system which dates back to the Lock-On days. Aspect is unimportant but for notching, jammers are simple noise which only protect your aircraft, chaff (and countermeasures generally) only affects missiles locked on you (so Vietnam- or Viggen-style chaff corridors are impossible). The list goes on. Certainly, radar modeling is hard, but that’s no reason not to do it.

So much of Eagle Dynamics’ attention has been focused on paying work—modules, engine upgrades, new theaters—that they’ve let their underlying technology fall by the wayside. In the long run, that’s unsustainable, and I only hope that they can find the time to fix what needs to be fixed before the ongoing, accumulated debt catches up with them.

(More) Testing the RMR and Irons

I’ve spilled plenty of virtual ink on slide-mounted red dots. Specifically, the RMR. When last we left the subject, I found it less than ideal for unconventional presentations. Of course, class being class, I’m not always getting good, apples-to-apples comparisons. And I’m not always able to get a chance to record data.

So I thought I might spend a little time on my club’s new Quick Draw Range with a timer and some pistols. Out came the Glock 34. Out came the Glockblaster. Time for some work. I did two five shot strings with each pistols. A quick coin flip said the irons would go first. I alternated pistols between strings. All tests were from the 7 yard line, square to the target for the standard draw. I care more about the overall results, and the second strings, i.e. after I’ve gotten ‘warmed up’ for comparison purposes here. No test is perfect, but here’s my rather unscientific data:

G34 String 1GBL String 1G34 String 2GBL String 2
1.361.361.261.11
1.321.381.271.33
1.401.411.261.16
1.481.361.171.04
1.281.171.231.24
Avg: 1.37Avg: 1.34Avg: 1.26Avg: 1.18

Sigh. Okay. Let’s draw some conclusions from the data. First, I need to practice more. There’s a lot of variability in there. I need to iron that out. And I need to get faster. Further, we can see that the red dot pistol is faster on average, both cold and when warmed up.

As I said before, everything is a compromise. I think red dots are a good one overall, if you’re willing to put the time in to practice. I’d also like to get and try a frame mount. Frame mounts add bulk, but make the dot significantly easier to track in recoil. There’s an obvious shootability win there, but I’d have to see one in person to determine what I think of the increased bulk. Stay tuned.