At the very bottom, Skypirates!1 is an RPG. World entities like characters and airplanes have rollable attributes, and those determine how they interact. Those interactions are out of scope today, though. We’re going to cover how the RPG layer works at its very core: the dice, or at least the simulated dice.
If you’ve been around a very long time, or spent a long time trawling the archives, you might have come across a set of rules for building zeppelins in Savage Worlds. This was the jumping-off point. Skypirates designs past used a step dice system Savage Worlds players would have found very familiar. Start at d2, and skills/vehicle characteristics go up to d12 by die size, then to d12+d2 and d12+d4.
That last clause indicates the problem: step dice have poor resolution. For a moment-in-time, quick-playing tabletop RPG, it’s sufficient. For a PC game where I expect the timeline to run from about 1922 to 1937, it doesn’t leave a lot of room for multiple generations of airplane, in a period of time wherein aviation technology would advance even more quickly than in reality owing to greater conflict between the major powers. It leaves even less room for variation in individual airframes2. So, regrettably, step dice had to go, simple as they are to reason about.
In abandoning physical dice as the underlying abstraction, I found myself wondering, “Why not a 1-100 system?” A number between 1 and 100 represents each skill or characteristic. To roll it, generate a random number between 1 and the skill value. Highest number wins. Hard to do with physical dice, trivial with computers.
It doesn’t quite capture everything, though, so I brought in an idea familiar to players of D&D Modern: advantage. Roll two dice, take the better result. But, I don’t plan on using it primarily for rolling character skills with a bonus. Instead, in a form I’m calling ‘capped advantage’, it’s a way to combine pilot skill with airplane characteristics.
Say a plane has Agility 50 and its pilot has Flying 70. I take that to mean that the pilot knows where the edge is, and can use every bit of the plane’s agility. So, behind the scenes, we roll Flying with capped advantage Agility: roll both skills, and take the better of the two, up to a cap of the best Agility result. If the rolls are Agility 37 and Flying 64, the pilot has hit the cap, and the final result is 503.
I’ll go into the representation of planes and characters at some later date, but I wanted to make sure we got through the week with some content here, even if it’s not the allegedly-weekly news update.
While the exclamation mark is part of my official branding plan, I am likely to omit it in the running text for reasons of forgetfulness. ↩
The Secret Horsepower Race relates a story of six production Spitfires, which varied in tested top speed from 330 mph to 360 mph. ↩
I plan on doing something similar with aerial gunnery: roll the gun’s accuracy with capped advantage the pilot’s Gunnery skill. For simulation-fun reasons, lighter guns are more inherently accurate, but that doesn’t mean a pilot can shoot better than his overall skill just because the gun helps. ↩
You may remember Random Carrier Battles, if you’ve been here for long enough. That project is now abandoned, because modern alternatives like Task Force Admiral exist, and although they lack the Random element, they hit the Carrier Battles part of the project with more verisimilitude and much prettier graphics.
But the germ of the idea stuck around, and a better, easier 2d engine in the shape of Flutter presented itself. The idea (small-scale strategy-game air combat in the Pacific) got me thinking: what other settings would fit this kind of design?
The Pitch
Enter Skypirates! (Exclamation mark included.) Skypirates! is a game of air piracy, zeppelin aircraft carrier combat, and high adventure in the South Seas. My current, very preliminary design document covers three main gameplay layers.
Air Combat
Send your zeppelin’s air wing into combat against all challengers: other planes and airships, surface targets, ships at sea, and more. From your radio room, direct squadrons of your own construction, staffed with pilots and officers whose personalities and particular abilities affect the way dogfights play out.
Airship and Crew Management
Design a zeppelin, or choose from premade options, with which to tackle the unfriendly skies of the Far East. Pick and choose aircraft to fill its hangars, and crew to fill its cabins.
Careful weighting of the options will pay off! Pilots with certain temperaments and skills match certain planes better than others.
High Adventure
Daring deeds and thrilling exploits are just around the corner in every port of call. Choose your own path through branching stories of treacherous pirates, ancient civilizations, and treasures thought lost to the mists of time.
Progress
These are the very early days, so it’s time for some generalities!
Technologies
“Flutter?” I hear the technologically-inclined in the audience asking. “The mobile app framework?”
It is an unusual choice, but not an unreasonable one, from where I stand.
Reason one: I’m familiar with Flutter right now, thanks to work. It’s simple and expressive, easy to extend, and ludicrously cross-platform. (I don’t intend to support anything beyond desktop, though.) It being a UI-centric toolkit, it makes the hard part (pretty UI) easy.
Reason two: Dart has gone from a pretty good language to a great one, with the addition of null safety. It’s concise without being unreadable, I like having named parameters, and it doesn’t go overboard on the punctuation.
Reason three: it’s less opinionated than most game engines about how world and data ought to be structured. This isn’t an attack on traditional game data modeling practice, merely a note that I find it easier to reason about when there’s a world state on one hand, and a rendering engine on the other, and they only talk in strictly limited ways.
Design: Scope and Scale
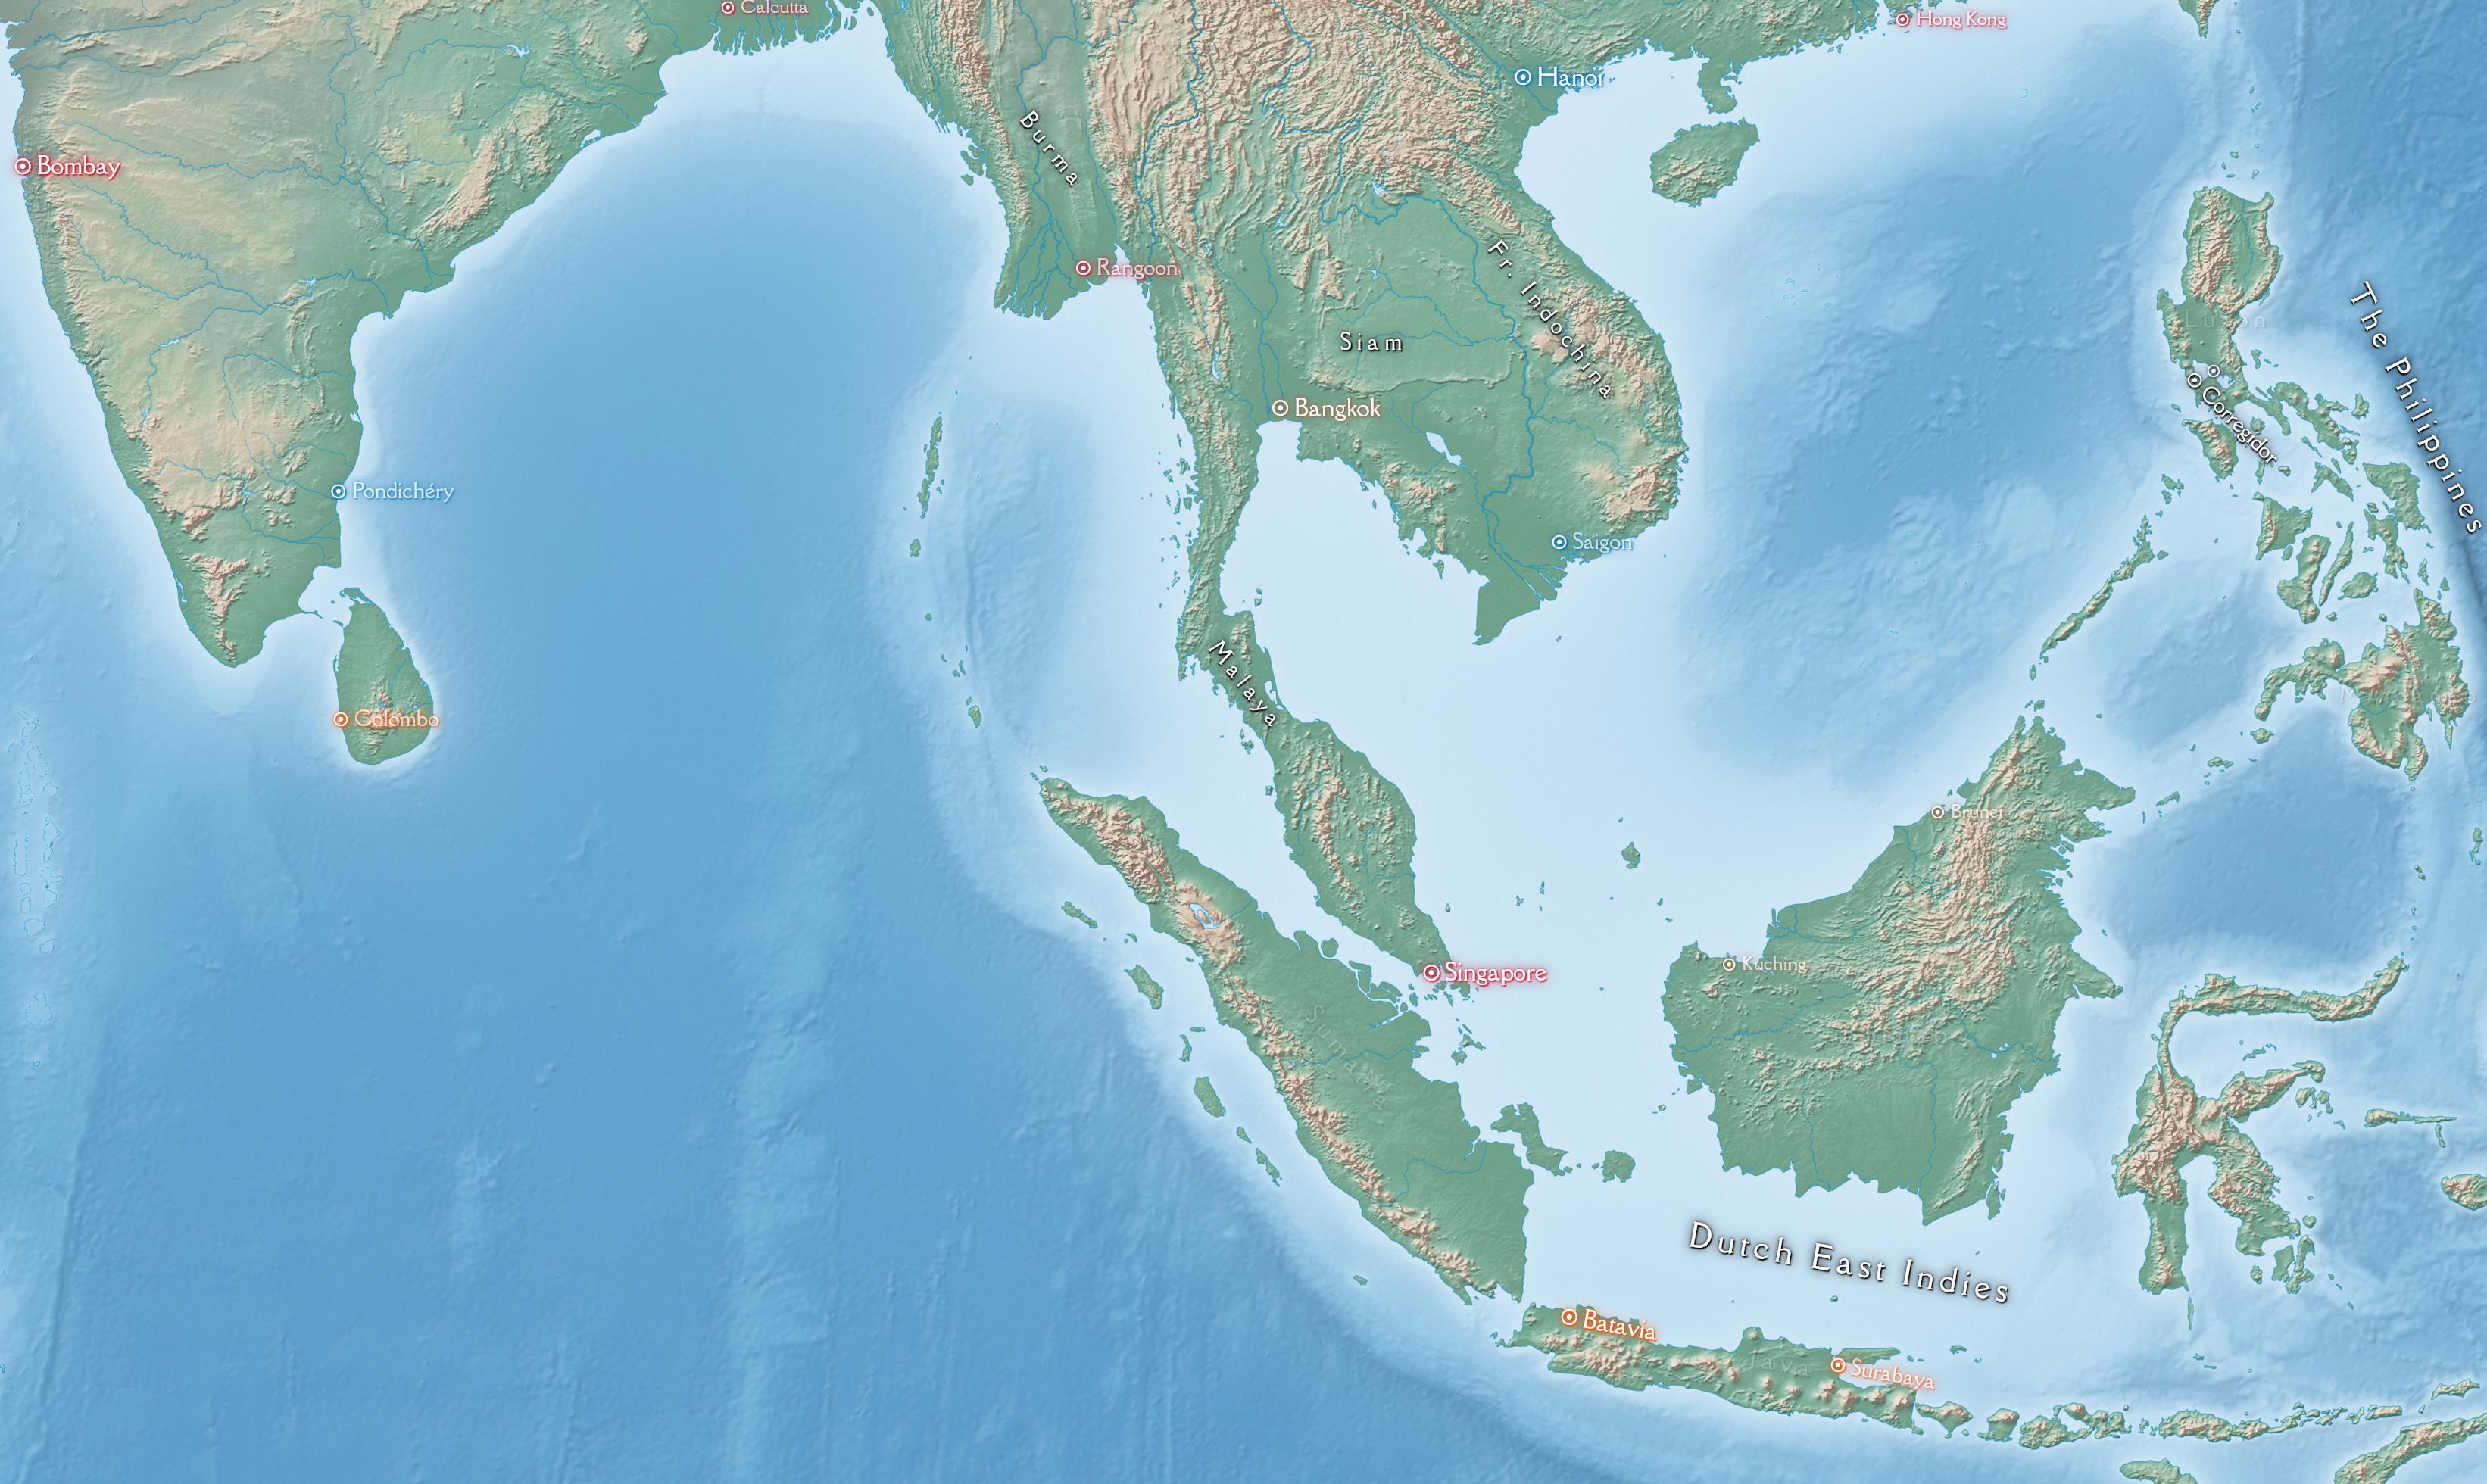
The world map image above is a lot of the map, but not the whole thing: it runs from about the top of Honshu west to Afghanistan, and south to about the northern third of Australia.
In this alternate history, that region of the planet has all of the ingredients for a vigorous population of pirates: namely, a lot of territories belonging to a lot of different powers, most of whom are busy in their home theater(s) with more pressing threats, and all of whom want to obstruct their opponents’ progress in overseas holdings as much as possible. Nearly every player in Europe is represented somewhere on the map: Britain, France, the Dutch Republic (alternate history, remember), Germany, Italy, Portugal… There are American colonies too, in and around the Philippines, from all the several American nations, and local powers too.
Because I am lazy, I’m using Cartesian geometry instead of spherical geometry, so distances aren’t quite accurate. Eventually, that may change, if I decide to expand the scope of the world, but India, Southeast Asia, and some very near parts of Oceania seem like plenty of room to run to start with.
The world runs on one-minute time steps, and although positional accuracy is basically ‘as high as floating-point numbers allow’, I’m planning on an ‘interaction range’ of 5-10 miles, at which point other systems (dogfights, visiting a port or point of interest, etc.) come into play. Maybe. This part’s still up in the air.
The typical player faction is a single zeppelin, its crew, and its air wing, an independent with an eye toward privateering or outright piracy. The design likely admits some mild variations on the theme (employee of an aviation security company, a task force of two or three airships…), but those will come later if they come at all. As alluded to in the elevator pitch, crew will have relatively detailed character sheets, and crew characteristics and aircraft characteristics intersect somewhat. A pure virtuoso pilot might prefer a more agile machine, while a tactician might want something with better energy fighting. An instinctive gunner might do best with a few heavy guns, carefully choosing his shot. A more exuberant personality might prefer more ammo.
Characters under the player’s command get placed into three categories, to reduce skill management minutiae: the player’s avatar, over whose sheet the player has full control; officers, who the player can guide down certain paths; and ordinary crew, who level up and gain skills on their own, according to templates.
Design: Aircraft
All of which will be accounted for in aircraft design—although designing airframes is outside of the player’s scope. On the other hand, souping up an existing model, swapping its engine for a bigger one, or adding guns are within reason.
I have a lot more to say about aircraft, because getting the math down took a ton of effort, so I’ll save it for its own post.
Anyway, that’s a very brief introduction to a few parts of Skypirates! As I continue the creative process, I’ll have more to say.
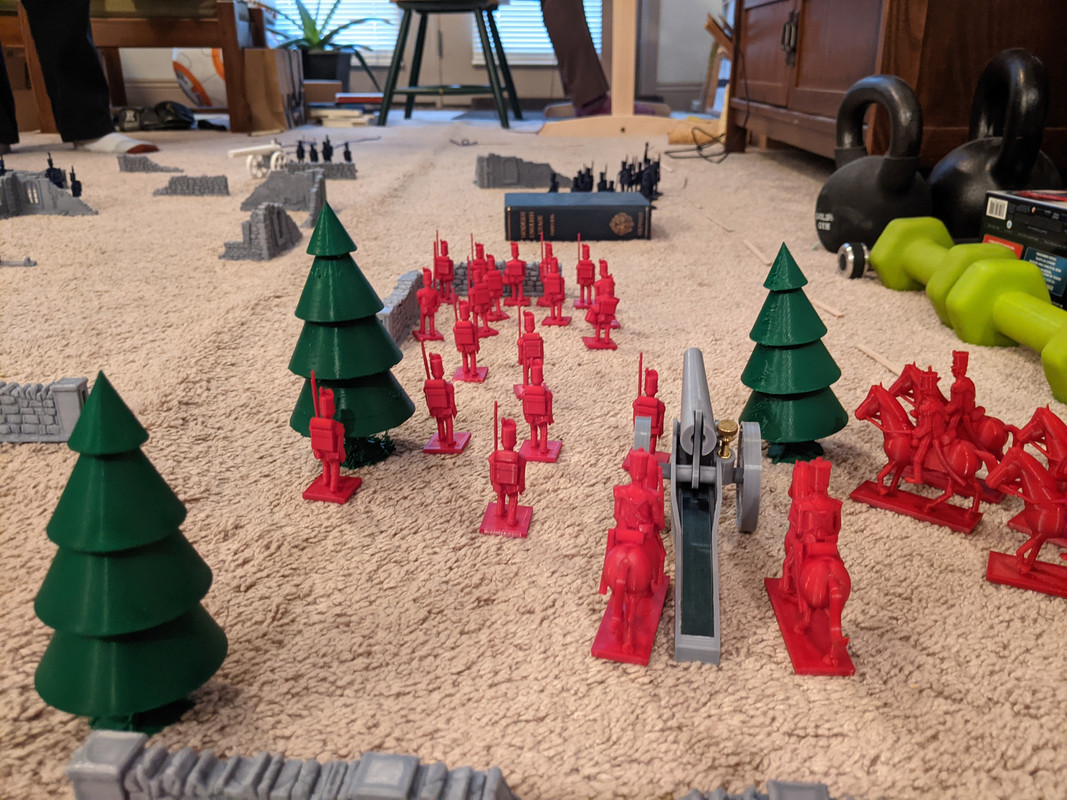
I got a chance to play a game of Little Wars with our very own parvusimperator last weekend, taking advantage of the slightly larger amount of floor space available at his apartment to bring out the printed scenery and the expanded armies I’ve been working on since the last game. Since it’s parvusimperator’s baptism by fire, we decided to play without any extra rules, Original Wells style. So, without further ado…
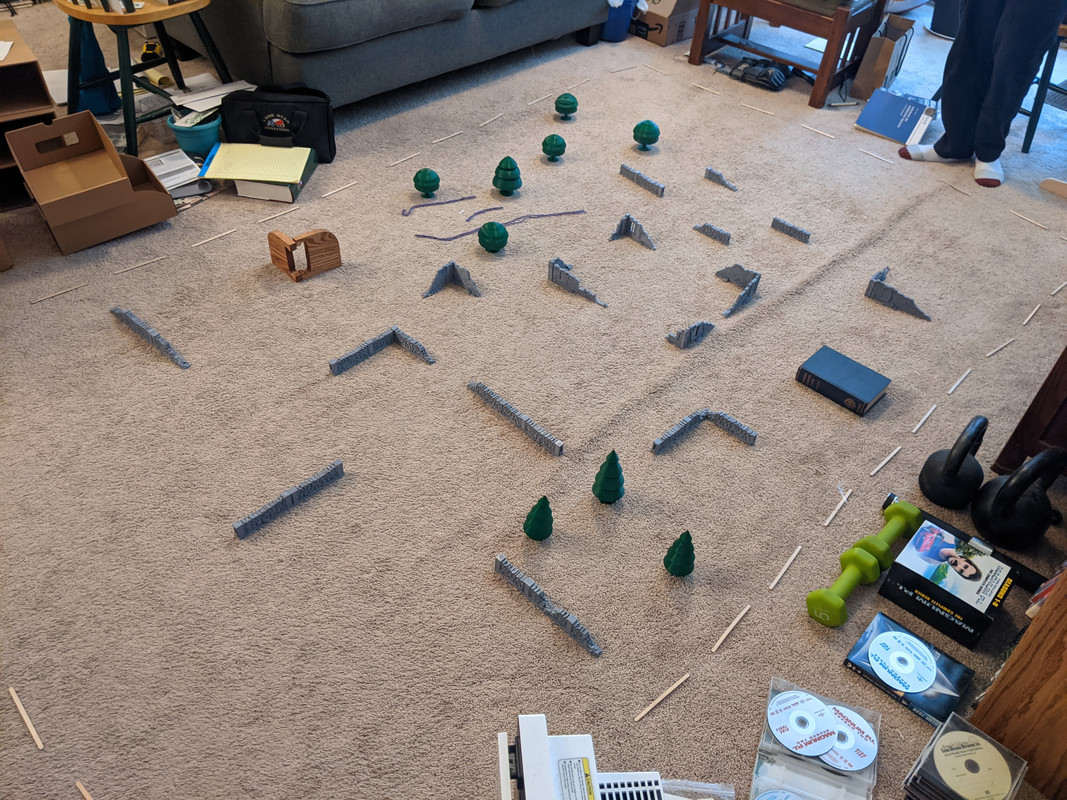
The Battle of Chopinburg House
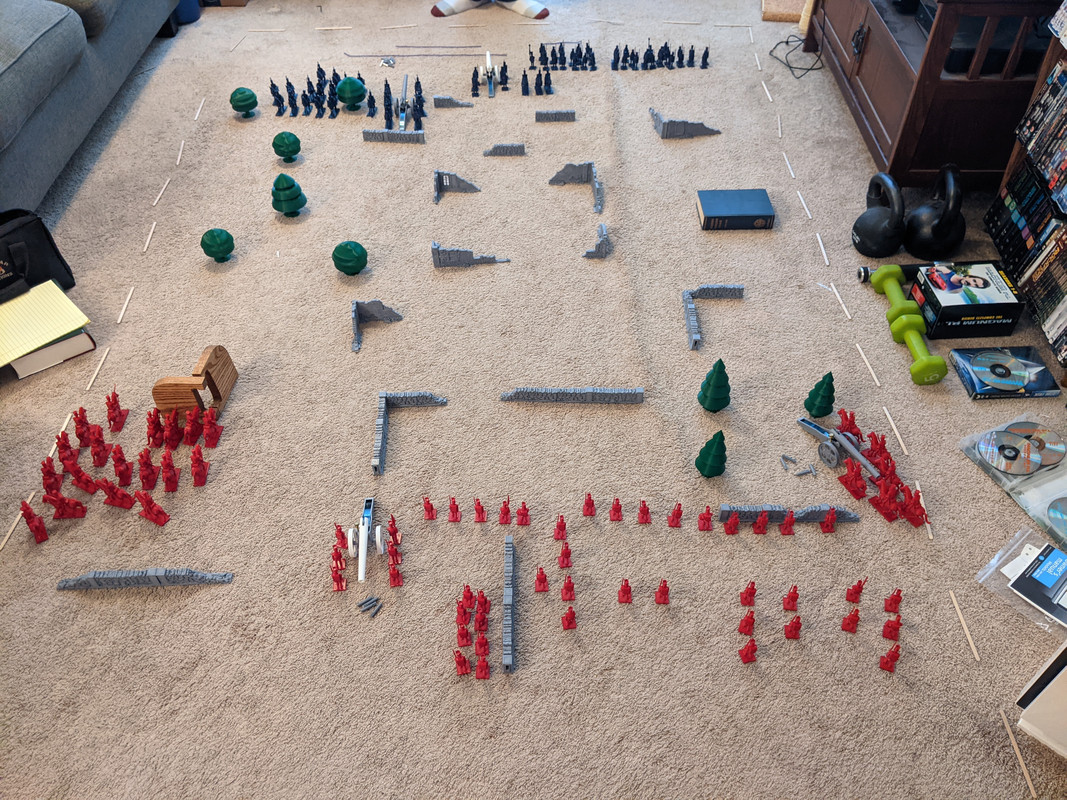
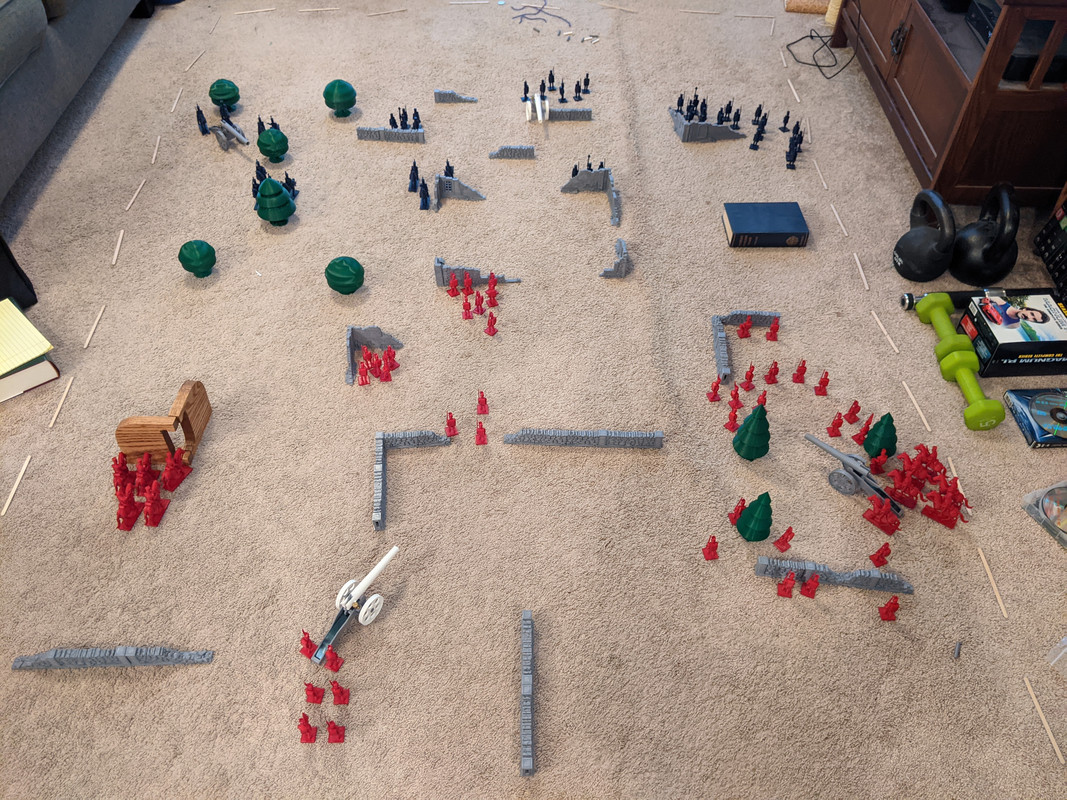
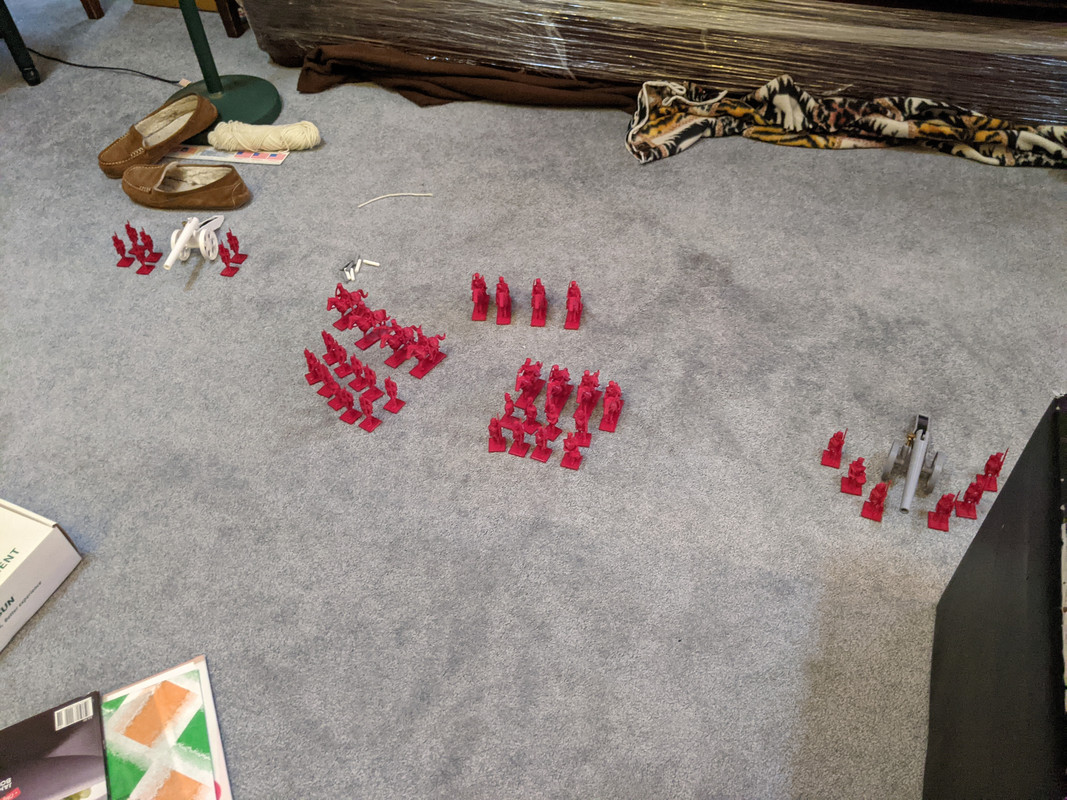
The red and blue armies meet at the ruins of Chopinburg House, a manor on the Continent destroyed in an earlier battle, and a vital point in the local road network.
North is to the upper right. I’m controlling the red forces; parvusimperator has the blue.
The central feature of the battlefield is Chopinburg House itself, just north of the center of the field. To the west of Chopinburg House is the orchard, and south of the orchard is the chapel. On the north and south of the house are the northern and southern fields, marked by stone walls. Southeast of the house is Chopinburg Wood, and the various remaining ruins and buildings (one represented by a book) are various outbuildings for the manor itself.
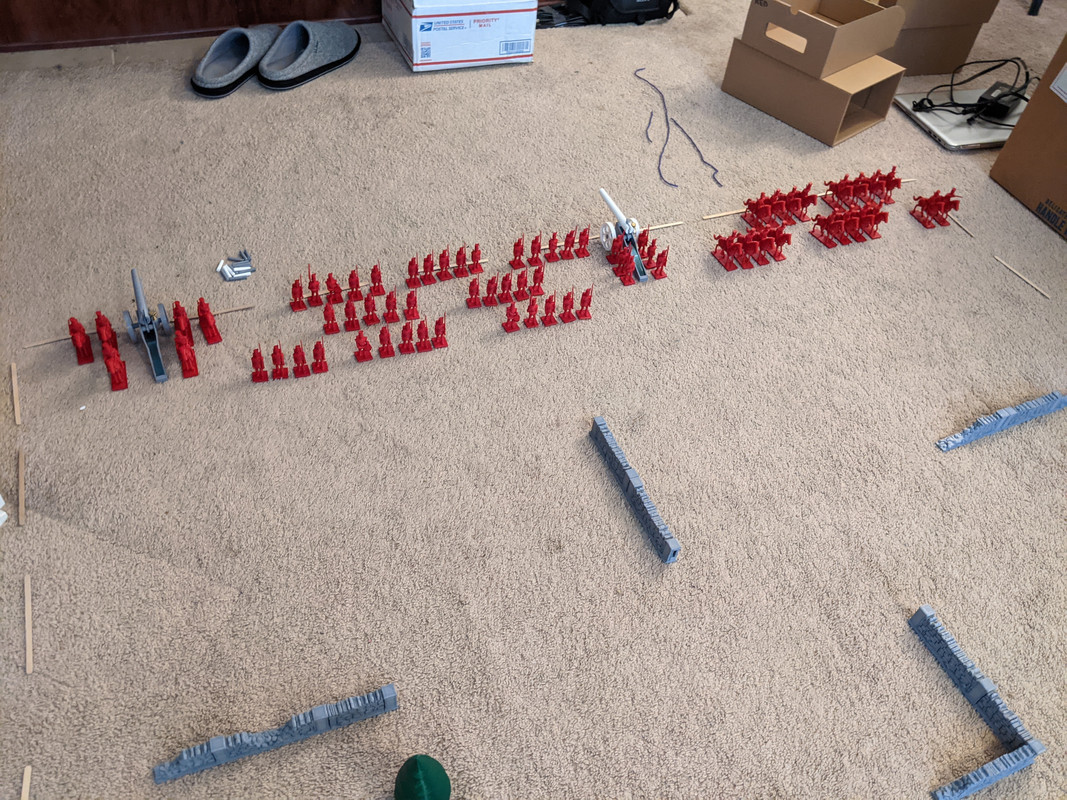
The red forces deploy in what’s becoming my traditional formation: infantry in staggered files to make a harder artillery target, cavalry striking force on the left, one unit of horse artillery and one of foot artillery.
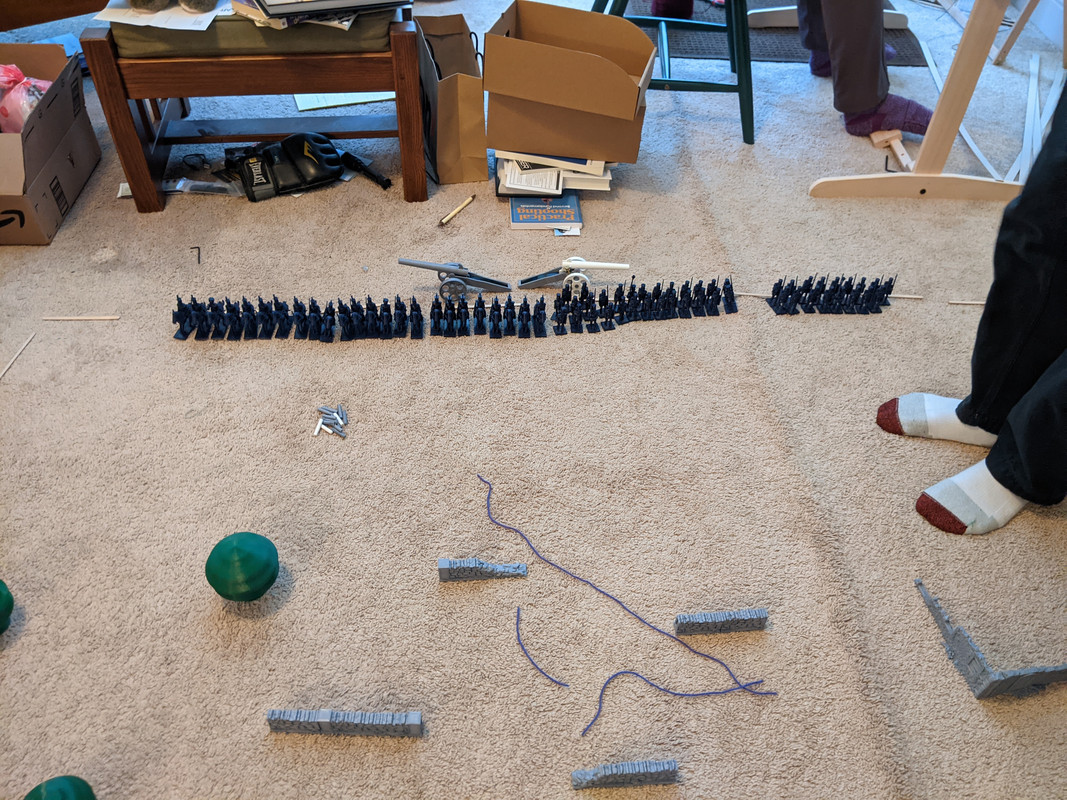
Parvusimperator’s deployment is ‘blob’, which is faster to set up and doesn’t make much difference beyond aesthetics. His cavalry is largely concentrated on his right, opposite my left.
My opponent, given that this is his first game, let me move first.
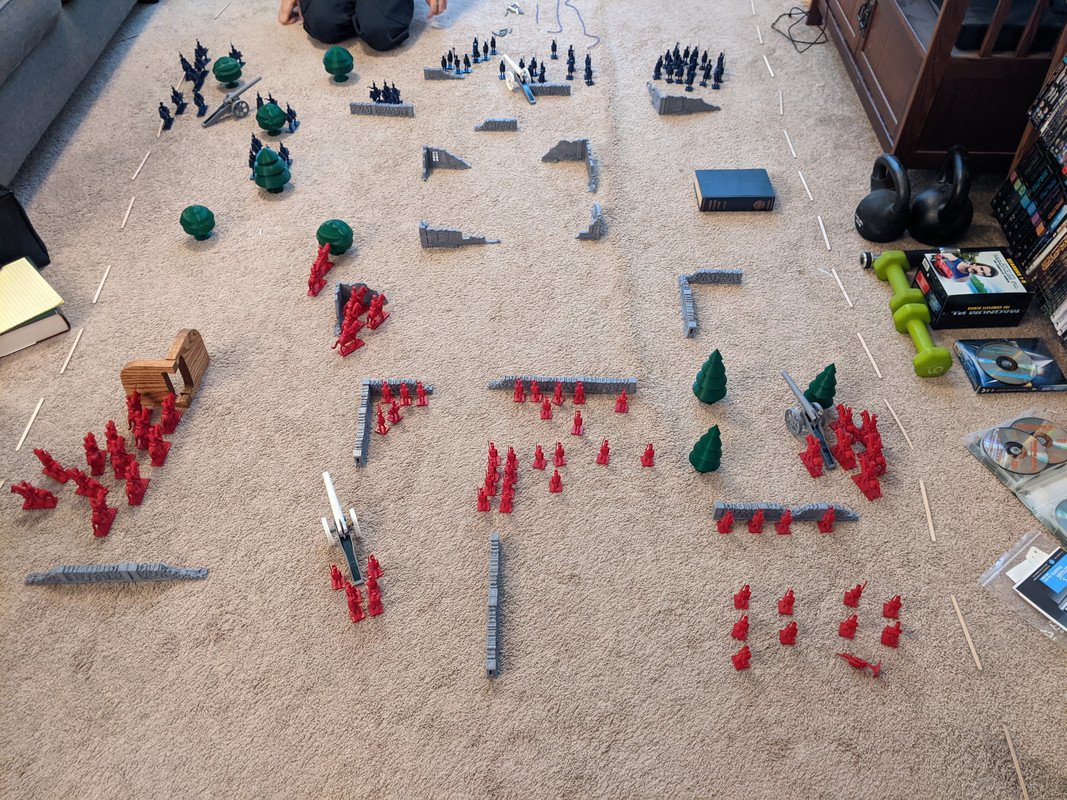
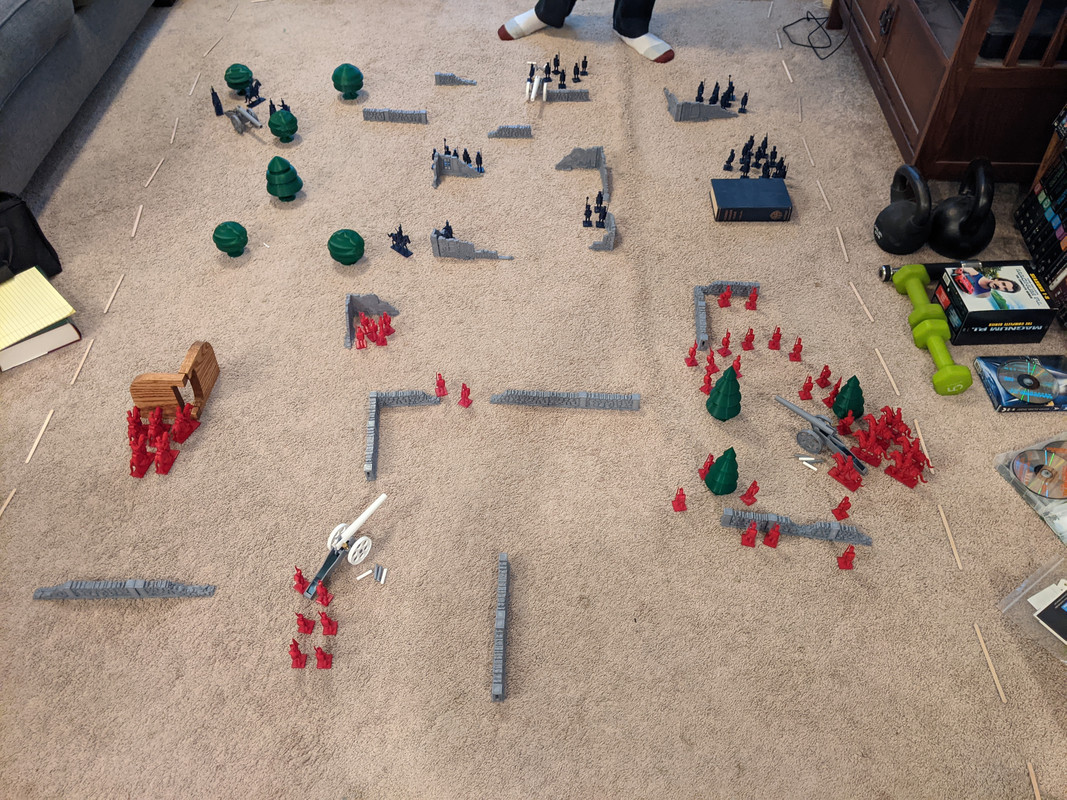
One and a half rounds in, I’ve moved twice and parvusimperator has moved once. My artillery has reached the positions where it’ll spend most of the game: my horse artillery gun, on the strength of its faster movement, takes up position in Chopinburg Wood, while my infantry gun sets up in the southern fields.
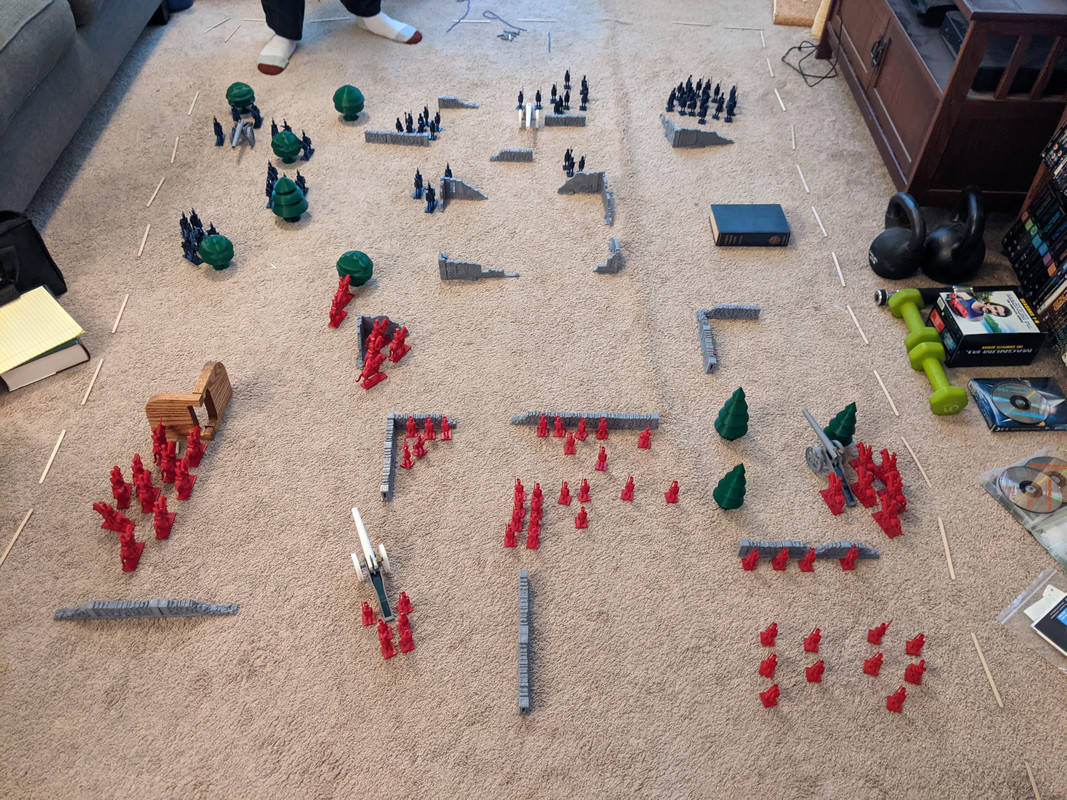
This picture is two turns later, halfway into round 3: parvusimperator has had two turns, and I’ve had three, so my artillery has opened up. Lucky shooting on my part knocks out a number of his cavalrymen on my left, while the gun in the wood hits a few of his men in the northern fields.
The enemy gun on my left returned fire, clearing out a few of the cavalry massing behind the chapel. Heavy but ineffectual fire from parvusimperator’s center gun hits the stone wall sheltering my center infantry repeatedly, but there are no casualties.
In the meantime, parvusimperator moves some of his cavalry up, obscured from my guns by the shelter of the orchard.
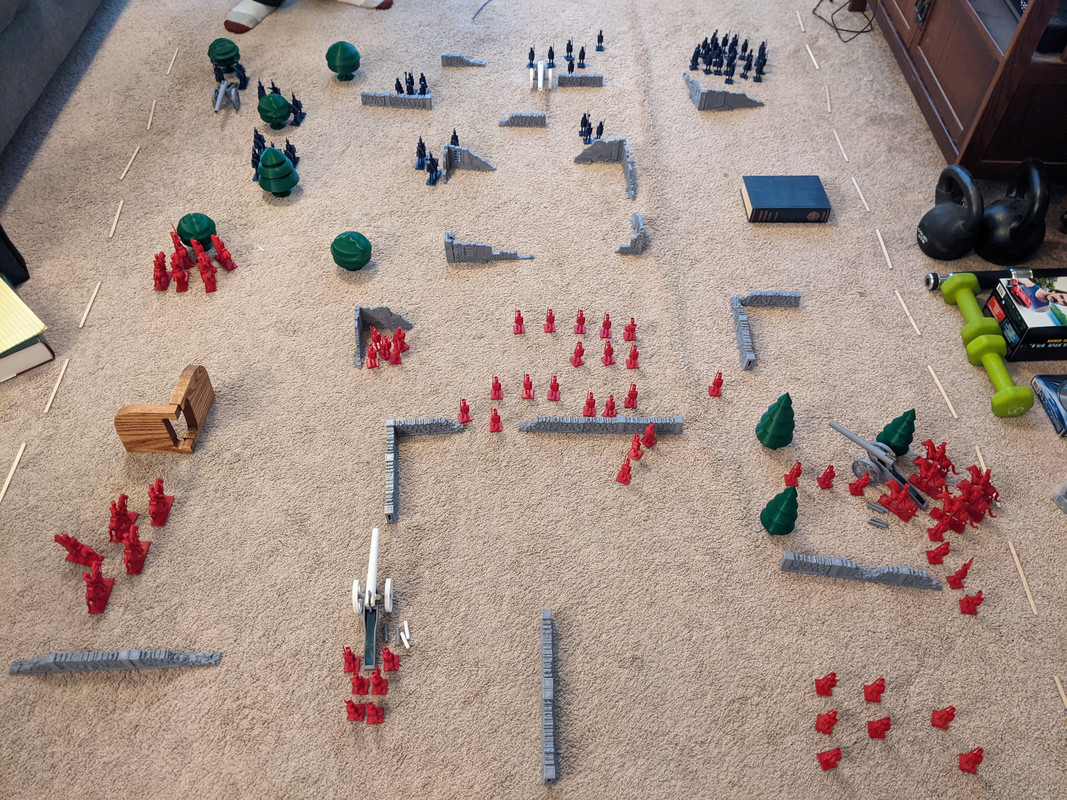
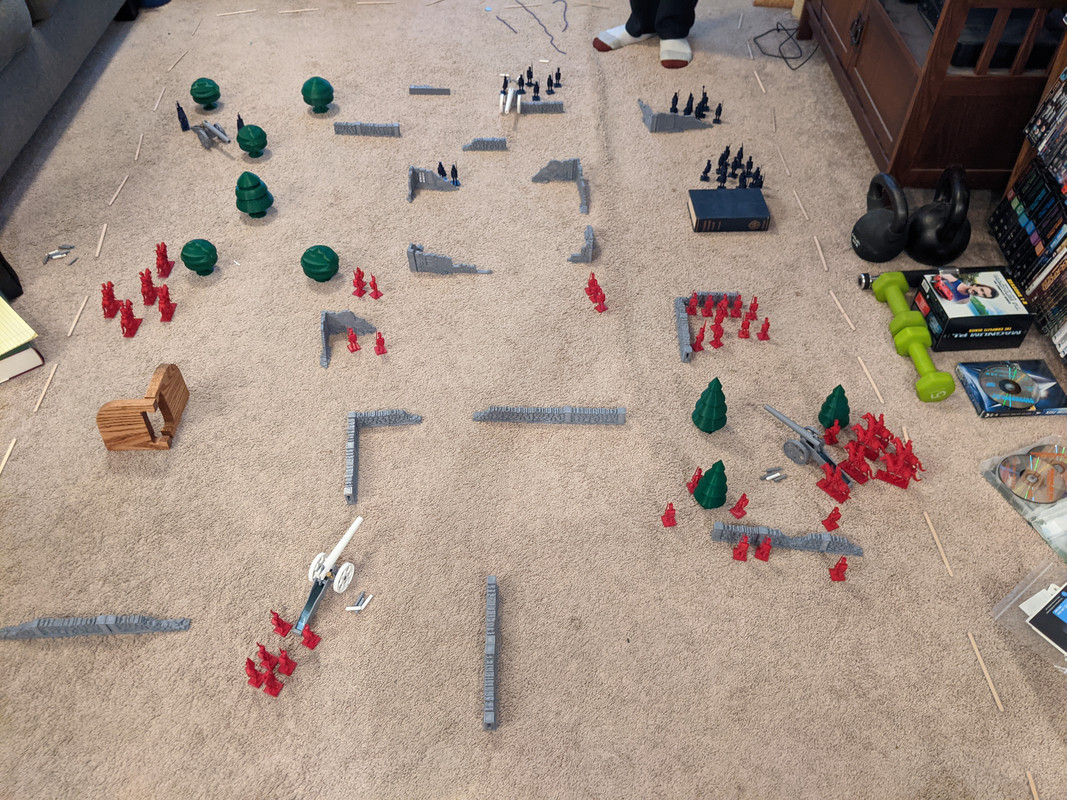
Our first melee! My cavalry at the chapel, along with the detachments that pushed forward therefrom last turn, charge parvusimperator’s squadron in the orchard, eliminating it. My artillery has a poor turn, only accounting for a pair of infantry.
From the last photo to this one, it’s a gap of two turns again. Parvusimperator has begun to advance on my right, sheltered from my guns by the eastern outbuilding. My center gun did take some shots at the advancing blue infantry, but had little effect.
The biggest story of this round was the utter annihilation of my advance cavalry force: parvusimperator’s center gun, with a single shot, took down five horsemen, domino-style. My five remaining cavalry on the left hunker down behind the chapel, while my center infantry advance toward the manor proper, taking cover as the blue guns turn in their direction. I’ve begun to move men north of Chopinburg Wood, arraying them to meet parvusimperator’s impending attack.
Another melee: parvusimperator’s cavalry at the orchard and the northern wall of the ruins charge my infantry at the southern edge of the manor, after artillery fire weakens them sufficiently for the charge to succeed. On the other flank, his infantry gather behind the outbuilding at Chopinburg House, preparing to advance on my right.
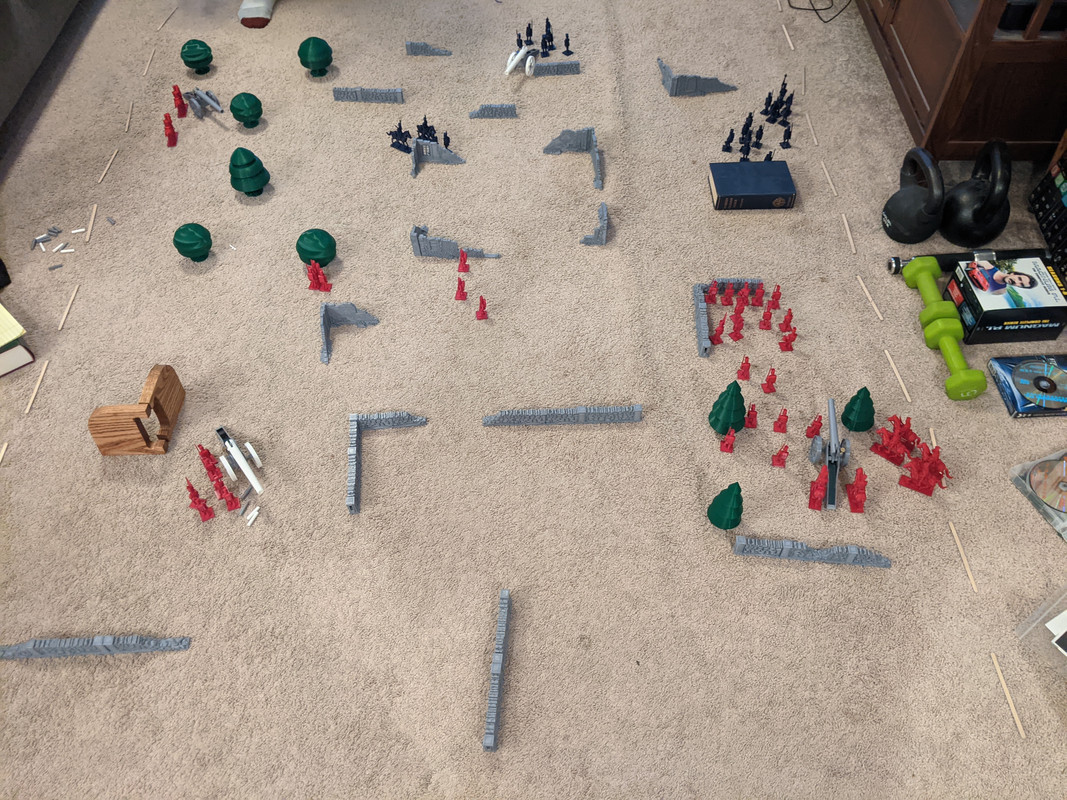
My artillery opens the turn with a key victory: my gun in Chopinburg Wood disables the enemy gun in the orchard. My other gun chips in by taking out parvusimperator’s detachment advancing through the ruins, hitting individual infantrymen three of four times—accurate fire!
With the gun in the orchard out of action, I’m free to do two things: first, my cavalry at the chapel makes a run for it, hoping to reach and capture parvusimperator’s orchard gun. Second, my infantry sheltering in the southern outbuilding charge parvusimperator’s two remaining cavalrymen who made the attack last turn, killing them.
Regrettably, I missed taking a picture after parvusimperator’s turn again, so this is another two-turn gap. It’s also where we decided to end the battle by mutual agreement.
Parvusimperator’s center gun, which earned its keep many times over, hit three of my five cavalry moving on the orchard gun. Even so, he decided to withdraw: his cavalry on the gun were badly placed, far enough apart so that I could engage one without engaging the other, and sheltered from the center gun to boot. My gun in the wood, with some very careful aiming, managed to put a few shots into the infantry massed behind the eastern outbuilding, reducing their strength to the point that parvusimperator no longer felt comfortable making an attack into the teeth of the gun. We tallied the forces on the field, and I emerged the victor with a score of 67 to 35 (counting the partially-captured gun for half).
At this point, neither of us thought we could push our advantage to a decisive victory. According to Wells’ rules, I could have made him play out the retreat, giving myself the chance to reduce his forces further. This would have been deeply unsporting, however, since I realized that I never actually put ‘how to retreat’ in my rewriting of the rules. Oops.
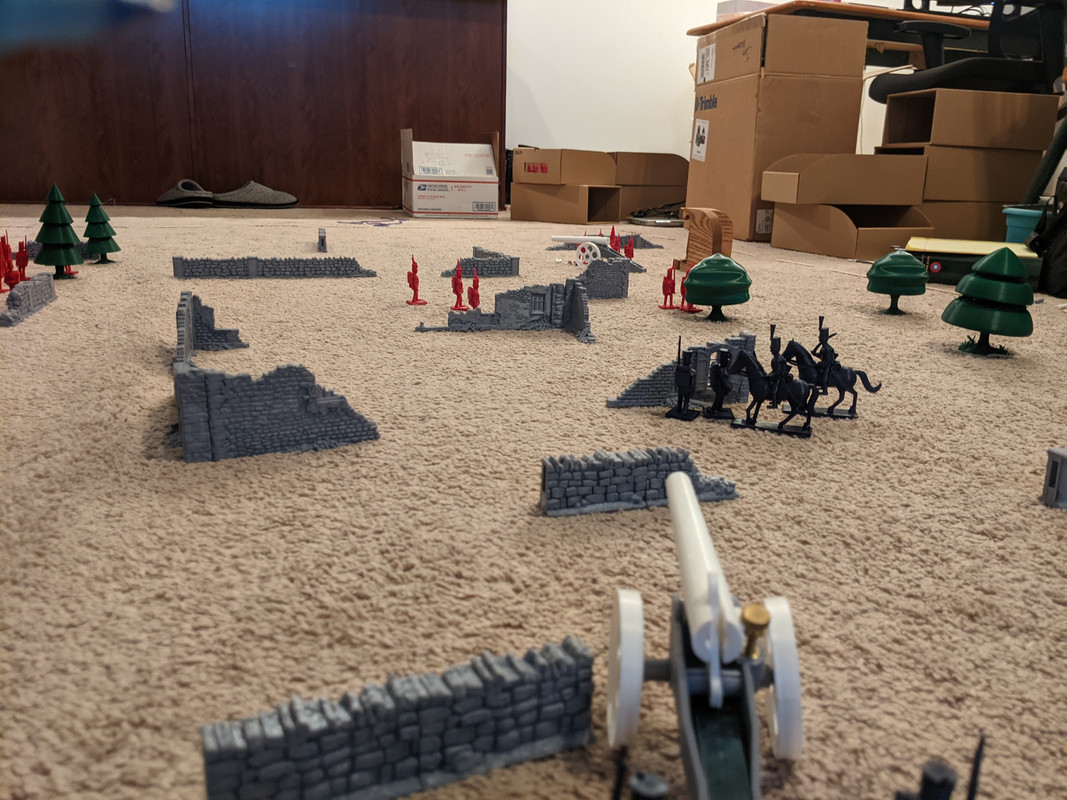
Here are some glamor shots of the final state of the battlefield, followed by some analysis.
Looking north from my position in Chopinburg Wood, the bastion that survived until the end of the game.
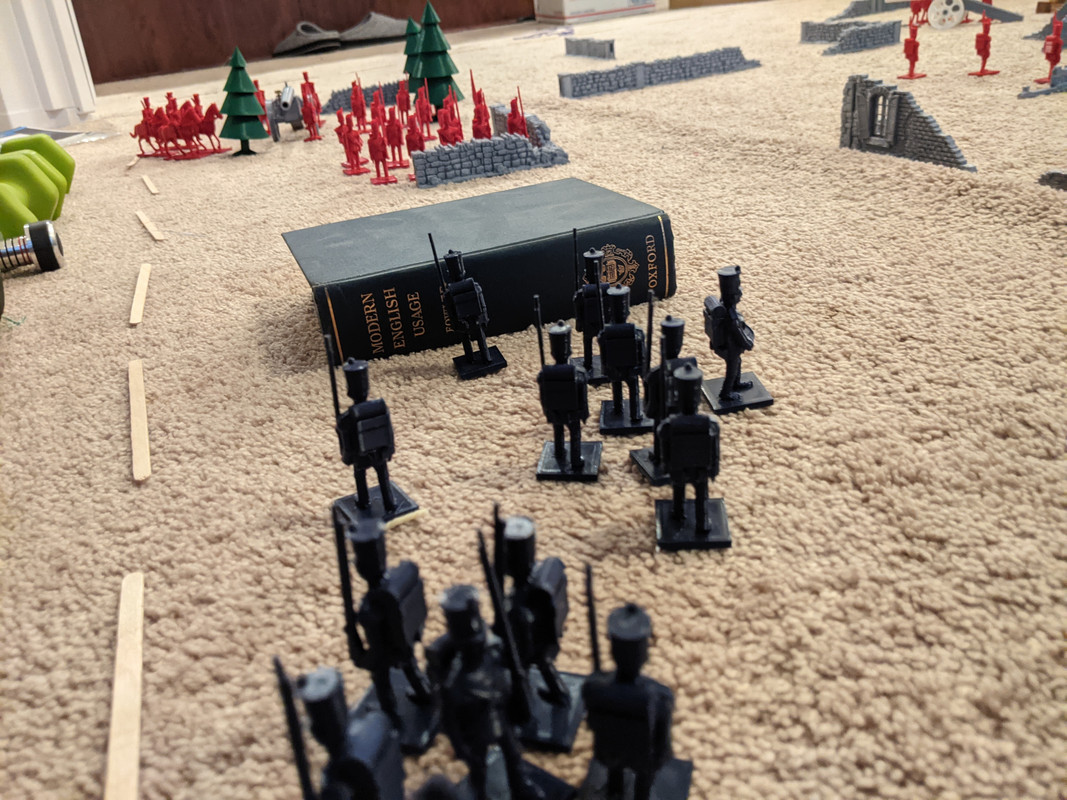
French soldiers shelter behind Modern English Usage, which we thought was funny.
The view of the field from Parvusimperator’s center gun. A commanding position, fire from which adroitly and repeatedly stymied my attempts to assault in the center and down my left.
Analysis time!
Time Limits
This is the first game I played where we reduced the turn time limits as men were killed. As it turns out, this is a critically important feature of the rules. On my turns through most of the game, I wasn’t able to use my cannons to their fullest and move all my men. Parvusimperator, a bit speedier, usually had a few tens of seconds left. The pressure is key: there simply isn’t time to get up and measure out a potential countermove, or who exactly will be in a melee. You have to rely on feel, which is a kind of randomization.
Cavalry
Cavalry still feel a little wimpy. They’re massive artillery targets, and in making their bases narrow enough so that frontal cannon fire can knock them over, I made them poorly-balanced enough so that they’re at risk of domino effect, one knocking the next over, if hit by enfilading fire. The cavalry charge rules will certainly help to some degree, although the rifle fire rules might count in opposition.
It also feels a bit strange that infantry can charge cavalry and bring them to combat. I’m not quite sure if or how to fix that organically.
Scenery
The printed terrain pieces were fantastic. The stone walls provided good cover to men in proximity without being impossible to shoot over, and the trees and ruin sections helped break up artillery sight lines without promoting quite the same amount of hiding all your men behind the largest piece of cover.
Cover being decent but not perfect was a major contributing factor to the number of melees we saw: it was much easier to get men in close in sufficient quantity than it has been in battles past.
Army Size
In rereading Little Wars before this battle, I realized that the forces we fought with are very similar to those in Wells’ example Battle of Hook’s Farm. There, two forces of 48 infantry, 25 horse, and 3 guns fought; here, the forces were 45 infantry, 24 horse, and 2 guns.
45/24/2 felt like a near-perfect ratio to me: the cavalry got into it in the early stages of the battle; infantry held positions and occasionally made attacks; the guns were important but not so much so that they overwhelmed the importance of maneuver.
Limited Ammo
If I want to do limited ammo, I think I probably need to have a stock of 25 or 30 shells per gun. It should be expensive to bring that much artillery firepower, but given the four-shots-per-turn limit, it’s entirely possible to use that many if your guns are well-placed.
We both remarked that limited ammo would have led to some extremely interesting choices: some of the shots we took were pretty low-percentage, especially early in the battle, and if we had to count shells, we might have skipped some of it, leading to more action in the mid-battle rounds.
Strategic Locations
I have strategic location variants written in the rules right now, but I’m not sure if there’s a place for them, given further thought. In Wells’ rules, the battle ends when one side retreats or is entirely eliminated. That doesn’t leave much room for divvying up victory points based on real estate held.
On the other hand, ending battles like we’ve done so far, with one side offering the other a truce, eliminates retreats from the game, and managing a fighting retreat seems like the kind of skill Little Wars ought to reward.
I wonder if there’s some way to combine the two: a two-stage battle, say. If one side holds an advantage in strategic locations for N rounds, it’s won the day, and the other side must then retreat from the field. Worth some thought.
Bigger Battlefields
The largest battle Wells mentions in his book is hundreds of soldiers on an eighteen-foot front.
Today’s battle was played on a front of about 5-6 feet, with a depth of 10-12 feet. Given furniture, a 12-foot front with 9 feet of depth is possible at my house, maybe a little more if we move things around.
The very largest room I have access to is at my mother’s house, if we move a couch and a table, and is maybe 12 by 12, given the furniture we can’t move. I’d love to play on an 18-by-12 field someday (in teams, perhaps, to keep turn times from getting too out of hand), but I can’t think of anywhere I could do that for free beyond maybe my driveway (impractical, because I wouldn’t want to pit PLA against south-facing blacktop) or the lobby at my church (not impossible, but I don’t know if I’d call it plausible).
I suppose I could also try the clubhouse at one of my shooting ranges.
Final Thoughts
Even though I spent a bunch of time just now thinking about ways to make the game better, that doesn’t mean it isn’t already good. The two people I’ve played with so far have both been nearly as enamored with it as me, and neither one said, “You know, once was enough.”
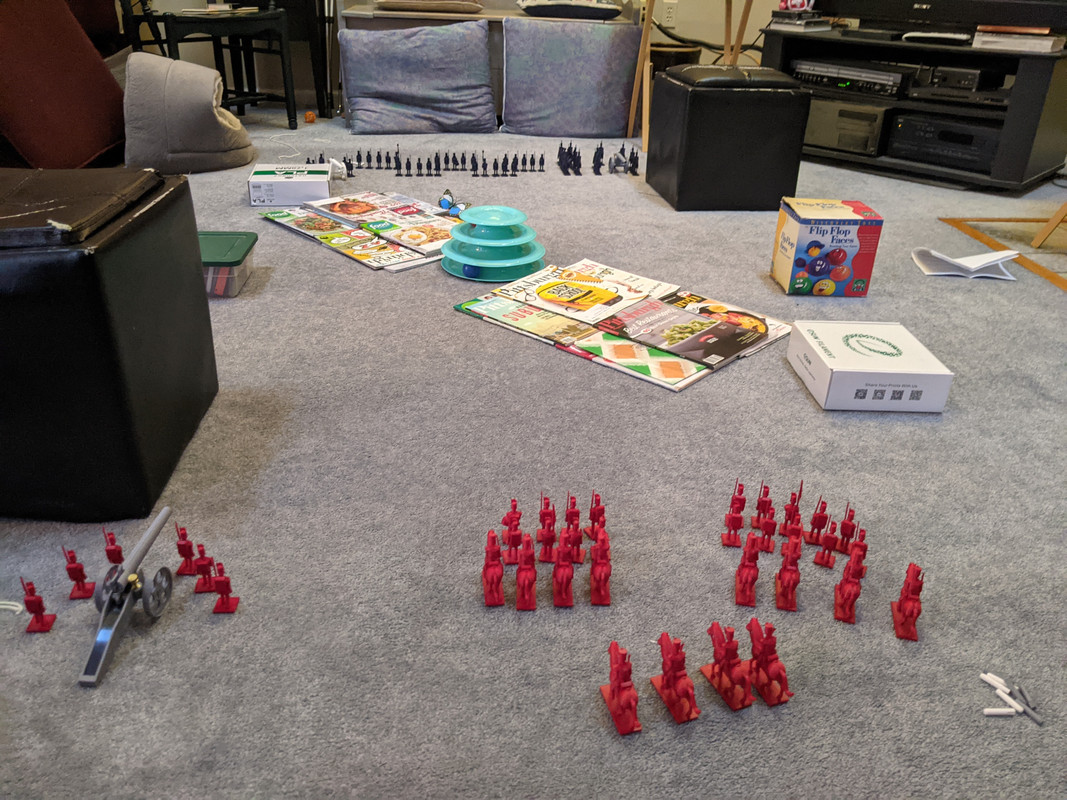
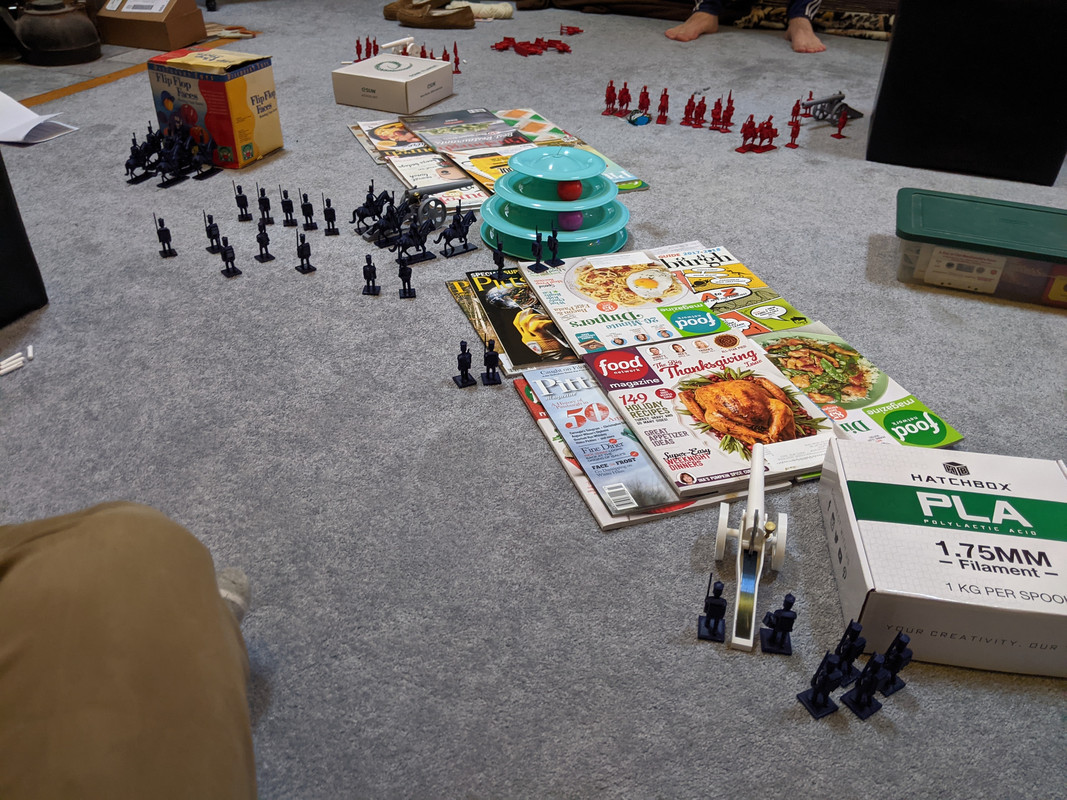
I wrote about Little Wars briefly in my last post, and thanks to a family get-together on Christmas Eve, I was able to play a small game for the very first time. I present to you the First Battle of Adam’s Ridge.
On the western edge of the field, my men, the blue army (French models).
Infantry in staggered ranks to make them a harder artillery target, with cavalry concentrated on my left.
On the eastern edge of the field, my brother, with the red (British) army:
[
He decided to concentrate his forces in the center, perhaps to respond more quickly to any moves I made to the flanks.
And now, the field, looking from east to west:
The central feature of this battlefield is Butterfly Hill. To its northeast and southwest runs the eponymous Adam’s Ridge, with the warehouse (the eSun filament box) at the northeastern end and the factory (the Hatchbox filament box) at the southwest end.
Due north of Butterfly Hill, to the right of the photo, is the fairground, and due south is the toy shop.
My brother won the toss and deferred, so I went first, advancing my cavalry force toward the fairground and moving my infantry in the direction of shelter under Butterfly Hill. I kept my right gun back by the factory, where it would remain for the whole battle, while the left gun moved forward with the cavalry.
Because the field was a bit small end-to-end, we decided to let the guns open fire after the first round, instead of after the second.
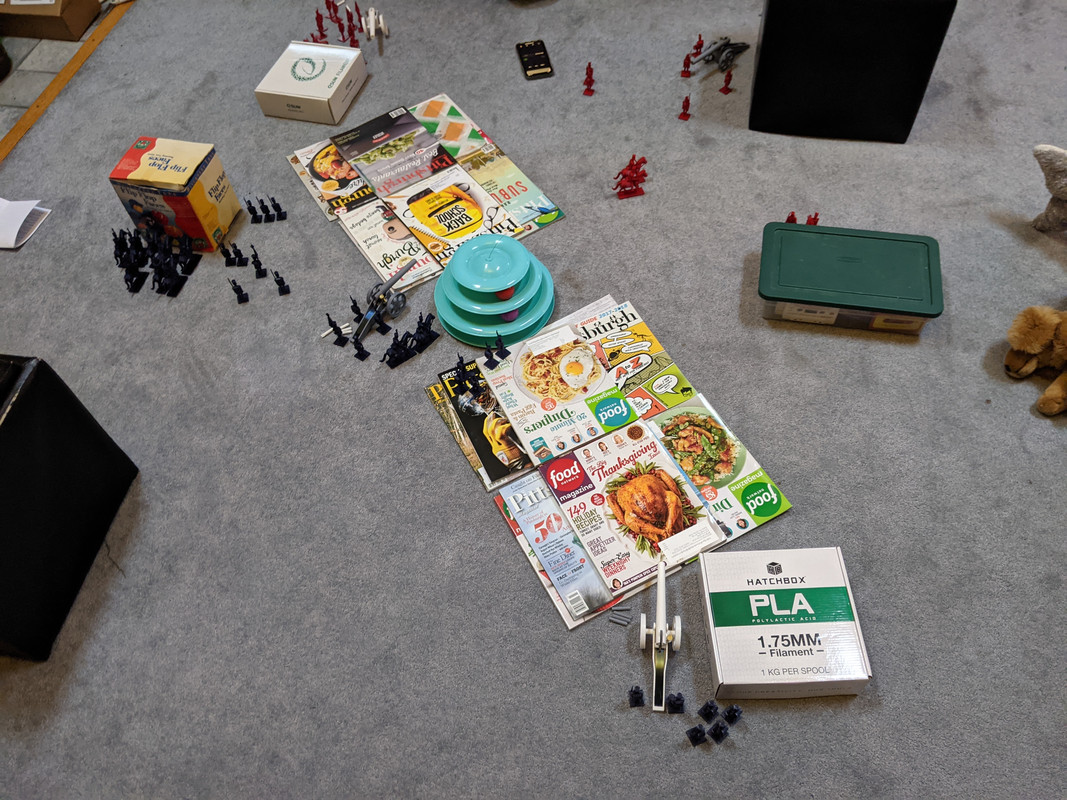
That brings us to about here, which is the end of the second round.
I’ve continued my advance toward the fairgrounds, and have reached cover from red’s guns, although they lost two of their number along the way. My men advancing on Butterfly Hill have lost several of their number to artillery fire, but my guns have done a respectable job in reply, dramatically thinning out the bunched forces in red’s center.
Bonus action shot, mid-round 2, as my brother aims a gun toward my artillery crew by the factory.
On to round 3!
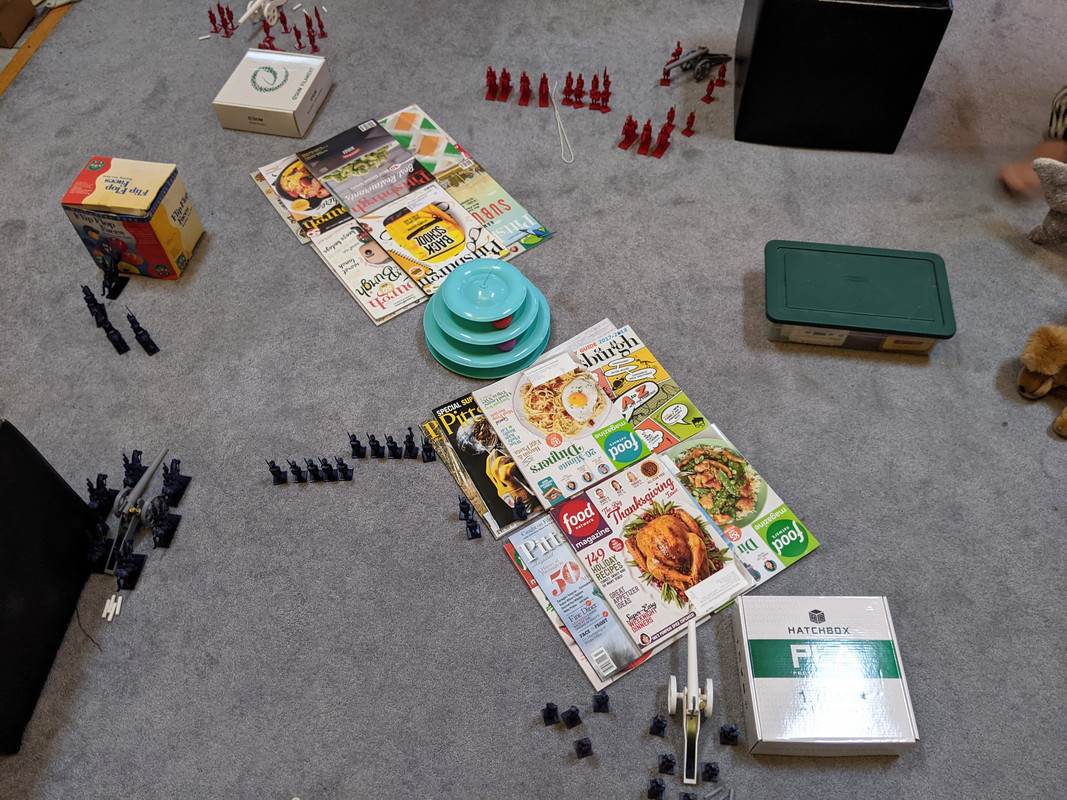
I’m concentrating my cavalry at the fairgrounds, in the hopes of making a rush at red’s gun by the warehouse, and have moved my left gun up to Butterfly Hill, which is a dire threat to red’s center. Even long-range artillery can pretty quickly dismantle forces out of cover. This close, it’s easy.
To make it a little easier to move the gun to Butterfly Hill, my gun at the factory engaged the soldiers manning red’s gun opposite. If you look closely, you’ll notice it only has three men nearby, which means it’s out of action. I took that opportunity to send the infantry from Butterfly Hill on a march toward the warehouse: I don’t have enough cavalry there to charge the guns and win.
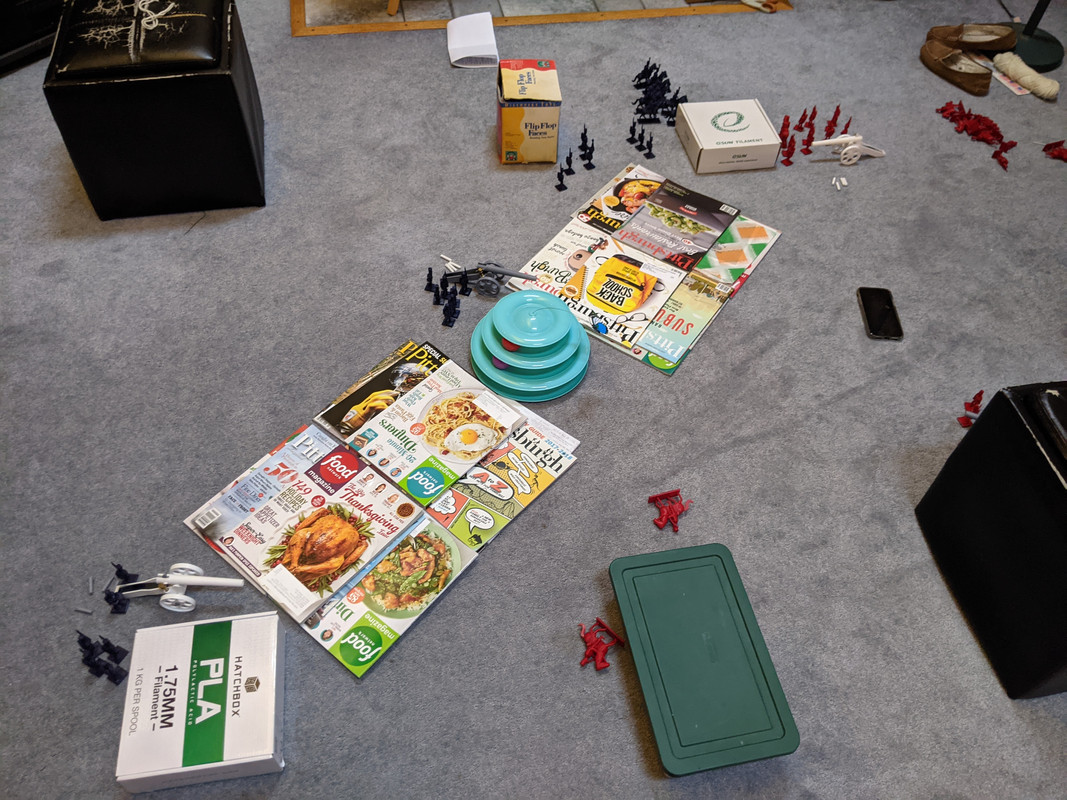
Round 4:
My guns did indeed exact a heavy toll on red’s center, but my force marching for the warehouse is now substantially smaller too. I think he had eleven men with his right gun (the one on my left), and I had eight cavalry behind the fairground at this point.
Red is attempting to get some cavalry around my right, behind the toy shop and the factory.
Notice also that red’s southern gun is out of action again. You only need four men near a gun, but having more seems to make artillery a lot more durable. Too, I think I probably failed to explain how guns work (four men within six inches, put two behind the wheels at the back of the trail after firing) to my brother, which led to his artillerymen being awfully exposed most of the time.
He has, however, moved his gun by the warehouse to the other side, where it can fire on my gun at Butterfly Hill.
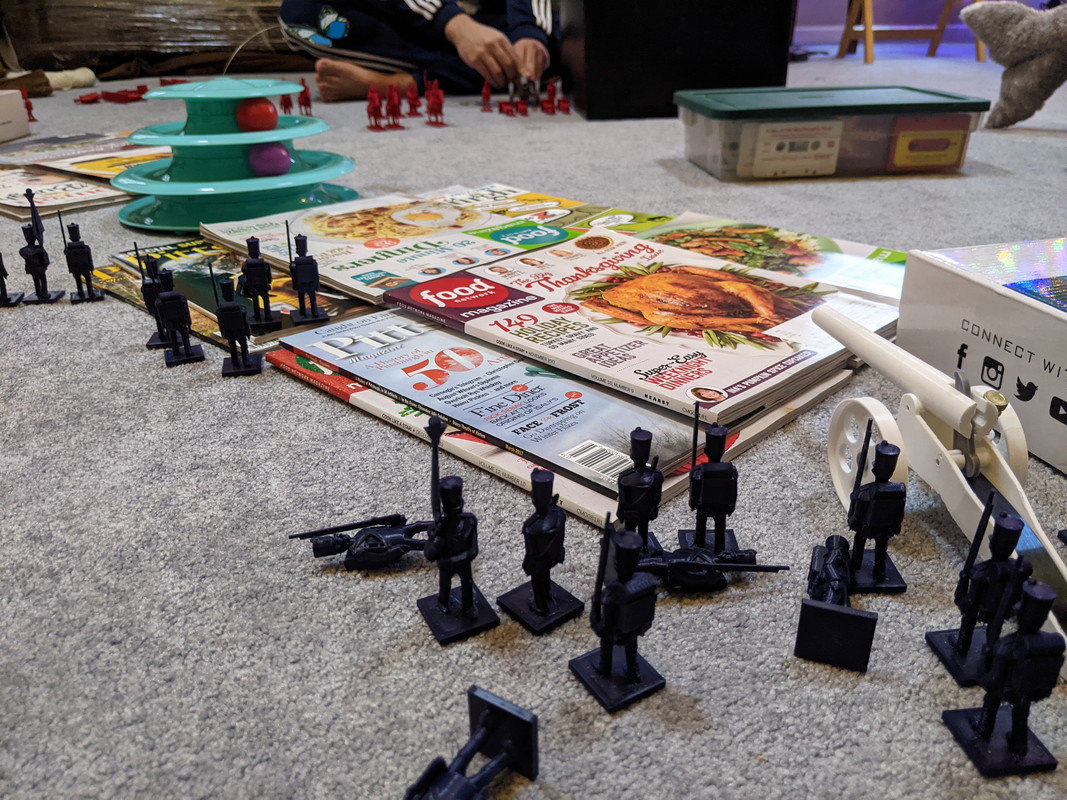
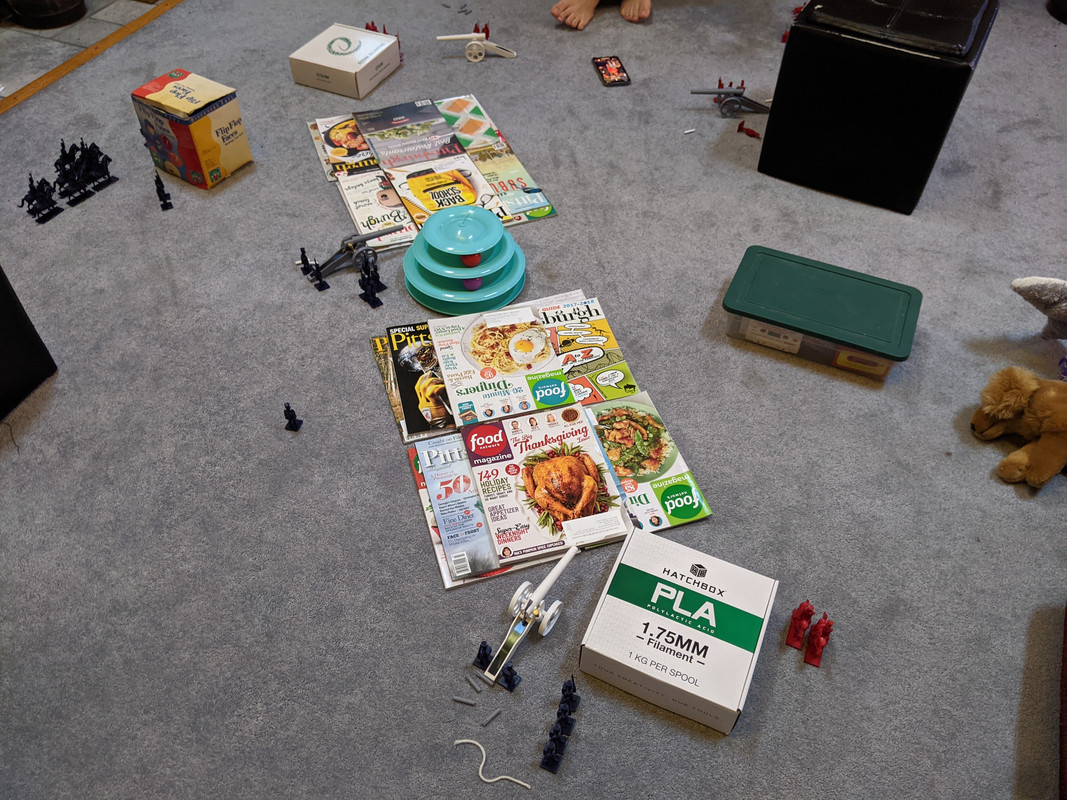
Round 5:
Both of red’s guns are back in action again, and a fair number of my infantry made it to the warehouse alive—I have a slight edge in numbers there, but am handicapped by the fact that it’s a combined arms attack. The infantry are still two turns away, or at least most of them are. I think. Looking at the photo, I might have been able to drive home a successful, if costly, attack by looping the infantry around the south end of the warehouse, while the cavalry took the northern route.
In the south, the gun at the factory brought down two of the four attacking cavalry. The other two are slightly out of frame to the south.
Round 6:
I didn’t see the potential for a multi-pronged attack in the moment, however. My brother played it smart and moved his northern gun back a bit, so that it wouldn’t be put out of action in a melee around the factory, and would be in perfect situation to blast any cavalry who engaged.
At which point I looked at the field, felt relatively confident in my advantage, and decided to fall back, which may go down in history as a McClellan-esque bit of caution. We ended the battle by mutual agreement at this point: I didn’t feel like I had a sufficient force advantage to press an attack successfully, and he felt the same way.
Having both started with 68 points of troops, I finished with 50 to his 37.5, for a victory for me. By the objective we’d chosen, I think it would have been most appropriate for us to split the 100 victory points, which would have brought the tally to 100 to 87.5.
Now, on to reactions!
To start with, the rules seem to work very well. Wells obviously played a fair bit of this before he put his rules to paper, given how few the rough edges are and how well they generate something that looks like a real battle.
Notably, we didn’t get to try out the close combat rules: gunnery proved a bit too effective. We’ll probably play next game with one gun per side. Wells recommended one gun per 40 or 50 men. A slightly higher ridge probably would have helped too: it didn’t end up being an obstacle to artillery, whereas if we’d used a few more layers of magazines to build it, it might have, or at least provided some partial cover.
It may be a little too easy to silence guns, but that could also be my brother’s imperfect grasp of the artillery rules. The guns performed well, firing with plenty of power to bring down soldiers and cavalry alike. I think the best shell of the game took down four? I might experiment with a slightly thinner spring, even—I need to order a batch of boxes anyway, since the filament boxes don’t quite fit the taller sorts of soldier, and I could always add spring steel to a McMaster-Carr order. One downside is that the late prototype guns (the ones printed in white plastic) don’t have quite the right tolerances, so their wheels were frequently falling off. Less than ideal. Too, gray is a very bad color for the shells. The next batch I do will probably be in white or red—something to stand out against your average carpet.
In spite of some initial doubt, we ended up playing with the prescribed three-minute time limit. It did its job perfectly: we didn’t have a ton of time to sight in guns, and when we did to ensure we got hits we needed to, we were short on time to do other things. I had to skip moving men once or twice, and made some bad movement decisions a few times because of the clock. A brief aside: Wells wrote about having to find a big clock with a second hand, or wrangle a visitor with a stopwatch into refereeing, which speaks to a timekeeping problem ubiquitous cell phones have relegated to history.
Even though we didn’t get to exercise the close combat/isolation/surrender rules, I was thinking about them as the game was ongoing, and they made a lot of sense: most of the melees that might have happened involved unsupported forces, and would have yielded some prisoner-taking. Given the situations we encountered, it seems like they’d work substantially better than I would have guessed.
Finally, we forgot or misapplied a few rules, but I don’t think it had a serious effect on the outcome of the game. Neither of us were playing the tryhard, but if someone were to do so, I think insisting on rules-following would make it relatively resistant to munchkinry.
All told, an extremely successful first battle, and I suspect we’re going to have a second one today.
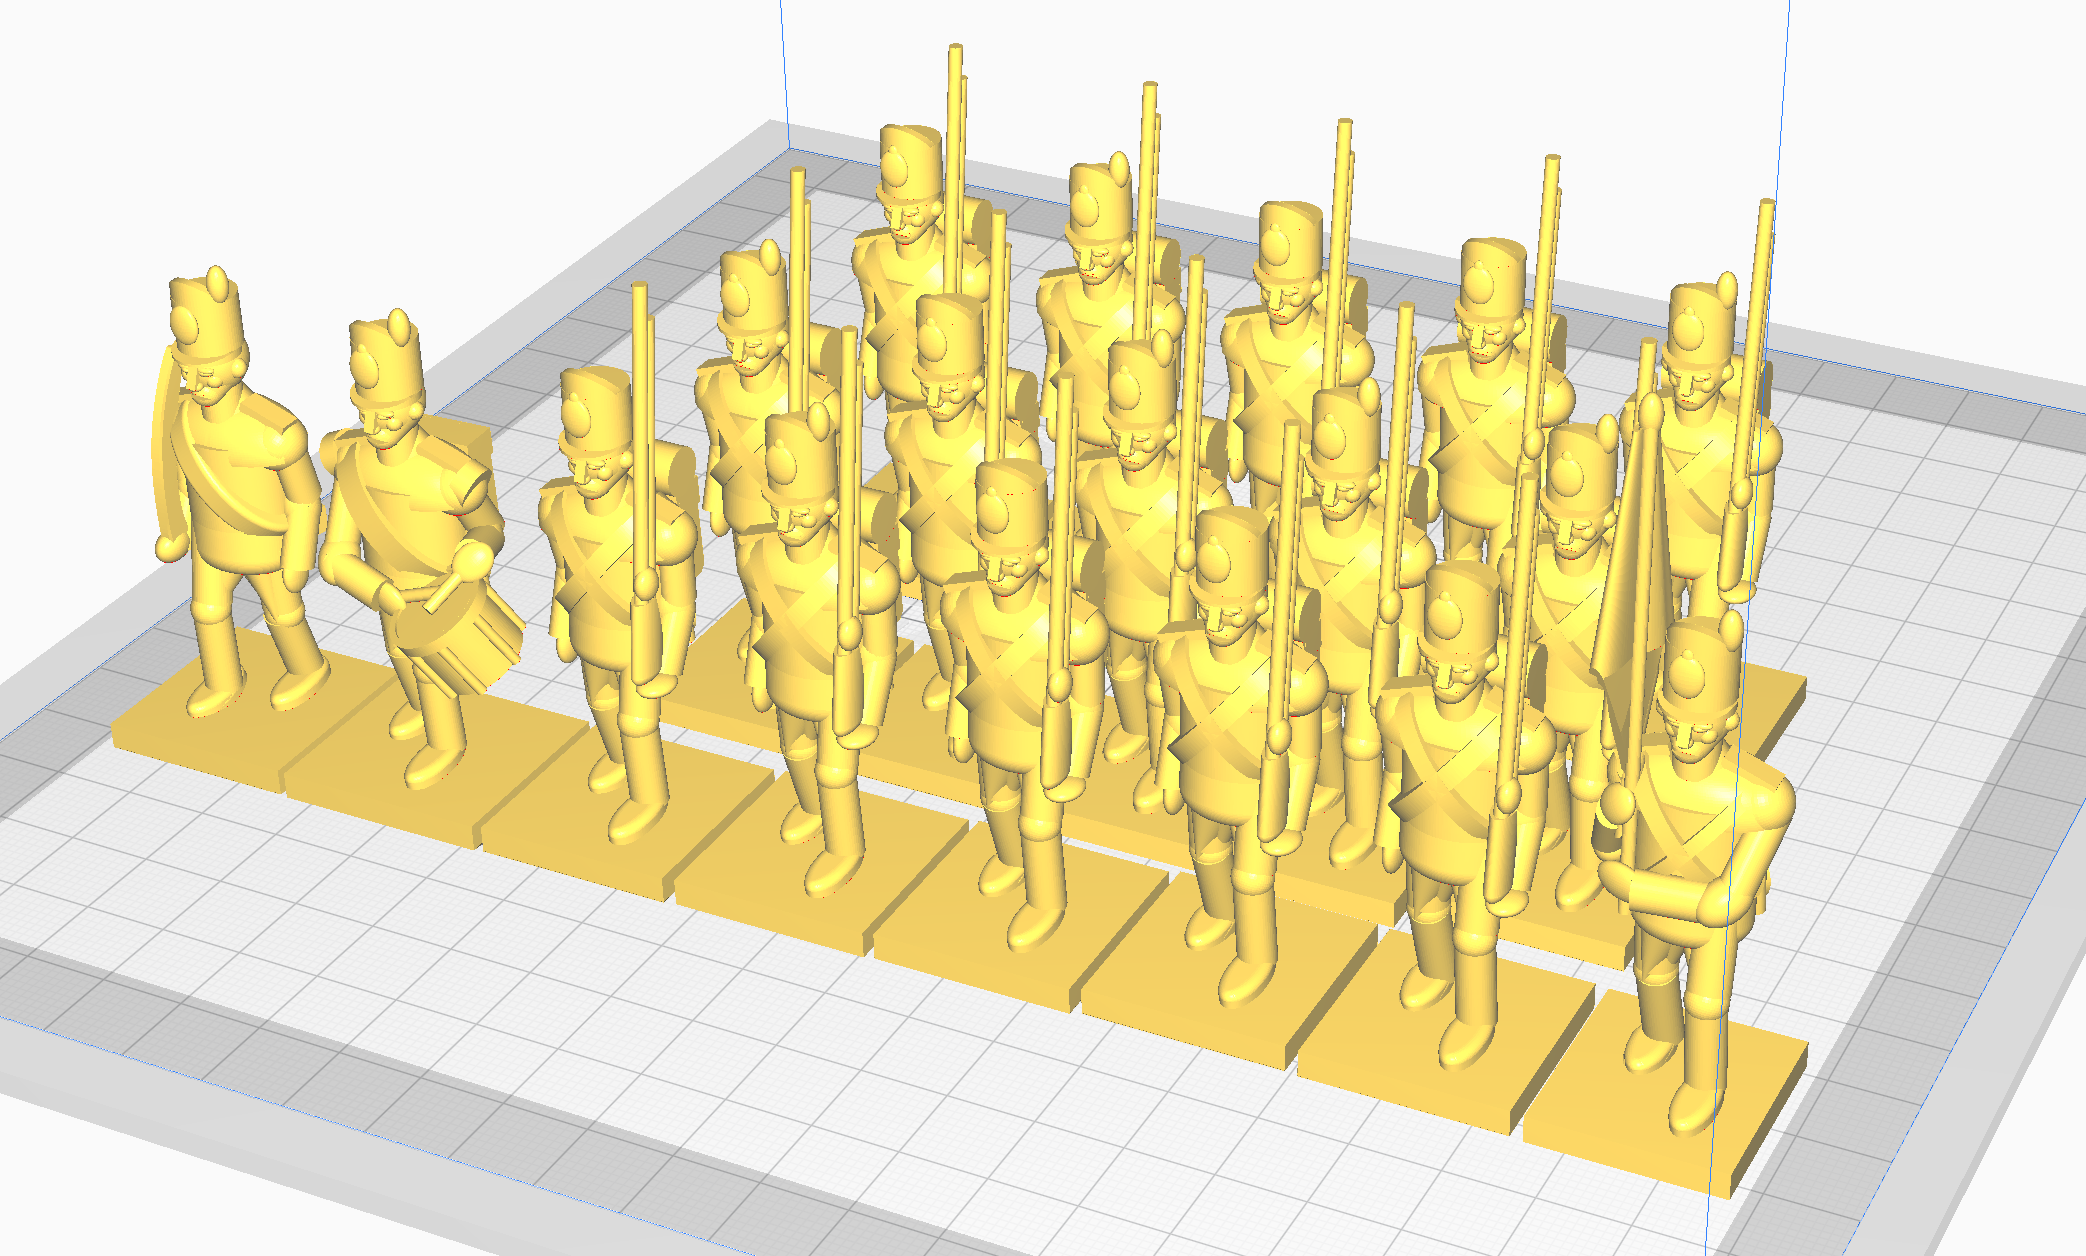
Are you familiar with Little Wars? In 1913, novelist H. G. Wells published it, the first set of rules for miniatures wargaming available to the public. Toy soldiers careen across carpeted (or cork-floored, in the original conception, but I don’t have a cork-floored playroom) countryside, under fire from spring-loaded toy cannon as they charge home for glory.
“Sounds great! Where do I start?” I said. Well, toy soldiers aren’t too hard to find, but I decided that I can print betterones, or perhaps eventually cast them in resin from silicone molds around 3D-printed masters.
The mighty artillery, however, is the sticking point. Nobody makes toy cannons of the right power anymore, and the early-20th-century originals from Britains Ltd. run about $50 a piece. Not exactly cheap, and especially not when a Little Wars game of moderate size might call for six or ten guns. I have in my possession, however, a 3D printer and a copy of FreeCAD, and armed with these tools, I set about fixing this availability problem, with the help of my Thanksgiving vacation.
That holiday at my in-laws being a pretty sedate affair—an awful lot of movies1 and television—I had ample time to Google my way to a minimum understanding of how to CAD, or at least how to use one of several alternative (or redundant, uncharitably) workflows in FreeCAD. Et voila!
I’m creeping toward the end of a game of Stellaris, and an incongruity hit me: why am I hiring more bureaucrats to make things in my large empire cheaper, against all reason and every historical example?
Let me explain. In Stellaris, there is a soft cap on the size of your empire: sprawl. Population, production buildings, and territory all generate sprawl. Bureaucrats increase your sprawl cap. If you go over your sprawl cap, things cost more. Ergo, bureaucrats make things cost less, which is facially absurd.
But how do you solve it? I think the answer is that maybe you don’t, or at least not entirely. You just need to measure two things: first, sprawl, which bureaucrats counteract, and second, administrative efficiency. Sprawl works like it does in Stellaris: the more empire there is, the more expensive things get, unless you have administrators to counteract the effect.
Administrative efficiency models the loss of efficiency from thicker red tape. The more administrators you have, the lower your efficiency gets, and the more things cost. Administration is less expensive than a vast kleptocracy, but still expensive compared to a smaller, leaner state.
Of course, that’s just a surface-level implementation. You might tune things so that size of empire and size of administrative state play off of each other, which would let you (imaginary game-designing reader) set a soft cap on effective empire size. Or, if you’re really into the concept that bureaucracy is at best a mixed bag, implement a kind of cost disease.
After a while, the goal of any large organization of humans becomes ‘justify this organization’s continued existence’. Bureaucracies almost never shrink over the long run, absent some outside cataclysm. They’re much more likely, instead, to grow. So, a given unit of bureaucracy is created to administer a given amount of stuff. The amount of stuff per unit bureaucracy never goes up, but the administrative cost of each unit of bureaucracy does.
Which brings us to the final form of the idea. When your empire expands, it needs bureaucrats. When you hire bureaucrats, you introduce a slowly-growing ossification into the structure of your empire. Eventually, your bureaucrats cut into your ability to do productive things, taking up more and more of your output until your empire is paralyzed by the cost of running itself, and eventually torn down by forces without.
This neatly mirrors some real-world trajectories. Depending on how you tune things (capping the penalty one bureaucrat imposes, tweaking the rate at which the penalty grows) it’s probably possible to set up an empire that can survive in a sort of semi-stasis, handicapped but not quite self-destructing. It opens the door to a wide variety of empire traits and events (moral, dutiful bureaucrats who aren’t as bad in the long run, bursts of patriotic fervor in e.g. a war temporarily reversing the downward trend, and so forth) to boot.
Anyway, I’m not working on anything in the 4X/empire-builder genre, so if you like it, take it. I’d love to play a game which leans into this idea.
A very busy August and a moderately busy first half of September are now behind us, so. Let’s see, where were we…
Ah, yes, it’s August 1940, and we’re crossing swords with the Austrians again. It sounds like the plan was, more or less, ‘crush Austria’, so that’s what we’ll do.
August 1940
Bit of a bummer to have one of our three carriers under repair, I have to say. Happily, she’ll be back at the beginning of 1941, and shortly after, we’ll have some fresher light cruisers too.
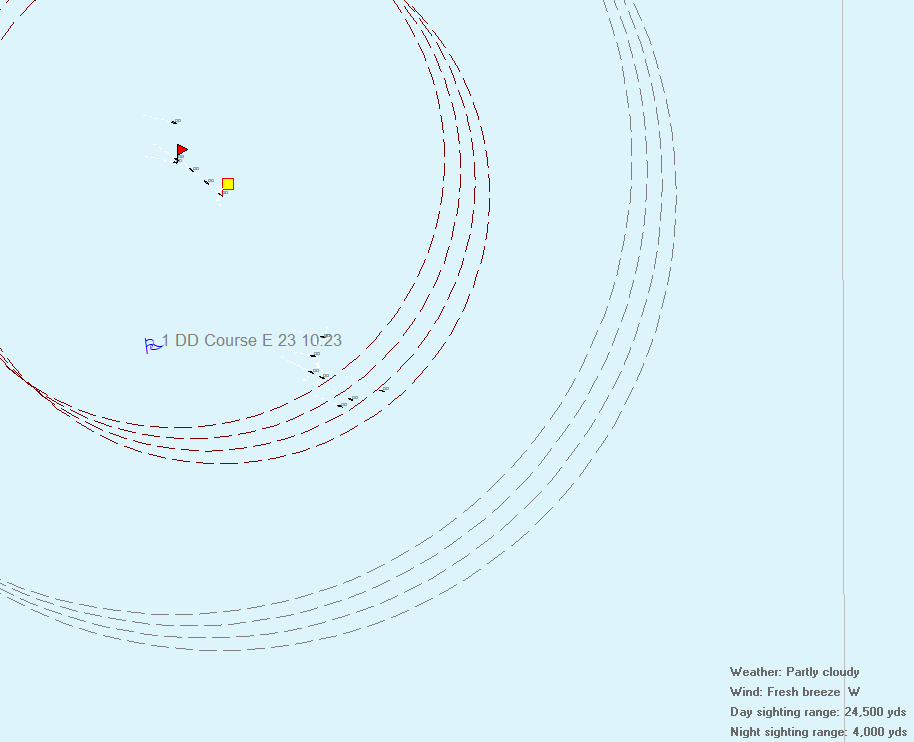
The first battle of this new update is a destroyer action in the Adriatic: nine French ships against a yet-unknown number of Austrians. We’re very near our air support, but it’s also twilight-soon-to-be-night, so we may not get the advantage of being within forty miles of around 120 friendly aircraft.
Just after night falls, we pick up some radar contacts 16,000 yards toward land. I guess we’ll try some blind torpedo launching.
…
Several in-game hours of frenetic micromanagement later, it turns into one of the most lopsided French victories in history: in exchange for the loss of one destroyer, the unlucky recipient of a brace of Austrian torpedoes early in the battle, we sink thirteen Austrian ships.
Not all of it is do to with my adroit tactics. Part of it comes to shipbuilding. Our recent Espignole-class destroyers are superb ships, fast and heavily armed, and for once we outmatch the Austrian hardware.
September 1940
I decline two battles to start the month, but the third catches my eye: a cruiser action off Brest. I don’t have any cruisers in the North Atlantic, but I do have the 27-knot battleship Rouen and an awful lot of aircraft. We’ll see how it plays out.
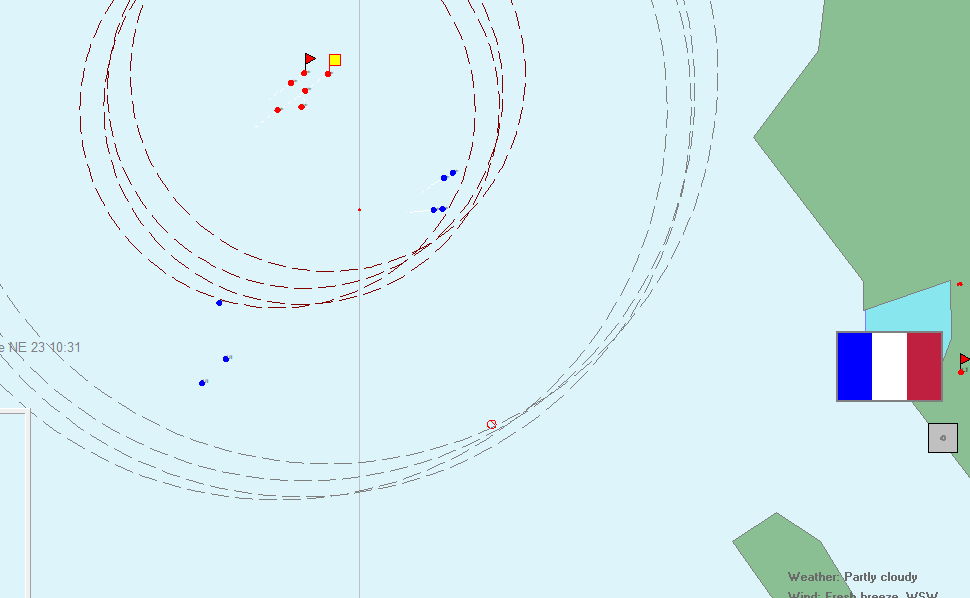
It plays out by them saying ‘no thanks’, and we get another destroyer action in the Adriatic. This time, it’s 11:00 a.m., so our tremendous quantities of air power should factor in.
Six French ships on seven Austrians, and we sank their modern destroyer fleet last time out. (They only have nine in service at present, so a big win here would basically eliminate the Austrian destroyer force.) Hopefully, this is a straightforward victory.
Since I don’t want to get any more of my ships torpedoed, I’m playing this one a little more cautiously than has historically been my style, staying at near-maximum gun range.
A long history of gunnery practice has made the French fleet a fearsome force in long-range gun duels, and by 12:51 p.m., the balance of hits is already substantially in our favor.
The afternoon sees some trading of blows by air strikes, though the French bombers come out looking better. It seems like a relatively dreary destroyer battle, wherein the vastly superior French ships sink a bunch of obsolete Austrian ones, when at 4:19 p.m., I see this report…
Surely there’s not a carrier out to play in a destroyer action? Then again, it’s awfully hard for even the greenest of land-based dive bomber pilots to mistake a destroyer for a carrier.
The next bombers in line ID it as a light cruiser, which means that whoever was in charge of the radio report from the first attack should probably be sacked.
A bit later in the afternoon, another few waves of aircraft find the target previously identified as a carrier and a light cruiser, and proceed to identify it as a battleship and a destroyer, which more or less runs the gamut of possibility.
In the end, it turns out to have been a destroyer.
October 1940
Maddeningly, the Austrians sue for peace before we’ve crushed them sufficiently to gain Morocco, either by treaty or by invasion. I guess we’ll just have to cheese them off again and try to win more slowly next time.
The peace dividend is a little easier to deal with this time; I mothball a few battleships and most of our old destroyers, and we’re sufficiently set so that the money will be there in a few months, as shipyard jobs finish.
Speaking of which, it’s still four months until Bearn finishes her refit.
November 1940
Evidently, I had a medium bomber prototype request in progress. This time, I pick the shortest-range option, because it can carry an aerial torpedo 565 nautical miles. This is a massive force multiplier for our land-based air. No longer will they have to ineffectually attempt to hit moving ships from moving planes!
December 1940
A bit of saber-rattling toward Japan brings our budget back into the black, even though we’re spending almost 13,000 funds per month on ship construction.
March 1941
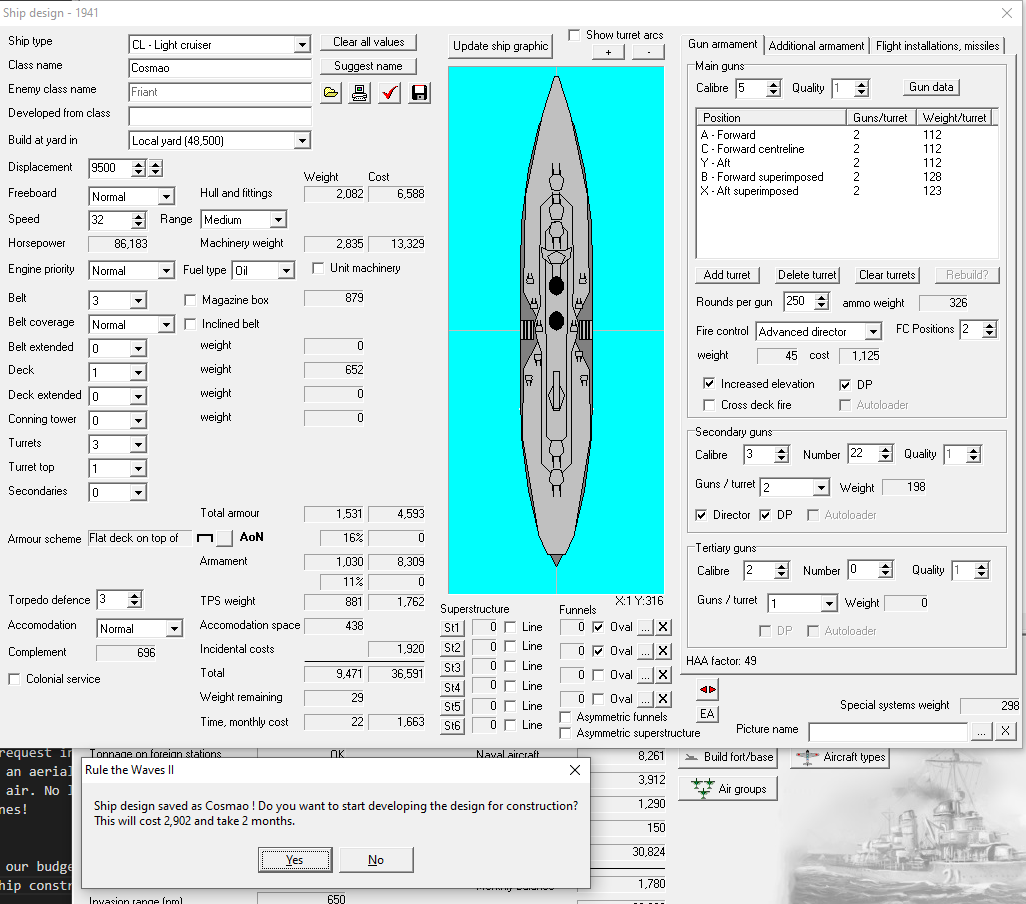
A new light cruiser design appears, similar to our existing Friants but with one fewer turret and a pair of floatplane scouts.
June 1941
A fascist coup takes place in Germany, and their flag changes once more to something a bit more historically familiar.
August 1941
Given that we lost a destroyer or two in the preceding war, I update the Espignole class into the Carqouis class, and plan to start one or two building in the next month. Once our cruiser Sfax finishes in two months, I’ll start another light cruiser.
September 1941
New aircraft types enter operational service; most of our combat planes are of 1941 vintage. The only thing left to upgrade is the floatplane scout, so I do that.
November 1941
Eh, cancel the starting another light cruiser. Maintenance and new aircraft construction are eating into our funds a bit, so we only have a 933-funds surplus of the 1,663 it’ll cost.
We’re able to build 80-plane airbases now, so I start to expand some of our most strategic ones—in particular, those suited to strike at Austria-Hungary and Italy, the one at Brest, and those closest to Germany.
January 1942
It’s a little confusing to be deep in the war years, and yet not have any wars on.
We do figure out the forward-firing ASW mortar, which is a delightfully useful tool. I prepare an upgrade of our escort-style Arc-class destroyer with one mounted.
February 1942
We have now developed airborne radar sets! I guess that’ll make our future search planes even better? Or maybe just better at hunting submarines.
May 1942
I’m going to pause here, not because I’m out of stamina for the game, but because the carrier Egalité just entered service, and her final sibling Terreur will be arriving in a few months. That means we’re going to have money hors du wazoo, which means interesting decisions.
Plans and Intentions
The first issue is one of strategy. It would be nice to snipe Morocco off of Austria-Hungary, but Austria keeps on wimping out of wars. Is there someone else we should go after? If so, who?
The next is one of shipbuilding. How do we stack up against the world?
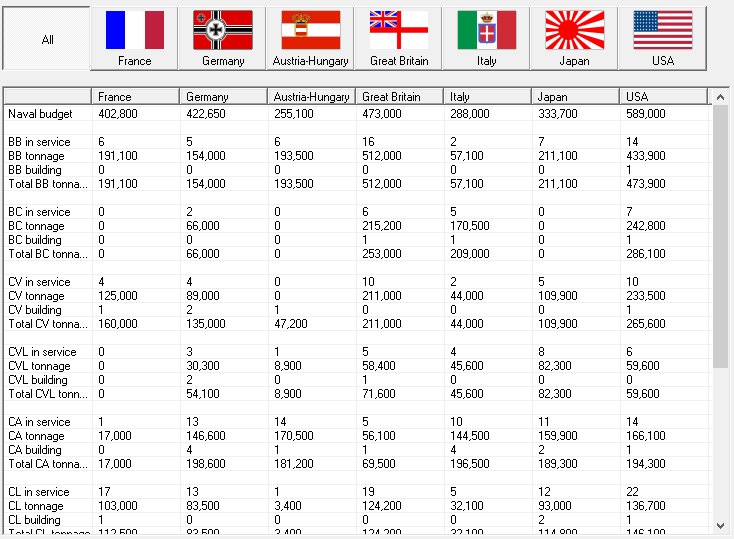
We’re extremely light on dreadnoughts compared to the world leaders, and on par with to slightly light on them compared to other countries in the Mediterranean. We’re middle of the pack on carriers, but our French Revolution-themed class, at 35,000 tons, are the largest carriers in service in the world, and carry 90 aircraft to the next best carrier’s 60. (The Americans are catching up here.) We have one carrier under construction, due to be finished in six months.
As ever, we have almost no heavy cruisers. We do, on the other hand, have a ton of light cruisers, but only seven of them are on hand in Europe or the Mediterranean, with the rest scattered around the globe to fulfill our colonial service obligations. Only four of our European ships are truly modern. We have one light cruiser under construction, due to be finished in 10 months.
We’re in decent shape on destroyers, especially compared to our fellow Mediterranean countries, although it should be noted that twelve of them, soon to be 15, are multi-purpose corvette-ish ships, and many of them are obsolescent. The other four destroyers we have under construction are modern, fleet service ships, of the kind that so adroitly slaughtered the Austrian destroyer force.
We’re behind on submarines, but between our airbases and our carriers, we have the most naval aircraft in the world, a lead we’ll only expand on as our airbases in strategic areas grow and our carrier force gets larger.
So, with those facts in mind, what do we build? We have a surplus of 3,410 funds right now (a pretty good carrier, a bad battleship, a cruiser and a half, two light cruisers, six to ten destroyers). In the next 11 months, we’ll have an additional 8,000 or so funds to allocate. We could afford a battleship or two, but that era is more or less behind us. We could spend it on more carriers, a newer destroyer force, the start of a modern cruiser force… really, the world is our oyster.
It has been several weeks, but the end of summer has proven to be busy. Unfortunately, it’s likely to be several more weeks before the next one. Happily, parvusimperator seems to have briefly regained his muse; with a little luck, he’ll cover me for a while.
Also, this update turned out to be all text, so we’ll see how closely you’re paying attention. There’ll be a quiz next week.
November 1938
Scrapping the three light carriers, the bevy of obsolete corvettes, and our five oldest submarines, mothballing three battleships and Latouche-Treville, and pausing one of our carriers under construction saves us enough money to move forward. We’re still shedding about 2,700 funds per month, but before we run out of money, we’ll finish building enough things to get back in the black.
Objectives remain as they’ve always been: crush Austria-Hungary, take Morocco, complete our domination of Africa (at least the parts not occupied by the Royal Navy).
It occurs to me that a fun ‘boss fight’ might be v. the UK, provided we can keep the US (or perhaps a resurgent Communist Germany?) on our side.
December 1938
A rebellion breaks out in New Calendonia, halfway around the globe. Evidently a lack of naval force there made it possible. Well, this month, our redeployments should bring our forces around the globe back into accordance with the requirements.
We also unlocked 6″ dual-purpose guns (not a sure bet; the chance to get that tech is relatively low), a perfect thing with which to equip our next light cruiser.
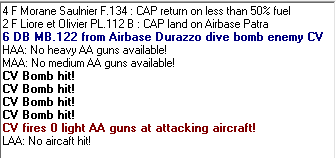
Finally, naval intelligence provides us with a brief on how we shot down enemy aircraft in the most recent war. We shot down 27 in total; here’s the breakdown.
Fighters: 15
Heavy AA: 8
Light AA: 3
Other aircraft (i.e., defensive armament): 1
So, the clear lesson here is that fighters are the answer, and heavy AA failing that. We didn’t quite face enough air attacks to draw further conclusions, which I suspect accounts for light AA being more effective than medium AA.
January 1939
The government wants to further cut the naval budget, in response to which we put our foot down, throw a tantrum, and manage to head off such wooly-headed talk with only minor concessions.
February 1939
Thanks to the press fearmongering about Italy, we get a nice bump in budget, nearly clearing out our deficit. Since tensions with Italy are already in the high yellow, I’m also going to start moving the fleet into the Mediterranean.
May 1939
French engineers develop an improved surface search radar, which we’ll start mounting to ships as soon as possible.
Only 11 ships in the entirety of the French Navy are not radar-equipped at present—an advantage we may be able to press in a hypothetical war with Italy.
July 1939
Tweaking Austria-Hungary again leads to increased budget. We’re already in the black.
August 1939
Between that increased budget and some global economic expansion, we have enough money for me to bring our three mothballed battleships up to reserve fleet status—wise, considering the rising tensions with Italy and Austria—and to re-activate Latouche-Treville.
September 1939
New Caledonia has thrown off the yoke of its French colonialist oppressors! Which is not great for us, except in that it doesn’t seem to affect our score and also reduces our overseas force requirements enough to bring a Troude home. So actually, it’s pretty great for us.
We also bring a new torpedo bomber into service. It can sling a torpedo as a medium bomb load, which means it has a combat radius of some 380 miles.
October 1939
We go from a slight budget deficit to a surplus of 5,200 funds per month, on the back of a few events and the completion of 12 destroyers. I put the money into a new carrier design (Egalité, except with a deck park and deck-edge lifts for improved aircraft capacity and ease of handling) and another of the Friant-type light cruisers. (I may see about a smaller 6″-gun option to help build out our numbers again.)
November 1939
Several more money-boosting events free up enough moeny for a few more of our corvette-destroyers.
I try a few things to build a better cruiser than the Friant, but the Friant seems to have a pretty good balance of just about everything. Another one goes into the yards.
February 1940
Three submarines and the new Egalité begin construction. I also decide to spend a bit of money rebuilding Bearn, our original carrier. She gains a much heavier AA fit and capacity for six more planes.
April 1940
Morane-Saulnier gets the nod for our next model of dive bomber, with a 1000lb-bomb range of 225 miles and a 250lb-bomb range similar to that of our torpedo bombers.
May 1940
Quite a short break between wars, it looks like. We accuse Austria of torpedoing our old battleship Rouen, driving tensions nearly to the limit.
June 1940
Italy’s rattling sabers, too. Might we get the chance to take on both of our Mediterranean rivals at once?
July 1940
Austria-Hungary declares war.
The first battle is a convoy defense, our destroyers against theirs in the fading moments of dusk. Radar suggests it’s nine of ours against eight of theirs.
It turns out to be exactly so. The French destroyer forces, with the massive advantage of radar—we were able to torpedo the Austrian line from beyond visual range—sink four of the attacking ships in exchange for one loss.
Capabilities, Plans, and Intentions
The Fleets
We are, of course, well-suited to war against Austria-Hungary. They’re a weak power, with a small budget of around 60% of France’s. our six battleships are, on average, newer than theirs, although most of their battleships outgun ours—only the two Austrian 8×13″ ships are inferior. Where French ships beat them handily is speed. Suffren is, at 26 knots, the slowest ship we have in service. The fastest Austrian battleship makes 25 knots. We have five battleships in the Mediterranean. Rouen, recently in mothballs, is operating on trade protection duty in the North Atlantic while her crew comes up to speed. (As I’m sure they will. Rouen holds the current record for battle stars in the French fleet, with seven.)
In aircraft, we’re again superior, with more than twice as many as the Austrians, and the ability to bring nearly as many as the Austrians have to their own home waters. One of our carriers, Bearn, is currently under refit, and will be back in service in seven months. Until then, we just have Liberté and Fraternité, representing a combined aircraft strength of 180 planes.
Trade warfare is where we’re inferior, somewhat. The Austrians have thirty submarines to our eight, and six cruisers to our one. We’re also a bit light on light cruisers right now: we have fourteen of them, but most are tied up overseas on foreign service. There are five in home waters, and two of those are our new Friant class, which are still working up in Europe. (I’ll let them get up to speed before sending them into battle.) The other three are obsolescent Voltaire-class ships, built in the late 1920s.
We’ve flipped things around somewhat on destroyers. Our most recent ships are faster, heavier, and better-equipped than their Austrian equivalents.
Things get a little spicier if Italy decides to join in. They’re quite close to us in overall strength, and adding them to Austria would put us on the back foot. Happily, we’re more or less immune to blockades from Austria and Italy—they have no bases in our build zone, so they can’t sustain a large fleet there. Since we have more bases in the Mediterranean than we do even in Northern Europe, we’re perfectly capable of blockading Austria forever. (Not Italy, though. They’re too strong.)
Shipbuilding
Besides the aforementioned Bearn, still in refit, we have seven ships in the yards. We’ll start with three new Arc-class destroyers, which are approximately equal to the most recent Austrian ships but inferior to both sides’ top-line options.
Next are two 90-plane Liberté-class carriers, Egalité (to round out the revolutionary trio) and Terreur (I ran out of positive-sounding French Revolutionary names). At 35,000 tons, they’re the envy of the world, nearly twice as large as most other powers’ largest ships. (Of couse, that does mean it’s a disaster if one of them gets sunk by, say, an Austrian submarine. Knock on wood.)
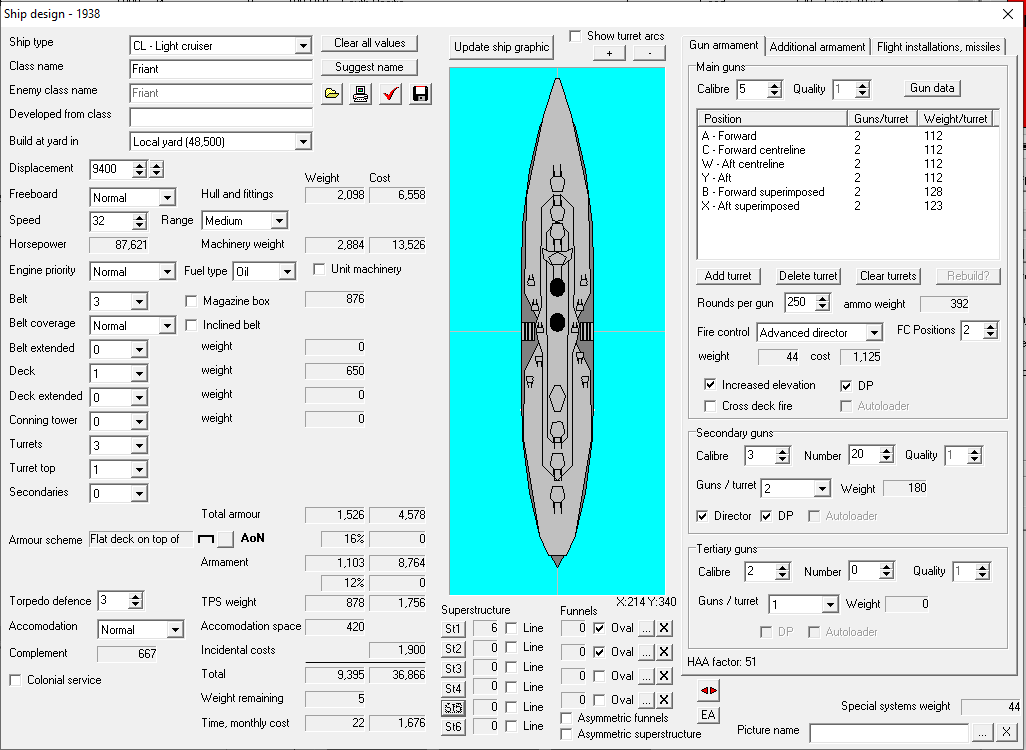
Finally, we have two more Friant-class light cruisers, 9,400-ton ships with large batteries of dual-purpose guns: 12 5″ and 20 3″. They also carry mines and torpedoes, but no aircraft. (Nowhere to put them, with all the guns.) Given that our carriers are large, losing the scout planes is no great drawback, especially since most of our battleships carry them now.
War Plans
Pretty straightforward here. Our goals are as before: take Morocco as soon as possible, so that the plot of Casablanca can take place on schedule. An invasion is already being planned.
As far as battles go, we can outmuscle the Austrians in most fights. Battleship actions are a bit iffy, however, given the ship-for-ship Austrian superiority, as are cruiser actions, where we’re badly outnumbered.
On the other hand, I’m absolutely going to take a chance on any battle where there are carriers involved, provided it doesn’t take place in the depths of the Adriatic. Anywhere else in the Mediterranean, we have a massive advantage in our land-based aircraft.
If there’s anything I ought to do differently, now’s the time to mention it.
My lovely wife is running an online D&D 5e campaign, which involves the use of Discord and a bot called Avrae. I’m led to believe the documentation for Avrae leaves something to be desired, and on those grounds, she wrote up a cheat sheet.
The field agrees on more carriers, but is split on what to do with the rest of the budget. So, here’s my plan:
When the battleship Solferino completes, start a new carrier.
When the carrier Fraternité completes, start 2-3 light cruiser escorts.
When next the budget allows, build another battleship.
March 1938
There is no battle this month—France declines to fight Germany near Jutland, France declines to fight Austria-Hungary in the Adriatic, Austria-Hungary declines to fight France everywhere else.
An enemy submarine torpedoes and sinks our light cruiser Friant, one of the three remaining Chateaurenaults puttering around on foreign service.
Otherwise, an uneventful turn.
April 1938
The Germans decline battle twice, when it would take them within striking distance of French land-based air.
They accept a convoy attack (that is, we’re fighting a convoy defense) far enough from the French coast that the dive bombers are out of reach. On the French side we have two light cruisers and a destroyer screen, so I don’t expect much of a glorious victory unless the Germans are not out in force.
I commit to the fight, gambling on the chance to sink an old German battlecruiser, but German torpedo gunnery seems to be more accurate than my own. We lose a light cruiser (Forbin, one of our newest ships) and four destroyers for my trouble.
May 1938
I decline a bunch of unfavorable battles. Our old battleship Lyon hits a mine and sinks; maybe it’s time to build a little minesweeper or two. There are also reports of food shortages in France thanks to merchant shipping losses. I crank up the number of destroyers under construction, and consider maybe combining a corvette-minesweeper into a slow destroyer.
In more positive news, I have a new AA picket light cruiser design:
June 1938
A surprise battle occurs in the eastern Mediterranean: a German squadron of unknown composition encounters a combined French-American cruiser squadron.
Steaming south of Heraklion, the French squadron heads east. It includes three heavy cruisers: our modern Latoche-Treville, and the obsolete American Frederick and Pueblo. Together, we have 17 9″ guns and 8 10″ guns, along with ten destroyers and air support from French bases in Kalamata and Benghazi.
Additionally, we have our old seaplane tender, Commandant Teste, in attedance. She launches some search planes.
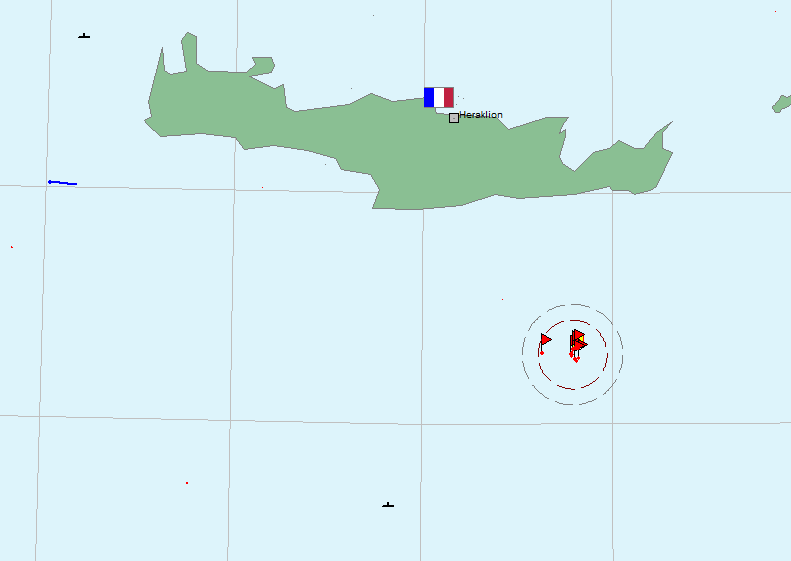
Altough the weather is cloudy, one of Teste‘s floatplanes nevertheless spots a German cruiser, steaming east at the far end of Crete. My mismatched squadron, with a top speed of 27 knots, nevertheless sets off in that direction.
The two American ships date to 1923 (Frederick) and 1916 (Pueblo). Pueblo, at 15,000 tons, has armor nearly as thick as Latouche-Treville, and the only 10″ guns in the squadron. She’s the slowest of the three ships at 27 knots.
Frederick has the same 31-knot speed as Latouche-Treville, but is very lightly armored, and ships one fewer 9″ gun. Being American ships, however, they’ve been upgraded to the gills. Both sport advanced gun directors and search radar.
By late morning, Kalamata has launched an air strike. Dive bombers approach the enemy cruiser, still 60 miles from our force, at about 11:00 a.m. They hit it two or three times. A group of medium bombers, following up, score no hits. (Oh, how I long for the days when we can put torpedoes on medium bombers…)
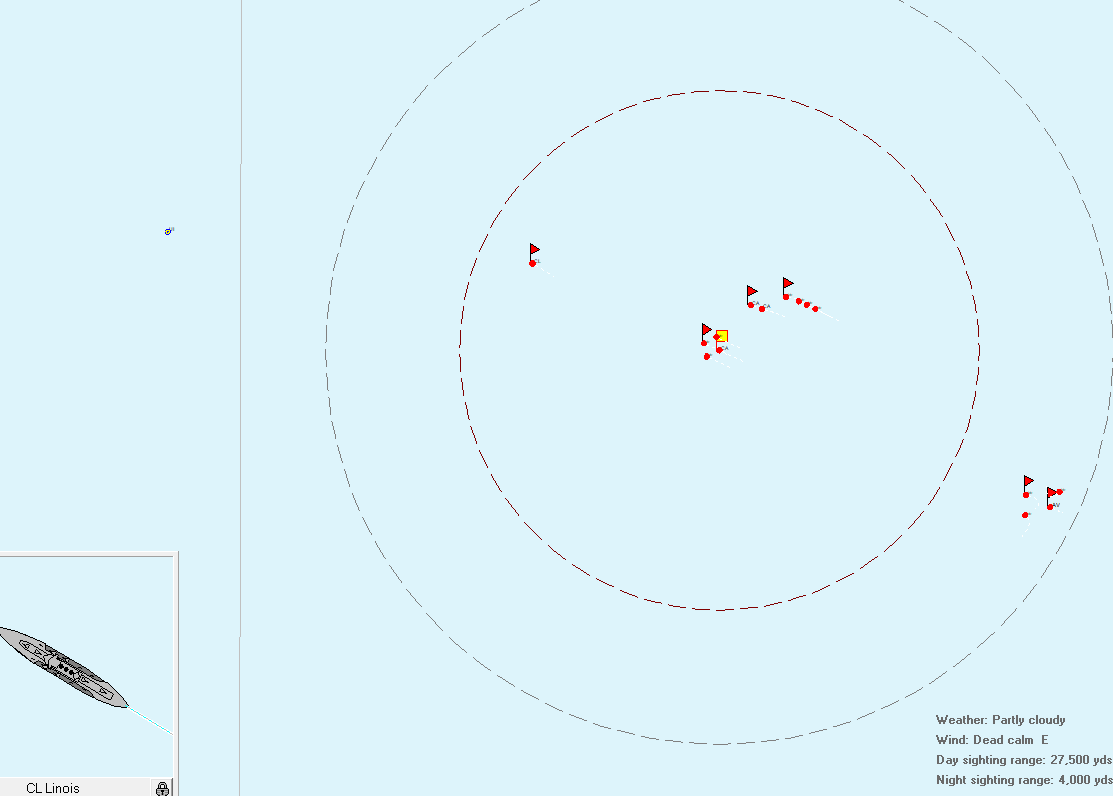
At 12:14 p.m., our light cruiser Linois spots the enemy ship. We turn to engage.
The target, a Roon-class heavy cruiser, has taken some damage from bomb hits already, and is slower than our ships are now. Latouche-Treville scores the first main battery hits at 12:40, with three in one salvo from her six forward guns.
She has very much found the range, with at least one hit per minute for the next twelve minutes.
By 1:06, the enemy cruiser is on fire and slowing to five knots. I believe it ships torpedo tubes, so I’m going to keep my distance, and perhaps send the destroyers in on a flotilla attack to deliver the death blow.
Before they can arrive, the German ship comes to a complete halt, and her bow settles beneath the waves.
Latouche-Treville hit with nearly 10% of her main battery fire. The German ship took 55 hits and delivered 2.
July 1938
Strikes and anti-war demonstrations roil Austria-Hungary, and our spies indicate that France isn’t the only country experiencing food shortages. Perhaps we can knock one foe out of the war soon.
Another Mediterranean cruiser battle against Germany lies before us, this one off Rhodes rather than Crete. It’s cloudy and before dawn, and we’re too far from our airbases to expect much help. (Maybe we need a small airbase at Rhodes with a group of dive bombers?)
Still, we have three heavy cruisers in the area to zero enemy heavy cruisers, so maybe we’ll get lucky and happen across the German ships.
Before even that can happen, at 4:07 a.m., we pick up a radar contact at a distance of about ten and a half miles.
We survive the predawn encounter to discover a German light cruiser/destroyer squadron as dawn breaks. If we can avoid getting ships torpedoed, this is a good matchup.
We do avoid getting ships torpedoed, at least to the point where the torpedoing means they’re combat-ineffective, and in a chase up the Rhodian cost, sink two Austrian and one German light cruiser, along with a few destroyers.
August 1938
We have some extra money, and I said originally I was going to build a battleship with it, but things have changed. I think instead I am going to make a class of 32-knot corvette-destroyers, only 1500 tons and much cheaper than our top-line ships. I can get a good ten of them building immediately, which may help with anti-submarine work should this war continue for that long.
The month’s battle is a destroyer action in the Adriatic. Surprisingly, we emerge the victors—the Austrians had a seaplane tender deployed, and we happened upon it while running from the main force of Austrian destroyers.
September 1938
France’s unrest score is now 5, which is a worrying upward trend. Solferino, our newest battleship, is in the dockyards for five months after eating a torpedo.
The UI now has ‘Fuel Shortage’ across the status pane in big bold letters. Consulting the manual, I see that can happen when a nation doesn’t have native access to oil, and is blockaded for a long time. What it means is that large ships may not be able to participate in battles, and strategic moves may be canceled. (Well, that part isn’t too bad.)
October 1938
After another month of declining unfavorable battles, High Command recommends that we not do that anymore or suffer losses in prestige. I’d much rather lose prestige than lose ships, at this point, especially given that we’re well ahead in victory points.
November 1938
The battle is an unexpected fleet battle. Weather limits air operations, which is good, because we’re in the Heligoland Bight and that’s a bit close to Germany’s heartland.
It’s a fleet battle, which is bad, because there are a lot more German ships than French ones. The goal here is going to be straight preservation of forces. If we can launch an airstrike or two, that’s great, but otherwise, fleeing to the northwest is the order of the day.
A Battle at Jutland
Radar contacts at 7:19 a.m. open things up. Hopefully it’s just scouts.
Regardless, the fleet turns north and opens the throttles.
Five hours later, and I’ve forgotten to take screenshots, but in my defense, not much has happened. The light cruisers Surcouf and Coetlogon, serving as scouts, were trapped between the German main force and scouting force. By turning east while the main body fled northwest, they distracted the German fleet while our own ran for the open waters north of Britain.
Surcouf and Coetlogon are lost, but at least two of their escorting destroyers look likely to escape, and all three might. Before Surcouf and Coetlogon sank, they and their destroyers launched two effective salvoes of torpedoes. Perhaps we’ll see some German losses in the after-battle tally.
In the end, it actually goes into the books as a French victory—a submarine sank a German light cruiser as it was returning to port, and the torpedo barrage orchestrated by Surcouf and Coetlogon heavily damaged several German dreadnoughts.
November 1938 continued
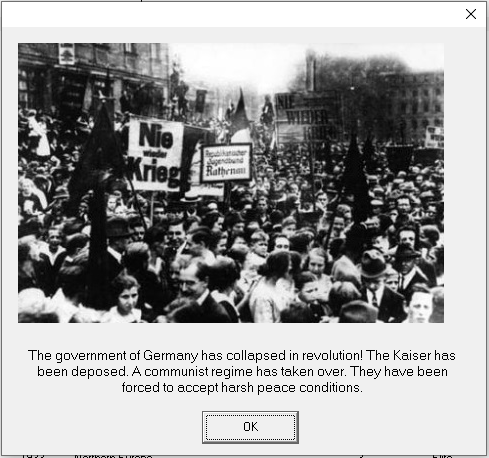
And, in the aftermath of that loss…
(The game even has a Communist German flag, and it isn’t even the real Communist German flag!)
In the peace agreement, we take Pommern, a 30-knot, 16″-gun battleship, as well as all of Germany’s possessions in Africa, and we still have a bit of headroom left for reparations.
Annoyingly, the collapse of Germany means the collapse of Austria as well, and we don’t get a chance to take territory from Austria-Hungary. Morocco remains in the hands of our enemies.
Now that the war is done, however, it’s time for us to take off our dashing admiral’s peaked hats and put on our boring bean-counter’s green visors.
Slashing the Budget
We have a monthly deficit of (drumroll) 9,312 funds, and a current balance of 26,500 funds.
There are a few things we can either mothball or scrap right off the bat:
1300 funds: 13 Carabinier-class corvettes. We have 10 new Arc-class minesweeping destroyers in the dockyards, 11 months away, and they’re more capable than the Carabiniers in every way. At 32 knots, they could actually serve in a fleet battle in a pinch.
105 funds: 5 Diamant-class corvettes. They’re basically useless, and if we want another class of corvettes, it’s not hard to build them down the road.
Those are the obvious candidates, and get us up to 1,405 of savings. Unless there are any objections, I’m going to do those two things.
For the rest, read on.
State of the Fleet
We have six battleships left after the war: Rouen (395 funds per month, an ex-battlecruiser with 9 12″ guns), Suffren and Courbet (two of our late-20s 8×14″-gun battleships, well armored; Suffren is the slowest one left at 26 knots; 500 funds each), Marengo (611 funds, a 27-knot, 16″-gun battleship), Solferino (~650 funds, a 30-knot, 14″-gun battleship), and Terrible (656 funds). Terrible is the ex-Pommern, a 30-knot, 8×16″-gun battleship. Her armor isn’t quite up to the standard of our mainline ships, but she mounts a heavier secondary battery and carries two floatplanes. Solferino is still being repaired from a torpedo hit. Once she’s back in fighting trim, we’ll save another 600 funds per month.
We still have the heavy cruiser Latoche-Treville; she proved her worth in combat in the Mediterranean toward the end of the war. She is, however, all alone, and all of our possible enemies have cruiser squadrons of moderate size. She costs 365 funds per month, and might be one to mothball or reserve.
Our light cruiser force comprises 13 ships, but 10 of them are on overseas service or most likely earmarked for it. We need more light cruisers.
We have five aircraft carriers of various types: the stout and dependable Bearn, the new 90-plane Liberté, and the light carriers Bruix (a converted cruiser), Arromanches, and Dixmude.
The latter three have speeds below 30 knots and only carry 24 planes each. Together, they account for 597 funds per month in maintenance (plus a bit more for their air wings, I suspect). Compared to a Liberté-type carrier, they cost 130% as much to maintain while carrying 80% as many aircraft, and it’s harder for them to coordinate air operations to boot. Potential candidates for mothballing.
For destroyers, we no longer have any really, truly obsolete ships. Our eldest ships, four each of the early-20s 1500-ton Flamberge and Glaive classes, are still in the 34-35-knot range, and each carry plenty of torpedoes. We also have eight 1500-ton Epees from 1933, four 2000-ton Arquebuses from 1935, and four wartime 2000-ton Espignoles from 1938. The Espignoles carry torpedo reloads. The 1500-ton ships each cost 32 funds per month to maintain, while the 2000-tonners cost about 44 funds per month each.
We have thirteen submarines as well, about a third of which date to 1915, a third to 1926, and a third to 1932.
In the Yards
Under construction, we have two ‘light’ cruisers, Friant and Jean Bart, each of 9,400 tons. They’re primarily anti-air pickets, fitting 12 5″ dual-purpose guns in their main battery, 20 3″ dual-purpose guns as a secondary battery, and eight anti-air machine guns of various calibers. They cost 1,675 funds per month each, and are 19 months from completion. We need light cruisers.
Next up are Fraternité and Egalité. They’re weighing us down to the tune of 3,560 funds per month a piece. One will be ready in 13 months, the other in 22. Big carriers are nice to have, and if we’re ditching the light carriers, we should probably keep both. We can pause Fraternité while other ships build, if it makes sense to do so.
We also have two Espignole-class destroyers 11 months away, at 532 funds each. They’re our most modern, most powerful destroyer design, with dual-purpose main guns, torpedo reloads, extra depth charges, K-guns… all the bells and whistles.
Also under construction are ten 1,200 Arc-class destroyers, built for second-line/auxiliary service. They’ll be our first minesweeping ships, which might be handy in future wars. We’ve lost a number of ships to mines. Each costs 360 funds per month; they’ll all be done in 11 months.
Back to Budget-Slashing
So, to recap, here’s where we are:
1,405 funds: scrapping old, useless destroyers.
700 funds: ships currently under repair (another 4 months or so).
That puts us at a deficit of 7,260 funds. Ships in reserve cost 50% of their ordinary maintenance, which means that reserving the entire fleet still would leave us about 3,000 funds short of break-even.
Ships in mothballs cost 20% of their usual maintenance, but obviously we wouldn’t want to mothball all that many ships. Mothballing Rouen, Latoche-Treville, and the three light carriers would only save us about 1,000 funds per month.
Pausing one carrier and one light cruiser saves us 5,250 funds per month, and in combination with some relatively broad reserve-fleeting or some targeted mothballing would get us there. It also delays entry into service of critically-needed fleet units.
Finally, pausing both carriers would get us over the hump without any other measures. That would delay their entry into service by about a year.
Re-Deploying the Fleet
We also have a deficit of ships overseas. We need another 2,250 tons in West Africa, another 4,250 tons in the Indian Ocean, and another 2,500 tons in the South Pacific. We can deploy our aging Troude-class cruisers and one or two old destroyers for the moment. Should we build another class of foreign service cruisers, or just continue our habit of shuttling obsolete ships overseas?


