Monthly Archives: June 2018

Movie Guns: Bond’s Walther PPK

Quite possibly one of the most famous movie guns ever, the Walther PPK has been (generally) Bond’s sidearm since his introduction to the silver screen in 1962. It probably doesn’t need much introduction, but I’m going to give it one anyway.

The 7.65 Browning (.32 ACP) Walther PPK replaced the .25 ACP Beretta 4181 as Bond’s sidearm in the novels starting in the book Dr. No. A fan, Geoffrey Boothroyd, had written Fleming disapproving of this small choice of firearm (in the Beretta). They corresponded for a while, and after establishing that Fleming thought Bond should be armed with a semiautomatic pistol, eventually settled upon the Walther PPK as the new firearm.

As a brief aside, I hate the Walther PPK. I can’t stand it. The trigger is garbage. The sights are virtually nonexistent. The mag release is in a stupid place. The grip is entirely too small for the hands of any reasonably-sized man. The slide seems purpose-designed to tear up the web of your hand. I would say at least it’s pretty, but there are plenty of other pretty guns out there that aren’t a total soup sandwich to shoot.

Now, because James Bond is a franchise but his weapon remains basically unchanged, we’re going to look at this first in the context of 1962 when the first movie was made. We’ll also look into it as a choice today.

1962
Much as I hate to admit it, the PPK is not a bad choice in 1962 given Fleming’s strict criteria. There are not a lot of small semiautomatic pistols available. My preference would be to either relax the semiautomatic requirement and carry an S&W Centennial Airweight, chambered for .38 Special, or to relax the size constraint a bit and carry a Colt Commander2, chambered for 9mm. In either case, I get a much more effective round and a much more shootable weapon. Most of the time, Bond has a great concealment garment on. This does require a bit more effort on the part of one’s tailor, but that is why one employs a tailor.

2018
You must be joking. There are so many better choices in 2018 that it truly boggles the mind, and it gets even worse if you relax those constraints again. In the Profoundly Small Semiautomatic category, we have the Glock 43, S&W M&P Shield, Walther CCP, and SIG P365. Also the Glock 42 if we don’t mind shooting .380. If we let ourselves go a trifle bigger into double stacks, we now include the PPQ SC, Glock 26, M&PC, and P320SC, which are even better, and can take larger magazines from their bigger brothers. If you’re still packing a .32 ACP anything in 2018 and you plan on wet work, you need to have your head examined. The .380 version is outclassed both by newer, better pistols in .380 as well as the latest crop of small, single-stack 9mm pistols. In .380 right now, I’d be all over the soft-shooting Glock 42, which fixes basically every problem I have with the .380 PPK.


  1. To quote the wonderful Mr. Boothroyd, “It’s a lady’s gun, and not a very nice lady at that.” 
  2. Later called the Lightweight Commander. It’s a 1911 with a 4.25″ barrel, an aluminum frame, and chambered in 9mm. What’s not to like? 

VLQ-12 CREW Duke

IEDs proved to be a persistent and deadly threat during Operation Iraqi Freedom. They’re pretty easy to make with cheap, off-the-shelf electronics and existing warstocks, and are pretty easy to scale to deal with whatever armored vehicle you fancy. What is a modern high-tech army to do? When you consider that IEDs tend to be remote-detonated, an obvious answer is to jam them. Enter the VLQ-12 CREW Duke.

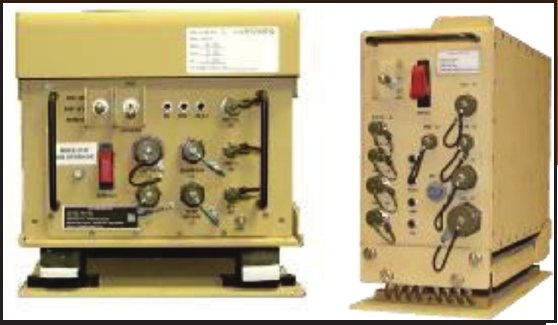
The VLQ-12 Counter RCIED Electronic Warfare (CREW) system, was designed to meet the threat of radio command detonated roadside bombs in Iraq. It is designed to be mounted to a wide variety of vehicles from the simple HMMWV to the mighty Abrams tank. Originally, CREW systems were placed in bustle racks of armored vehicles. CREW V3 is integrated into the Bradley M2A4 and Abrams SEPv3 upgrade packages in an under-armor installation. Clearly, cargo and utility vehicles have plenty of space available for the system.

crew duke v3 primary and secondary units

CREW Duke V3 comes with two major components, plus a controller, antennas, and related cabling. The primary unit weighs 70 lbs and measures 12.8″ x 12.8″ x 16.1″. The secondary unit weighs about 40 lbs and measures 14.4″ x 7.0″ x 11.7″. The secondary unit is one of the added components separating the Duke V3 from the Duke V2. The secondary unit also requires a directional antenna, the PRC-119. The PRC-119 weighs 5 lbs. and measures 23″ x 10.5″ x 1.5″.

One other useful capability is threat event logging. CREW Duke can store information on the kinds of signals it encountered and jammed, which can be accessed via ruggedized laptop or PDA.

Parvusimperator’s AIWB Experimentation

I’m not going to pretend I’m some kind of fantastic innovator. AIWB is pretty popular these days. I’m late to the party. I get it. But it’s still a decent topic, and when all of your trainer friends use it daily, it might be worth looking into. And I’m really big into experiential learning, so what the hell, right?

Let’s review our terms. AIWB (Appendix Inside the Waistband) is a mode of carry where the gun is forward of the hipbones (usually between 10 o’clock and 2 o’clock on your person). It has a number of advantages over traditional behind-the-hip IWB:

  • Better concealment

  • Faster draw time (generally)

  • Easier to defend against a gun grab

  • Much easier access to the gun when seated

At the same time, there’s an obvious bit of caution here. Clearly, we’re in the vicinity of some very important things. For some actual testing, and not just a bunch of nervous prattling, check out Ballistic Radio’s video on the subject HERE. As a bonus, this also includes some good AIWB reholstering technique to maximize safety.

Now that we’ve dealt with that annoying elephant in the room, let’s get on with it. I did need to get some stuff for this experiment. First, holsters. I wanted holsters designed with appendix carry in mind, so I hit up the good folks at Dark Star Gear for some AIWB holsters. Dark Star Gear is also the brand used in the cool video above, they’re the brand used by several of my instructor buddies who kicked off this shindig, and as a further bonus they’re local to me. I got a holster for my Glock 34 (which also fits the Glockblaster if I remove the weaponlight) and another for the Glock 17. While the Glock 17 will fit in the Glock 34 holster, I wanted to see if the reduced length of a Glock 17-specific holster mattered for comfort.

Key things I wanted in my holster were adjustable cant (I wanted to play with zero-cant and negative-cant options), and something to help tuck the gun in close to my body.

I also got a Wilderness Instructor Belt. I got the wilderness belt because lots of my instructor buddies recommended it. They also mentioned that having some kind of belt with the capability for lots of (possibly small) adjustments would go a long way to making my appendix carry experience good.

Also, note that I did not purchase pants with a waist size any larger than what I would wear if I did NOT have a gun tucked inside the waistband.

And now, a brief bit about me. I’m about average height and am a skinny dude. I spend most of my workday sitting. So sitting comfort is important to me, and the easier seated access is a nice plus. Also, my commute is roughly twenty minutes each way.

In terms of pistols, I tried my Glock 34, my Glockblaster sans weaponlight, and my Glock 17 with RMR. Here’s what I found:

  • All pistols were concealed much better AIWB than IWB or OWB with a cover garment. I could be quite discrete with even a light t-shirt as a cover garment. While my office is a pretty permissive environment, this made me feel better generally. Also, it’s pretty cool.

  • Both guns were comfortable seated at my desk or in my car. I had no complaints and wasn’t tempted to remove my gun to improve seated comfort.

  • The Glock 34-length holster made bending over a little uncomfortable. The Glock 17 less so. I don’t bend over much during the day, so this wasn’t a huge downside. Still worth noting.

  • My draw times from concealment are faster. I expect them to improve with practice.

  • My instructor buddies were spot-on about having a belt supporting a wide range of adjustments. The wilderness instructor belt is a lot more comfortable with an AIWB holster than my standard heavy leather belt, mostly because of the wider range of adjustments.

So my conclusion overall is that I really like appendix carry. It works well for me, my body type and the guns I like to carry. As with everything else, your mileage may vary. However, if you’re curious about AIWB, I would encourage you to try it out with some purpose-built gear.

On J-Frames

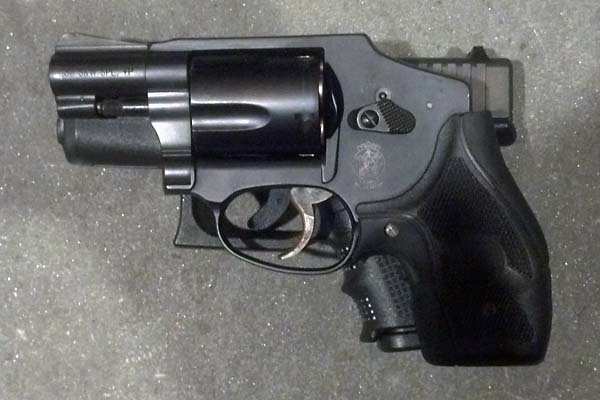
The persistent popularity of small snubnosed revolvers, typified by the J-Frame models of Smith & Wesson, for concealed carry purposes astonishes me. Back in the day, sure. Small, reliable, semiautomatic pistols in a reasonable defensive caliber did not exist. But this is Anno Domini 2018. It is not 1958. There are plenty of options if you want something really small and concealable and reliable and chambered in a reasonable defensive caliber. Off the top of my head, there’s the S&W M&P Shield, the Glock 43, and the Walther PPS, all with established track records and manufacturers with good QC. These are reliable choices. They’ve been on the market for years. They work. Really. And they provide so many advantages over the small revolver that I still am astonished that people go for the revolvers instead. And no, I also don’t know why my tactical friends keep seeking out training on the damn things. Let’s review the many ways that the small, single-stack semiautomatic is flat-out better than the old-school revolver competition.

  1. Sights
    I tend to get picky about my sights. Modern semiautomatic pistols allow me to be picky. There are a wide variety of sights available for your Glock 19, letting you pick exactly the ones that work with your eyesight. Single-stack subcompacts like the PPS, Shield, and Glock 43 are no different. They all have sight dovetails. This highly advanced technology allows you to change out the sights to something that better suits your needs and eyes. It’s amazing. And these small pistols from established manufacturers have a large aftermarket. You need dovetails, but you also need sights to put in them. But we have you covered with the choices above, whether you like 3-dots or tritium or fiber optics.

    The vast majority of J-frames have atrocious “sights” that consist of a little lump of metal on the front of the barrel and a little trough cut in the rear of the frame. Not adjustable, not high-visibility, not tritium, and certainly not interchangeable. Simply put, the stock sights are awful and you are stuck with them. There are a few J-Frame models that actually have dovetails, but they are tremendously expensive and there are few manufacturers working with this market niche. Otherwise, better hope your chosen rounds shoot someplace sensible based on a reasonable sight picture.

  2. Trigger
    I’ve gotten less picky about my trigger choice these days, though I still like good ones. Anyway, I can think of few things worse in a trigger than the average double action pull of a recently-made revolver. Long and heavy, and probably gritty too. Lots of people will advocate an Apex spring kit in your J-frame. Which helps. Or you could get one of those single-stack subcompacts that has better trigger out of the box. And these single stacks can also take trigger improvements, just like their bigger brethren. I’m sure if I grew up firing revolvers and figuring out how to make that trigger work well, a slightly-lightened wheelgun trigger would be the “bees knees”. But I didn’t, so it’s not. Comparing stock to stock or modified to modified, the semiautos will have the better triggers, and you’ll likely be more familiar with them, because most of your shooting is going to be with some full size semiautomatic pistol.

  3. That Wheel
    You get five shots in a j-frame. Six in some competitors. At which point you’re working with speed strips, probably. Maybe speedloaders, but those are bulky. This is a different and slower reload drill than the modern semiautomatic, which you probably spend most of your time shooting. And even the small single-stack pistols mentioned previously all hold more bullets. Also note that the J-Frame’s footprint matches that of the double-stack Glock 26, which holds twice as many bullets and can accept magazines from other, larger Glock pistols.

Just about everybody is going to be better suited to buying a small semiautomatic these days. And you’re not giving anything up on size either. Here’s an overlay from the late Todd Green, who is also firmly in the more bullets camp, where we can see that a J-frame and a Glock 26 are both about the same size.

Glock 26 j frame

Oh, and one more thing. J-frames with the locking hole in the side of the frame above the cylinder release have been known to have this lock break, jamming up the gun. Just what you want.

Shopping List: Fishy USPSA Revolvers

These lists, unlike the earlier Carry Optics list, are shorter and simpler. There are no optics to mount or, indeed, new sights to buy; nor is there compatibility with pre-existing tuning to worry about. So, I decided to write up all of my options, to lengthen the article a bit.

For All Three

We’ll call it $200 for the two items below, to cover shipping and other expenses.

Moon Clips ($30)

No competitive revolver shooters use speedloaders; they’re an extra step and not worth the time. Moon-clipped revolvers are faster, and moon clips are cheaper than speedloaders. So much the better.

Belt Rack ($150)

Moon clip holders which can carry eight clips can be found for about $150 from a number of retailers. Even with my expressed preference for six-guns, I don’t think I’d need more than 8. My usual preference is to have about 60 rounds on my belt for a 32-round stage. 48 in the holders and 6 in my pocket is close enough.

The Safe Option(s)

A Ruger GP100 10mm ($800)

Ruger recently released a GP100 Match Champion in 10mm/.40, which fits my desire to use existing stocks of competition ammo. There aren’t a lot of gunsmiths who work on Rugers, but some polishing compound and some spring work should serve to get the trigger pull down to acceptable levels.

Or, A Ruger Redhawk .357/.38 ($800)

Ruger also has an 8-round Redhawk model in .357 which accepts moon clips. (They are, however, expensive moon clips.) This would let me play with the big boys in USPSA Revolver, and eliminates one of my objections to eight-round revolvers. 9mm is a wimpy semi-automatic caliber, not suited for a manly gun like a revolver, and 8-round 9mm revolvers are an abomination unto God. .357 (and yes, also wimpy .38 like I’d actually be shooting) are true revolver calibers.

It eliminates another one of my objections, too; a Ruger in .38 Special is undoubtedly hipster in the modern revolver competition world. I’d be able to shoot Limited in ICORE, if Western PA ever ends up with a club which runs ICORE matches.

Of course, there are some downsides. If there are few gunsmiths who work on Match Champion revolvers, there are fewer gunsmiths who work on Redhawks. The sights might not be very much good for competition, although they are at least replaceable.

All in all, a compelling option: the Redhawk gets me to the 95% competitive bracket really easily, with no esoteric stage-planning requirements.

Kydex Holster ($100)

Given that these are the cheap options and not especially long-barreled, a Kydex competition holster is probably the way to go. $100 is a bit of an overestimate here, but $800 is a bit of an underestimate for the guns, so it’s a wash.

Some quick Googling suggests that a Kydex holster for the Redhawk might be hard to come by. In that case, I would have to go leather, which is delightfully old-fashioned.

The Weird Option

A Chiappa Rhino .40 ($900)

A what? Yes, Italian pizza-gun manufacturer Chiappa, who you might know better for their replica old-time firearms in the finest spaghetti western tradition, also makes a six-gun which wouldn’t look out of place on the set of Blade Runner. The bottom cylinder fires rather than the top one, and so the barrel is mounted low in the frame. The recoil impulse is nearly straight back. People say it’s nice. The Rhino can be had in .40 with a range of barrel lengths; I’d probably want the 6″ barrel because, in my opinion, it’s the coolest-looking1.

On that note, as I intimated in the first post in this series, the Chiappa’s major advantage is that it’s cool, and beyond that, that it’s uber-hipster. Nobody shoots Major in USPSA Revolver; of those who do, nobody shoots .40; of those who do, absolutely nobody shoots a Chiappa Rhino. That does have value to me; I like the attention I get when I’m shooting something offbeat.

A Guga Ribas Holster ($200)

Unfortunately, nobody makes holsters for Rhinos either, and a six-inch barrel makes for an unwieldy draw. I’d have to look into a Guga Ribas holster, sufficiently adjustable to grip the trigger guard of just about anything. That adds some expense.

The Boring Option

A S&W 929 ($1100)

I could also go the boring way, buying what everyone else has, a 9mm S&W Model 929.

Not only is it the most expensive option, it’s also the most popular one, and if you know me at all, you know how very unlikely that is.

A Guga Ribas or Other Adjustable Race Holster ($200)

If I were going to take leave of my senses and buy the boring race gun everyone shoots, I could hardly cheap out on the holster.

Conclusions

So, I’ve laid out four options. Every revolver option costs at least $200 for a belt rack and moon clips. Both Ruger options add $900 or so to the total, for $1100 to get in the door—slightly less than the Limited P-09. If I added another $100 or $150 to the total, to bring the price up to the P-09’s all-in price, I could get an adjustable race holster.

The Rhino adds another few hundred bucks of cool for about $1300. Unlike the Redhawk, it wouldn’t be competitive, but I would at least look cool while shooting slowly.

The Smith and Wesson option, at $1500, is probably out of my price range, in addition to being prevalent and therefore boring.

Okay, But You Actually Have To Make a Decision

You can’t make me. Not yet, anyway. More on that in a second. The way I see it, it comes down to P-09 Carry Optics, which is cool in a modern technological way, and the Ruger Redhawk, which is cool in an old-time lawman way.

What about the Rhino? For me, it comes down to competitiveness. I’m not shooting USPSA to become a better shooter, although that’s a pleasant side-effect. I’m shooting USPSA to compete in USPSA. The point of the game is the game. For the same reason I wouldn’t go to a fencing tournament with a left-handed foil, I’m not going to intentionally buy equipment which is well below par. As classic as the Ruger six-gun is, and as cool as the Rhino is, competing with them is, in a word, uncompetitive2.

So what’s it going to be? A Carry Optics P-09 or an 8-round Ruger Redhawk? I said I don’t have to answer yet, and I’m sticking by that. 2018, and in all likelihood 2019, are for improving with the guns I already have. Revolver requires a whole new level of planning, and a whole new level of shooting perfection, over Limited and Production. I have a pair of plenty-competitive guns I can easily shoot two seasons with.

In two seasons, the story might be different. Carry Optics rules are a moving target right now, and I don’t want to commit too early. On the flip side, in two years, Revolver might not be a USPSA division anymore, or Chiappa might come up with an 8-round Rhino. The point is, choosing now would be silly. I have time. It doesn’t matter how I lean now; it matters how the landscape looks in two years. I’ll let you know what I’m doing then.
  1. I actually emailed Chiappa asking if they had plans for an 8-round, 9mm version. (They already have a 9mm version in all the barrel lengths, as well as a competition-focused 9mm version.) Alas, the guy who answered my email said, ‘No, not at this time.’ And why am I okay with a 9mm revolver in this case? Because it’s the opposite of classic-looking, and so can use a non-classic cartridge without my scorn. 
  2. “What about that time you shot a two-gun match with British WW2 gear, though?” That’s entirely different. For one, I wasn’t shooting in nationally-organized three-gun with classifiers and ratings. For another, it was a for-fun match with gear I already had. 

Shopping List: CZ P-09 Carry Optics

In my previous USPSA what comes next post, I mentioned two possibilities for my next division, likely for the 2020 season. In this short post, we’ll take a look at what I would need for Carry Optics.

A Cajunified Lower (free)

Or, at least, free if you’re following the same path I am—starting with a Limited-spec P-09 and expanding your horizons. In that case, the Cajunified bits come gratis.

If you’re starting from zero, the Cajun bits will cost you about $600, including the magazines, (CZ Custom) 140mm base plates, and and (CZ Custom) spring/follower kits. (You save about $100 by skipping the verboten-in-Carry-Optics magazine funnel.)

A Donor Gun ($475)

At a bare minimum, I need a new barrel for 9mm. Realistically, I need a slide; I’m going to be knocking out the rear sight and putting in a sight mounting plate, and I don’t want to have to change back and forth between a dot and the Limited rear sight.

Of course, nobody sells a P-09 slide without a frame, so the only thing to do is buy a second whole P-09 and toss the frame in a box for later use. $475 takes a little bit of deal-hunting, but not much; you could probably find one for less with a little patience.

2019 Edit: An Extra Magazine ($50)

The P-09’s .40 magazines can feed 9mm, but don’t do so reliably, especially when there are only a few rounds left in the magazine. You get two with your donor gun, which is realistically enough for most stages at 23 rounds each (24 if you squeeze ’em in), but I started in Production, and even in 140mm-magazine divisions, I like to carry four with me. A third 9mm magazine gets me three fully functioning ones, which is plenty for any reasonable stage plan.

Swapping the CZ Custom base plates and spring-follower kits from your .40 magazines to your 9mm magazines is easy to do on the fly, and CZ helpfully engraves the magazine bodies with their calibers so you don’t get them confused.

Cajun Upper Parts ($50)

The lower uses reduced-power springs, so the Carry Optics slide needs an extended firing pin, reduced-power firing pin spring, and reduced-power firing pin plunger spring to match the Limited slide.

Happily, with the exception of the firing pin retaining pin (a roll pin), none of those parts are all that annoying to install.

An Optic Plate ($50)

Springer Precision makes a Fastfire/Venom/Viper-compatible mounting plate which sits in the rear sight dovetails. It also has polymer-tipped set screws, so you can crank it down onto the slide for better stability—important for a competition gun with no possibility of back-up sights. The last thing you want to do is lose your zero during a match.

An Optic ($225)

Although Springer makes mounting plates for other, more expensive pistol dots, the Burris FastFire III and the Vortex Venom/Viper are the obvious victors from a value perspective. Both run about $200-$225. Parvusimperator says Vortex has better warranties, so they get the nod.

Conclusions

Enhancing the P-09 with Carry Optics compatibility would cost, therefore, about $800. Switching from Limited to Carry Optics isn’t the sort of thing I could do at a match; not only do I have to swap the slide, but I also have to put the decocker in (or accept a subpar Limited start condition by leaving the decocker in). It isn’t that much work, though; five or ten minutes on the old workbench, even with the fiddly spring you may remember from the last post.

The nice thing is that I don’t need to buy any extra gear. The gun still fits in my existing holster, the magazines fit in my existing carriers, and everything fits on the belt I already have. For the revolver option laid out in a forthcoming article, the initial purchases are just that: initial. For the Carry Optics option presented here, there’s nothing left to buy.

Too, it’s a 100% competitive option. If I’m shooting at a disadvantage to others in the division, it’s much smaller than the disadvantage (or advantage) I end up with from being a worse (or, in some rare cases, better) shooter. For all my fondness for strange and oldtimey things, I’m ultimately shooting USPSA to compete. Even with the coolest, most hipster gear in the coolest, most hipster division, if I’m giving up effectiveness based on my equipment, I can’t be 100% happy.

Resurrected Weapons: Project Babylon

Back in the 1950s, when rocketry was extraordinarily difficult, and TV was full of videos of NASA rocket tests failing miserably, Gerald Bull had an alternative idea: Use a giant gun to put a payload in orbit. This led to Project HARP, which got a lot of great research done. By the 1960s, we had figured out (mostly) how to make rockets that work. It was still hard, but now we could generally expect launches to work. And so the plug was pulled on HARP, but Gerald Bull still dreamed of using a giant gun to put a satellite in orbit. Eventually, in the 1980s, he found someone with money willing to back his dream once more. That man was Saddam Hussein.

Project Babylon came in two phases. Stage one was “Baby Babylon”, a proof of concept model with a 350mm bore and a barrel length of 46 meters. This was initially used for horizontal testing, and was then erected on the side of a mountain. The full size “Big Babylon” would have been the biggest gun ever, with a one-meter bore and a barrel length of 156 meters. The original design was intended to be suspended from a steel framework by a system of cables.

Testing of the Baby Babylon cannon showed issues in dealing with seals between the barrel sections. While these were being fixed, Gerald Bull was assassinated outside of his Belgian apartment on March 22, 1990, which crippled the project. It would not be resumed after the First Gulf War.

Bull’s assassination was almost certainly not due to his work on Project Babylon. The superguns were massive, fixed targets. Easy to spot with aerial or satellite reconnaissance, easy to destroy. But Bull was also working on improving the range of Saddam’s Scud missiles. Those are much more effective than a giant gun. This was the project that most likely angered Saddam’s enemies enough to get an assassination. The most likely candidates are Israel or Iran, both of whom have intelligence agencies with lots of experience in liquidating potential problems.

Project Babylon itself is also extremely problematic. It’s a lousy weapon, as we’ve mentioned before. But I’m also extremely skeptical of their utility as a launch system. Even with a 156 meter barrel, the acceleration is going to be absolutely brutal. This is going to seriously restrict the payloads you can launch. A rocket is going to be far gentler on the payload, and much less likely to wreck a satellite. Plus, rockets can accept oversize shrouds to handle larger payloads, or be clustered to lift more weight. You’re pretty stuck with the weight capacity and payload diameter restriction here.

Verdict: Funding Request Denied by the Borgundy Ordnance Board

Gravity, Graviton, Pendulum: a wireless hydrometer for homebrewing

I’ve been working hard on this project over the past week or two, and I put another week or two into it at the end of last year. Finally, though, it’s just about ready to show.

Gravity, Graviton, and Pendulum are the three components of an end-to-end wireless hydrometer system for homebrewers.

Graviton is a Golang server which manages batches and hydrometers. Gravity is a vue.js front end for Graviton. Pendulum is an ESP8266-based floating tilt hydrometer, with built-in calibration and automatic temperature compensation. Put them all together, and you get something a little like this:

dataflow

For each batch you have in progress, you get a dashboard with a chart showing measured gravity and temperature over time, along with apparent attenuation and current calculated alcohol by volume: everything you need to know about a batch of beer in progress.

Backstory

Obviously, I homebrew, or else I wouldn’t have started on this project at all. I homebrew with a friend, however, which means that wherever we brew, at least one of us is going to be remote. The ability to check on a beer remotely is therefore valuable to us.

There are other existing systems: the open-source iSpindle, which inspired this project; Tilt, a commercial floating hydrometer of the same sort as Pendulum and iSpindle; and BrewBuddy, a commercial product which solves the long-term power issue by replacing your carboy bung and dangling a sensor-only torpedo into the wort.

The commercial products are out because we homebrew in part because it’s cheaper than buying good beer, and a do-it-yourself solution is way cheaper (if you, like me, value your labor at near-zero). Why not an iSpindle, then? Because we brew in glass carboys, whose necks are a mere 29.5mm across at their narrowest points, and iSpindle uses an enclosing cylinder which won’t fit.

So, because no product out there fits our needs, and because Go, vue.js, and some very light electrical engineering are all useful skills, I decided to roll my own.

How it Works

Like all tilt hydrometers, Pendulum uses the interrelation between density and buoyancy to figure out the density of the medium it’s floating in. A cylinder with a weight at the bottom naturally floats at an angle. If the liquid is denser, the angle between the hydrometer and the vertical increases. If it’s less dense, it decreases.

Pendulum is calibrated by preparing a series of sugar-water solutions of known density, recording its measured tilts in those solutions, recording specific gravity readings from a calibrated hydrometer, and providing tilt-gravity pairs to Pendulum’s configuration interface. It does the required calculations internally.

calibration

Technical Details

Pendulum uses an ESP8266 microcontroller, a GY521 MPU6050 accelerometer/gyroscope breakout board, and a lithium-ion 18650 battery. Which precise ESP8266 board depends on how it fits in roughly 27mm tubes; I have several coming which will help me answer that question. The board I’m using for development has some nice features, like built-in USB battery charging and discharge protection, and if possible I’d like to stick with it.

As far as cylinders go, I have two options: a 27mm outside diameter jobber with a narrower screw cap, which will have to be hacksawed off, and a 27mm inside diameter tube used to hold collectible coins. The former may be too small on the inside, unless I detach the battery caddy from the development board, and the latter may be too big on the outside to fit into our carboy.

To-Do

In addition to the hardware task above, I have some work to do on the software side, too; some fixes to hopefully make the ESP8266 wifi connection slightly more reliable, and some changes and improvements to the web app and back end to allow for management of users and permissions.

Most of the hard work is already done. It’ll take about a month for the various enclosures to arrive from China, a week or two to work out the remaining hardware issues and perhaps add a transistor to the voltage measurement circuit, so it can be fully turned off. By mid- to late summer, I should have something release-ready, with enough documentation and photography so that anyone handy with a soldering iron should be able to assemble their own Pendulum. Until then!