Tag Archives: militariana

Retro Air Force Procurement II: Lightweight Fighter Edition

It’s time for another classic showdown. Let’s look at two competing lightweight fighters. Specifically, the F-16 Viper and the F/A-18 Hornet. We’re going to keep this fair, so we’re generally looking at older Vipers, from back when both were in production. For a mid 90s procurement challenge, we’re going to have the F/A-18C/D Hornets go up against the F-16C/D Block 50/52 Vipers.

The F-16 was the fighter that (re)popularized the light fighter concept. It’s relatively small, has one engine, and a reasonable amount of capability. For a western fighter, it’s pretty cheap too. One engine means that the maintenance and support costs are going to be lower. Plus, it’s engine is common with that of the F-15, which is awesome if you operate the bigger type. It has possibly the most cockpit visibility ever. It can do any mission you please. It’s great.

The F/A-18 Hornet brings something a little different to the table. It’s got two engines, a navy-grade undercarriage, and some really fancy avionics for the time. The Hornet was small and advanced, but it cost more both to buy and to maintain. It’s also multirole, and was the first aircraft to shoot down enemy aircraft with missiles and complete a bombing mission on the same sortie in the Persian Gulf War. It’s also got great cockpit visibility.

So let’s break this down:

  • Cost: Viper. Duh. Viper is cheaper to buy, cheaper to fly. Has just the one engine. And it’s the same engine used in the F-15, which is a big bonus if you also operate Eagles, because then you don’t need to add another engine’s parts to the support list. And we do operate Eagles.

Looking at FY98 prices for both (using total program cost for each, because that’s what I happened to find), Vipers will run $26.9M and Hornets will run $39.5M.

  • Cockpit Systems: Hornet. The Hornet has three displays compared to the Viper’s two, and they’re bigger displays at that. The Hornet can run a moving map display too, which is really cool.

  • Engine Power: Viper. Even though it only has one engine compared to the Hornet’s two, the Viper has a lot more thrust, and a pilot can use this thrust to get out of trouble. Or take off quickly.

  • Low-Speed Handling: Hornet. The Hornet is a fantastically high-alpha jet. It performs well at low speeds and high angles of attack, so it’s a great turning dogfighter.

These two previous points mean that while the two aircraft fight very differently, they’re both very capable machines. Practical dogfight capability is a draw.

  • Targeting Pods: Viper. Both aircraft have access to the full range of NATO FLIR targeting pods like LITENING, which use infrared-spectrum cameras and lasers to identify targets. However, the Viper can also mount the ASQ-213 HARM Targeting System pod, which allows for identification of type, bearing, and most importantly range of enemy radars. Accurate range data allows the AGM-88 HARM to be used more effectively.

  • Weapons Fit: Tie. Both aircraft can operate a wide variety of ordinance, with no significant differences between the two.

  • Jamming Systems: Tie. Mostly because both can mount modern ECM pod options, and those are a pain to compare with unclassified data. So we’ll call it a wash.

  • Towed Decoys: Viper. The Viper can be equipped with the ALE-50 towed decoy system. While the bigger Super Hornet can also be so equipped, the standard Hornet cannot.

  • Naval Capability: Hornet. If you want to operate your fighters off of carriers, the Hornet is CATOBAR capable and the Viper isn’t.

  • Twin Engines: Hornet. Lots of Hornet export customers like the twin-engine reliability, since they have big, foreboding, sparsely-populated regions. Like with Naval capability, if this is important to you, the Hornet gains points.

  • Radar Range, Track Fighters: Viper. Based on totally shady open-source materials, I’ve found the maximum radar range to track a small fighter to be 80 km for the Block 50/52 Viper (with the APG-68(V)7 radar) and 72 km for the F/A-18C Hornet.

  • Radar Range, Track Bombers: Hornet. The same source gives the F/A-18C Hornet a maximum radar range to track bombers to be 150 km and the Block 50/52 Viper with APG-68(V)7 radar a maximum tracking range of 140 km.

  • Recon: Hornet. The Viper requires a camera pod for reconnaissance missions. The Hornet can replace the gun and ammo package with a reconnaissance camera package,

  • Pending Upgrades: Viper. In the above, I’ve compared what was flying in 1998 for both aircraft. However, both Greece and Israel were looking to buy some Vipers, and a number of improvements were offered. Specifically, the Apg-68(V)9 radar and removable conformal fuel tanks were available for F-16s ordered in 1998, and both of these features were purchased by the Israelis.

Okay, so where do we come down for Borgundy? We’re going to go with the Viper. The Viper provides excellent multirole capability while also being relatively low cost to purchase and operate. As a bonus, it can have common engines with our Eagle/Strike Eagle fleet. In the late 90s, the Viper is not only super popular in the export market, but it also continued to see development. It does a good enough job at everything we’d like it to do, while also being cheaper than the competition. It’s superior SEAD functionality is a bonus, as we take that mission seriously.

Note that while I picked 1998 as the year for this, mostly because I had price data for that year, the conclusion is similar for other Hornet/Viper matchups of similar vintage. The key differentiators that would push for a Hornet buy are naval aviation (or a naval/land common fighter project) or large remote spaces that would lead to a favoring of a twin-engine design. Neither of which applies for Borgundy, unless the United States wanted to sell one of their (likely conventional powered) carriers to us as well.
Mythbusting: The US Army and Autoloaders

Let’s tackle a persistent myth. The myth is that the US Army does not like autoloader systems for tanks. Proponents can point to the M60 having a human loader and the Abrams having a human loader, and then cite all of the nice things about having a fourth man in the tank when it comes time to post guards or do labor-intensive maintenance like fixing/swapping tracks, and ipso facto, the US Army loves human loaders. Clearly autoloaders are only for godless commie scum and cheese-eating surrender monkeys!

Of course, when we actually bother to look into the matter, those meddlesome facts get in the way of our carefully crafted myth. The US Army actually loves autoloaders. Let us examine the evidence.

Exhibit A is the MBT-70. This ill-fated project was a joint effort between the Americans and the Germans. It would end up being doomed by cost overruns and an inability to come to agreements on a number of key systems, including the gun and engine. However, one thing the Germans and Americans did agree on was that it should use an autoloader. Yes, that’s right, the wondertank of the 1970s embraced new ideas like an adjustable, hydropneumatic suspension and a fancy mechanical loader, just like the T-64. Since I like arguments supported by sources, and we’re busting myths here, one might consult a good source like Hunnicutt’s Abrams volume for details of the MBT-70’s design.

Exhibit B is the early design sketches of what would become the M1 Abrams. Again, we’re looking at Hunnicutt’s excellent work on the subject. The US Army originally wanted an autoloader for the Abrams, but then had it deleted to try to help sell Congress on the idea that the notional Abrams was economized and not a high-risk, gold-plated project like the MBT-70.

Exhibit C is the Abrams follow-on plans. Autoloaders galore. TTB had an autoloader. CATTB had an autoloader. The Abrams Block III proposals all had autoloaders. Want to upgun? That needs an autoloader. Want to isolate the ammo and the crew and reduce the turret profile? Gonna need an autoloader. Want to try to pretend you’re keeping the weight down as you add armor to deal with the relentless improvement of tank guns? Autoloader.

So there you have it. The US Army actually likes autoloaders.

On Army Shotguns

Shotguns are curious weapons. While they are possessed of limited capacity and are a pain to reload with any kind of speed, they have a number of useful features. While they were terrifyingly deadly in the trenches of World War 1, these days they tend to be specialized weapons, often using breaching rounds. Let’s talk about some of the different kinds of rounds one might want to shoot through a shotgun in a military context, and then we’ll talk models of boomstick.

Buckshot
Everyone’s favorite close-range manstopping load. Contrary to popular belief, you do need to aim with buckshot, and it will not send a man flying. Seeing as it consists of 9 pellets, each about .33″ in diameter, it will do an excellent job of ruining a man’s day.

Slugs
Hunters know there are a lot of fancy slugs out there for specialized purposes. The military guys tend to stick with pretty boring slugs. They’re still 0.72″ in diameter, and they’re absolutely great for wrecking stuff.

Breaching rounds
While buckshot and slugs can be used to smash the daylights out of hinges and locks, there’s a significant ricochet hazard. Breaching rounds are made from sintered metal pressed together, and are designed to safely destroy door hinges or locks with no risk of ricochet injuries.

Now, let’s get on to the guns themselves, and bring up Questions of Procurement. Let’s first note the obvious absence above: there are no “less lethal” rounds listed. This is notable mostly because it drives the constraints on our firearms. “Less lethal” rounds like beanbag rounds and rubber bullets don’t have enough of a propellant charge to reliably cycle most semiautomatic shotguns. The semiautomatic shotgun would then have to be manually cycled. While this is doable, if this is a key consideration then a pump-action shotgun is going to work better.

With any manually-operated shotgun, the onus is on the operator to not screw it up, and this is annoyingly easy to do. In general, absent a strong need to run less-lethal loads or a very severe budget restriction, the semiauto shotgun is the better choice, because it means there’s one less thing for the shooter to think about. There are few enough shotguns on the market that it suffices to ask a few more features questions, and that will determine our weapon.

First, let’s look at operating systems. Semiautomatic shotguns are either inertia-driven or gas-operated. Both can be reliable if well made. The simplicity and lighter weight of the inertia-driven options make them extremely popular with sportsmen. However, inertia-driven shotguns have the weight of the gun as one of the key parameters for their operation. So, adding weight to that gun, say by adding the lights, lasers, and optics that usually come on military weapons, can make them less reliable. For this reason, we’ll stick to gas-operated models.

Let’s next talk of magazines. Due to the nature of the (usually plastic) shotgun shells, making a reliable detachable box magazine fed shotgun is tricky. There are some who do it right now, namely Saiga and Molot.1 Both of these are Russian, and we run into the usual issues of NATO and politics. We might also expect Remington and Mossberg to introduce some new models of their respective Versamax and 930 shotguns to take advantage of the detachable box magazines which they have introduced on their respective model 870 and 590 pump-action shotguns. However, these are not yet out, and we in the Borgundian War department do not like to be beta testers. I would also honestly wonder if a more traditional, integral, tubular magazine fed shotgun would not be preferred for its extra handiness, since the shotgun is a specialized secondary weapon in military service.

Given the above, the choice is pretty obvious: the Benelli M4 (known in US Service as the M1014). It is highly reliable and tolerates long firing schedules and the general abuse of service well. We will make a few further catalog stipulations. Specifically, we’d like to opt for the M4 Entry model and the factory, three-position, collapsible stock. The three-position stock allows for easier use for those wearing body armor. The Entry model has a 14″ barrel, instead of the 18.5″ barrel on the standard model. Given that the shotgun is a secondary weapon, and the breacher also carries a carbine, we would expect the reduced weight and length to be preferable. Postulating a magazine tube of equal length to the barrel, this will also reduce capacity from 7+1 to 5+1. Again, because this is a secondary weapon used for special purposes, the loss of capacity is not a major issue.


  1. Of the two, Molot seems to have better QC. In both cases, competition shooters tend to tune the guns extensively, though a good deal of that is due to wanting to run their shotguns with the cheapest ammunition in Walmart. 

Harrier II short takeoff roll reference table

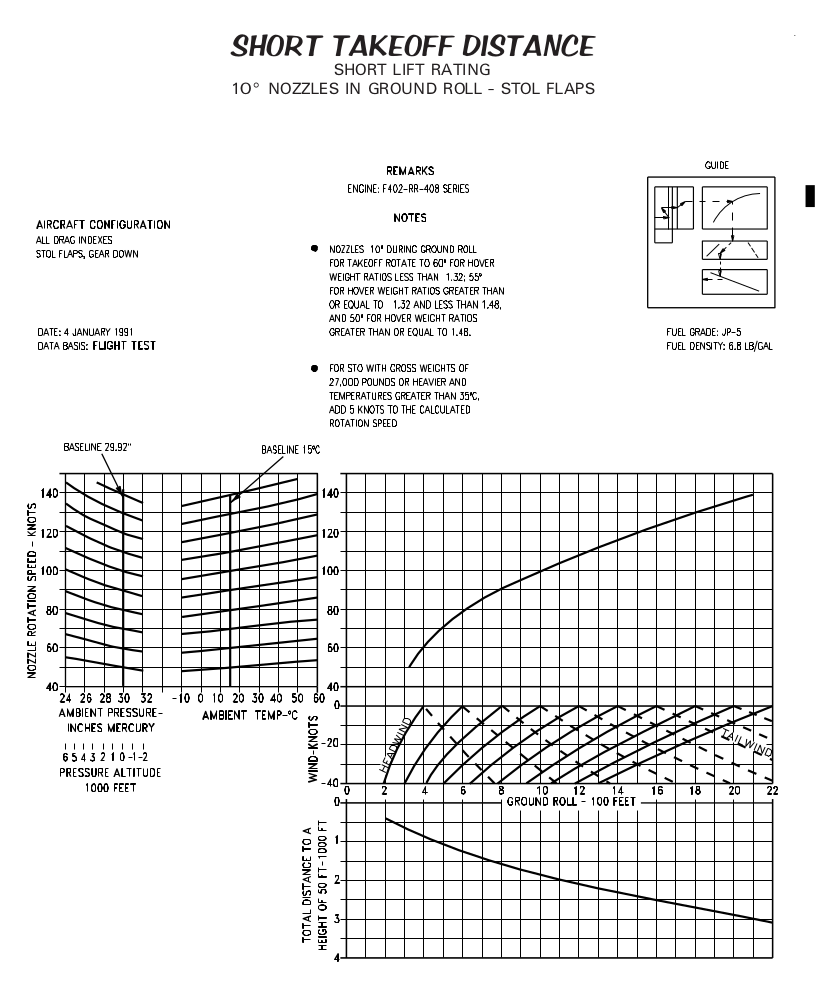
I was looking for this information as part of my still-forthcoming Harrier blog post, and couldn’t find it anywhere. So, here it is: a quick table of Harrier II short takeoff rolls by gross weight and headwind, assuming the Pegasus -408/11-61 engine, standard temperature and pressure (15 degrees Celsius, 29.92″Hg), and 0% datum hover performance.

Gross WeightTakeoff Roll (no wind)Takeoff Roll (20kt headwind)
20000 lb400 ft.275 ft.
22000 lb450 ft.325 ft.
24000 lb550 ft.375 ft.
26000 lb725 ft.500 ft.
28000 lb1025 ft.750 ft.
30000 lb1350 ft.1000 ft.

Sources and Charts

These numbers come from the Harrier II NFM-400 manual. Please don’t share the download link off-site; it’s a fairly large PDF, and we’re pretty shoe-string budget-wise.

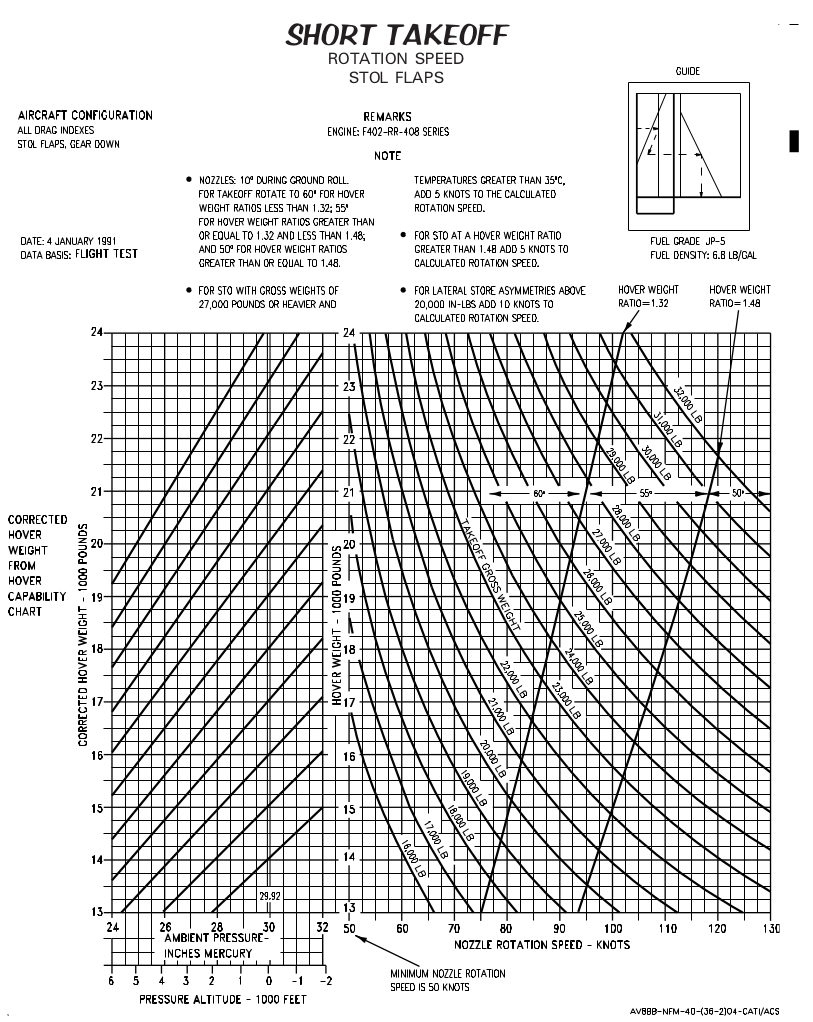
The relevant charts are reproduced below.

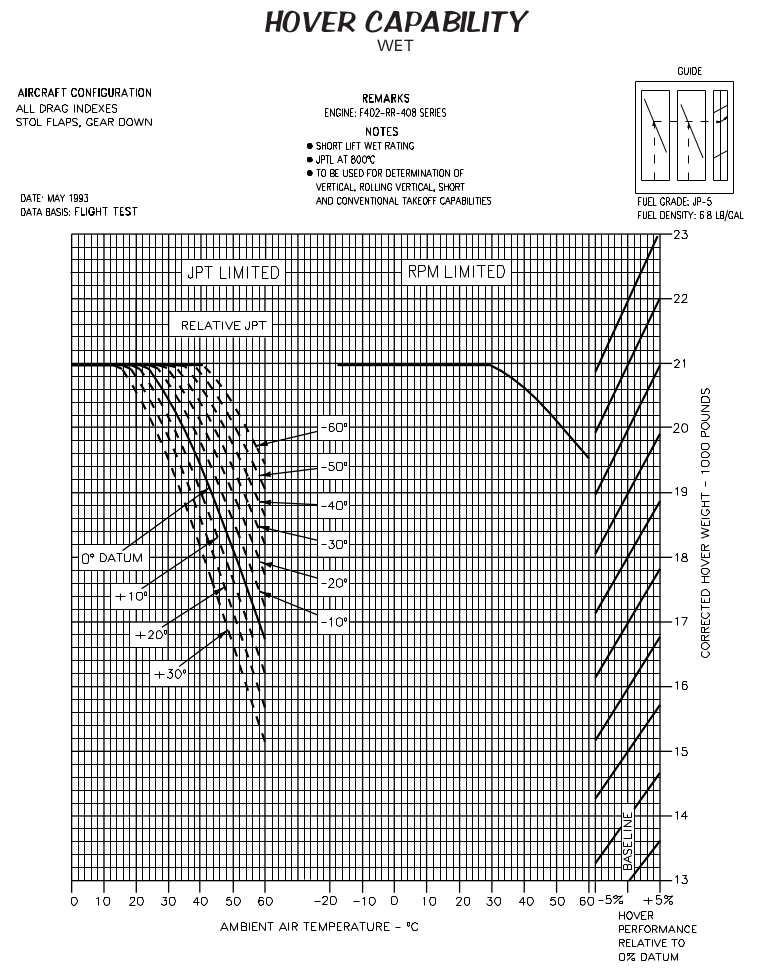
hover chart

To use the hover capability chart, enter from the bottom, beneath the JPT half of the chart, from the appropriate ambient air temperature. Move up to the 0-degree datum line. Then, enter the chart from the bottom, beneath the RPM half of the chart, from the ambient air temperature. Move up to the RPM limit line. From the lower of the two intersections, move right to the hover performance 0% datum line without following the adjustment guidelines.

The JPTL adjustment values are maintenance-provided and outside the scope of my table. To use them, move up to them rather than to the 0-degree datum line. The hover adjustment guidelines are also out of scope. To use them, after moving right to the 0% datum, follow the guidelines up or down.

For 15C, neither JPT or RPM limits performance. Move across the chart to the 0% hover performance datum and read from there: 21,000 lb.

rotation chart

To use the nozzle rotation airspeed chart, enter from the left using the corrected hover value from the hover chart. Move straight across to the 29.92″Hg datum. Move parallel to the guidelines to the ambient pressure.

From there, move straight across to the takeoff gross weight. Stop at the intersection, move directly downward, and read the nozzle rotation airspeed off the bottom of the chart.

For a 22,000lb gross weight, start at 21,000lb, the corrected hover weight, and move across to the 29.92″Hg datum. Since the pressure is 29.92″Hg, continue moving directly across to the 22,000lb gross weight line. At the intersection, move down the chart to find the nozzle rotation airspeed of about 63 knots.

takeoff chart

To use the takeoff chart, enter from the top left using the nozzle rotation airspeed calculated before. Move horizontally to the 29.92″Hg datum, then move parallel to the pressure guidelines to the ambient pressure. Move horizontally to the start of the temperature guidelines, then parallel the temperature guidelines to the ambient temperature. From there, move horizontally to the curved line to the right. At the intersection, move down to the zero-wind line at the top of the ground roll chart to find the 0-knot takeoff roll. Follow the solid line down the chart to the appropriate line to find the headwind takeoff roll.

To continue the example, enter the chart at 63 knots and move to the pressure baseline at 29.92″Hg. Move horizontally left to the start of the temperature guidelines, and parallel them to the 15C baseline, at about 66 or 67 knots. Move horizontally to the reflector line, then move vertically to find the takeoff roll of roughly 450 feet. Parallel the solid headwind guidelines down to a 20-knot wind to find the headwind takeoff roll of about 325 feet.

Brief Comments

Experience with DCS Harrier suggests that these numbers include a good deal of margin. I have no trouble getting off the Tarawa deck with at least 200 feet to spare, even at loads north of 30,000 pounds. These are, however, the by-the-book numbers.

Configuring a Leopard 2 for Borgundy

As mentioned previously, the Leopard 2 has a ton of available upgrade options. So let’s go to our local KMW Dealership and select our optional extras. Since I’m sticking with various catalog options, I’ll list the model or project where you can find the option.

We’ll start with the turret, since there are a few different configurations available. There are basically no old stocks of Leopard 2A4s that people are looking to part with, so we’ll have to go with new-build units. We’ll also select the gunner’s sight mounting above the horizontal axis of the main gun, as on the Leopard 2A5 and subsequent models. We’ll also opt for the lengthened turret bustle, as seen on the Strv. 122 and some other exported models. We’ll also opt for the electric turret drive for both traverse and gun elevation, again, as pioneered on the Leopard 2A5.

One of the key things that got the Leopard through our gauntlet of armchair1 testing is the gun. We’ll opt for the Rheinmetal 120mm L55A12 smoothbore, the finest gun in the west.

Now, let’s talk armor. As always, we’re using the best and latest composites. Our inserts will be those of the German Leopard 2A7. We’re going to opt for the standard 2A5+ wedge applique on the turret front. We’re also going to take the roof protection kit that the Swedes got on the Strv. 122. We’re also opting for a glacis applique package, again with those modern composites. We’ll add the armored housing for the commander’s sight that’s popular on some of the later export models, including the Strv. 122. And of course, we’re going to opt for spall liners.

We’re not done. There are a bunch of other supplemental packages that we can add or remove as needed. There’s a mine protection kit that was first seen on the Leopard 2A6M. There’s no good reason not to get the belly plate these days. And then there’s the flank protection. The skirts come in two sizes, with the older ones being about 150mm thick and the newer ones about 325mm thick. We’re going to take the newer, thicker ones. We’ll also take advantage of the mounting points on the sides of the turret in the newer Leopard 2 models to mount some nice AMAP modules for side protection.

Our armor changes listed above will necessitate some other, minor structural changes. The roof protection setup means we’ll need to redesign the hatches on the turret roof. The new ones are slide-opening. Again, this can be seen on the Strv. 122 or the Leopard 2HEL. We’ll also opt to add the roof storage boxes for the crew’s carbines that the Danes opted for on the Leopard 2A5DAK. Internally, we’re going with shock mounts and a protective kevlar cover for our ammo rack. This will protect against splinters and provide some measure of blast dampening, but will reduce reserve ammo capacity from 27 to 21 rounds.

On to the sensors! For the commander, we’ll select the PERI R17A3 sight, which comes with the Attica GL 3rd Generation FLIR system and an eye-safe laser rangefinder. This is a pretty standard addition on the Leopard 2A7 and related models. We will also put the Attica GL into the gunner’s sight, replacing the older WBG-X FLIR. We’ll also take the opportunity to upgrade to an eye-safe laser rangefinder for the gunner. Further, like the Leopard 2HEL, we’ll add a crosswind sensor for improved targeting system efficacy.

We are not done. There are many more internal systems to pick. We’re going to go back to the Bundeswehr’s A7 and A7V for some of the other systems in the turret, specifically the ultracapcitors and the integrated air conditioner/NBC system. These are in the right rear portion of the turret bustle, replacing the turret hydraulics on older model Leopard 2s. We’re also going to use the upgraded Steyr M12 APU, capable of generating 20 kW. We’re going to round out the electronic systems suite with a battle management system and the SOTAS-IP Communication system.

Because RWS are the hot, not-so-new thing, we’re going to fit one, namely an FLW 200 RWS with an M2HB heavy machine gun. This will replace the loader’s machine gun mounted on the roof.

We’re also going to select a few extras to provide more protection. These are Saab’s Barracuda multispectral camouflage system and Rheinmetall’s ADS Gen 3 active protection system. Barracuda makes the tank harder to spot visually, and reduces the thermal signature. And ADS is a fast-reacting, relatively3 safe for nearby infantry active protection system to intercept those pesky rockets.

And there you have a Leopard 2A7 BOR model. It’s pretty great. I’m also going to talk briefly on support variants, since the Leopard 2 has several. We’ll want an armored recovery vehicle and an armored bridgelayer. For bridging, we’ll go with the Panzerschnellbrücke Leguan, and for armored recovery, we’ll go with the Wisent 2. The Wisent 2 also comes in an armored engineer vehicle version, and we’ll buy those as well.


  1. It’s a very comfortable armchair. 
  2. Ordered by the Bundeswehr and in production as this goes to press, so I can have some too. 
  3. Still dangerous, but tests show an ADS interception of an RPG-7 rocket is less dangerous than the detonation of said RPG-7 rocket. 

US Army Mortar Improvement Request

The US army has finally decided to improve it’s mobile mortars. They have announced their goals to develop a turreted mortar system for their vehicles, with a completion target of 2021. Let’s break down what they’re looking at:

  • Caliber: 120mm
  • A manned or unmanned turret
  • Autoloading system must accomplish loading rounds from ready rack into the breach.
  • Ideally all ammunition handling would be automated
  • Vehicle should be able to stop moving and fire within one minute of getting a fire mission
  • Project will investigate being able to shoot on the move
  • Maximum rate of fire (sustainable for one minute): 16 rounds/minute required, 24 rounds/minute ideal
  • Sustained rate of fire: 6 rounds/minute required, 12 rounds/minute ideal
  • System should have a direct-fire capability
  • System should be compatible with all existing 120mm mortar ammunition
  • Maximum range should be at least 5 miles
  • Minimum range should be 220 yards (direct fire)

Patria’s NEMO system comes close to meeting the above requirements, but would need some work to meet the short-term maximum rate of fire requirements. AMOS should be able to do the rate of fire goals given its twin barrels. My one worry is that the perfect would be the enemy of the good enough. Big Army should just pick an off the shelf system (probably the reasonably priced NEMO) and start slapping them on Strykers and AMPVs and call it a day. Have a couple beers and some wings in Alexandria. Any such turreted system is going to be a significant improvement in survivability for the mortar crews, and should also provide improvements in effectiveness. Don’t overcomplicate this.

More on the Namer

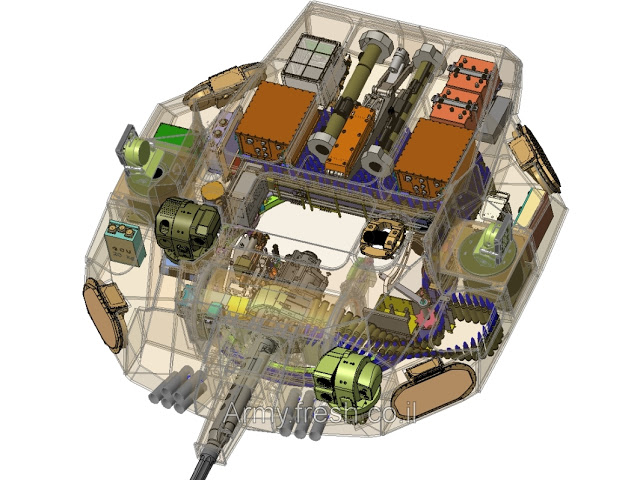
We picked the Namer as our IFV of choice. But I have more to say about it, and a few things I might like to tweak. First, let’s take a good look at the turret.

namer ifv turret

This is from a presentation, so it’s a trifle incomplete. We can see most of the mechanisms though. Note that the popup missile launcher has a pair of MATADOR rockets installed here. These could also be Spike 2 ATGMs. There’s also no indication (at this stage) of an autoloader for the Trophy install, or any indication of the autoloader assembly for the mortar.

Still, it’s a great turret. I really like the firepower in the Namer IFV. We could debate caliber until we’re blue in the face, but 400 rounds of 30x173mm plus two rockets or missiles is very solid. However, I’m a good armchair strategist, and I can always find things I might like to tweak given the opportunity. We’ll go through these in order of ease of doing.

  1. Side skirts. The skirts on Namer aren’t very thick. Thicker skirts would help protect against incoming RPG fire better. Given the vehicle’s size, this is an obvious threat vector, so let’s armor up.

  2. Engine change. The Namer currently uses the AVDS-1790, which generates 1,200 hp. We also know the Namer is very heavy. The CEV version (which has Trophy but no turret) weighs 63.5 tonnes, and the turret is going to mean even more weight. To improve mobility, we’d like ours built with the MTU 883 engine, which makes 1,500 hp. This is the engine used on the Merkava 4, so this change should be pretty easy to do.

  3. Glacis work. Due to being a newer, liquid-cooled engine, the MTU 883-based powerpack is smaller than the one built around the AVDS-1790. A smaller powerpack means there’s more room for glacis armor, so let’s fill the void. There is no such thing as too much armor.

  4. APS change. I like Trophy. It’s combat proven. But IBD Disenroth1 has a system called AMAP-ADS. The Gen 3 version reacts considerably faster than Trophy (0.56 ms for ADS compared to 300-350 ms for Trophy). In Swedish tests, ADS also has a smaller danger space for nearby infantry. Further, in the turret picture above, we note a lack of reloads for Trophy. We can fit a whole bunch of ADS effectors on the Namer, and we’d like to do so.

  5. Additional missiles. Given the deletion of trophy from the turret, it might be nice to see if we could get more missiles in there.


  1. Now a subsidiary of Rheinmetall. 

MBT Roundup 2018 Addendum

It appears that I have made a minor screwup, dear reader. In my 2018 MBT roundup, I neglected to come down on a choice for Borgundy. Also, I completely left out the Merkava 4. I will rectify them both here.

To make our comparison easier, it will help to pick a winner from our roundup. It is a tossup, and we don’t have much in the way of political or pricing configurations to throw in. But let’s break it down anyway. As far as I’m aware, the Abrams has never been offered for export with the depleted uranium armor. That said, it’s been offered with arrays of similar weight, so it shouldn’t be terribly worse off. Sweden’s testing showed that even with some supplemental armor on M1A2, Leopard 2A5 had overall better protection. Abrams could also really use a gun upgrade or else we’d be stuck hoping the US will sell their latest antitank rounds. The Abrams has been fitted with an L55 gun, but there were stabilization issues and the US Army hasn’t paid to fix them yet with a new stabilizer. We could, but that violates my COTS rules. So the Abrams is out.

My COTS rules also give the Leopard 2 the win over the K2, though here it’s much closer. The superior gun and some of the available protection options make the Leopard the better buy given the rules I have set for myself. Clearly Samsung Techwin could work up a solution and present it for evaluation (fixing the gun problem is pretty simple, really), but as I am limited to armchair analysis, I have to make do with what I have. The K2’s lack of a good top-attack armor protection solution is problematic, as is its acceptance of more weaker zones on oblique shots in the pursuit of less weight. So the Leopard 2 is our champion.

Let’s now throw the Merkava 4’s hat into the ring. I know it hasn’t been compared in any trials, but that’s part of the fun. I’m pretty confident the Israelis would export it if someone asked. The Merkava is a big, heavy, generally well-protected tank with some unique design features. These features are based on Israel’s experience in the Yom Kippur war, among others. These features include a front-mounted engine, door at the rear of the hull for easy resupply, removable ammo racks at the rear of the hull to allow the Merkava to evacuate soldiers, and a 60mm mortar in the turret.

The Merkava 4 has a 120mm L44 smoothbore gun. The MG253 on the Merkava 4 has a longer than standard recoil length, and should be able to take higher pressure ammunition. As far as I am aware, the Israelis do not use depleted uranium in their APFSDS rounds. Admittedly, they don’t have much in the way of modern armor threats to prepare for these days.

On to the comparison. I would expect the Leopard’s L55 gun to be able to get better penetration than the L44 gun on the Merkava, even with enhanced ammunition in the Merkava. I would certainly expect the L55A1 gun to do better. Advantage Leopard.

In terms of protection, it’s hard for me to adequately gauge protection levels. Merkava 4 seems to have better protection on the sides and roof of the turret. It also seems to lack wide skirts like those available on the Leopard 2. Also, the Israeli armor arrays are optimized towards the threats they face, which tend to be lots of ATGMs, and not much in the way of APFSDS threats. We’d expect Merkava, with all of its heavy side and roof protection and very large frontal profile to be less well protected towards the front.

I’d also like to talk a little about ammunition stowage. The Leopard 2 has 15 ready rounds in the rear of the turret. There’s another 22 or 27 (depending on version) rounds stored in the front hull, next to the driver. This provides good protection across the frontal arc, but does leave the ammunition vulnerable to side hits. No blow out panels or bulkheads are provided. The Merkava 4 has ten ready rounds in a pair of drums which can present rounds to the loader. Remaining rounds are stored in cases at the rear of the hull. These can be removed to facilitate evacuating wounded. There are no bulkheads or blowoff panels for the Merkava’s hull ammo storage either. Given its location, the ammo storage on the Merkava is vulnerable to side hits as well as wider-angle shots from the front arc that penetrate the side armor and hit the front of the storage area. It’s a small thing, but I prefer the storage arrangement on the Leopard 2. I also prefer the Leopard 2’s larger ready ammo supply.

Merkava 4 has an in-production active protection system. The Leopard 2’s has been trialled, but none have been ordered yet by Germany. At least one user has placed orders, though.

Overall, I think the Leopard 2 is the better buy. It’s better suited for tank v. tank combat, which is the first mission of Borgundy’s MBT Corps. Leopard 2 has the better main gun. It has very good frontal armor, and adequate side protection considering that we do not expect to fight an irregular war with extremely well equipped terrorists.1 Plus, the Leopard 2 has a number of available configurations, and is more easily tailored to the customer’s needs. Additionally, it’s protection is more forward oriented. And of course, Leopard 2 has a ton of excellent upgrades available.


  1. I.e. we are not fighting Hezbollah anytime soon. 

AU-220M, a New 57mm turret

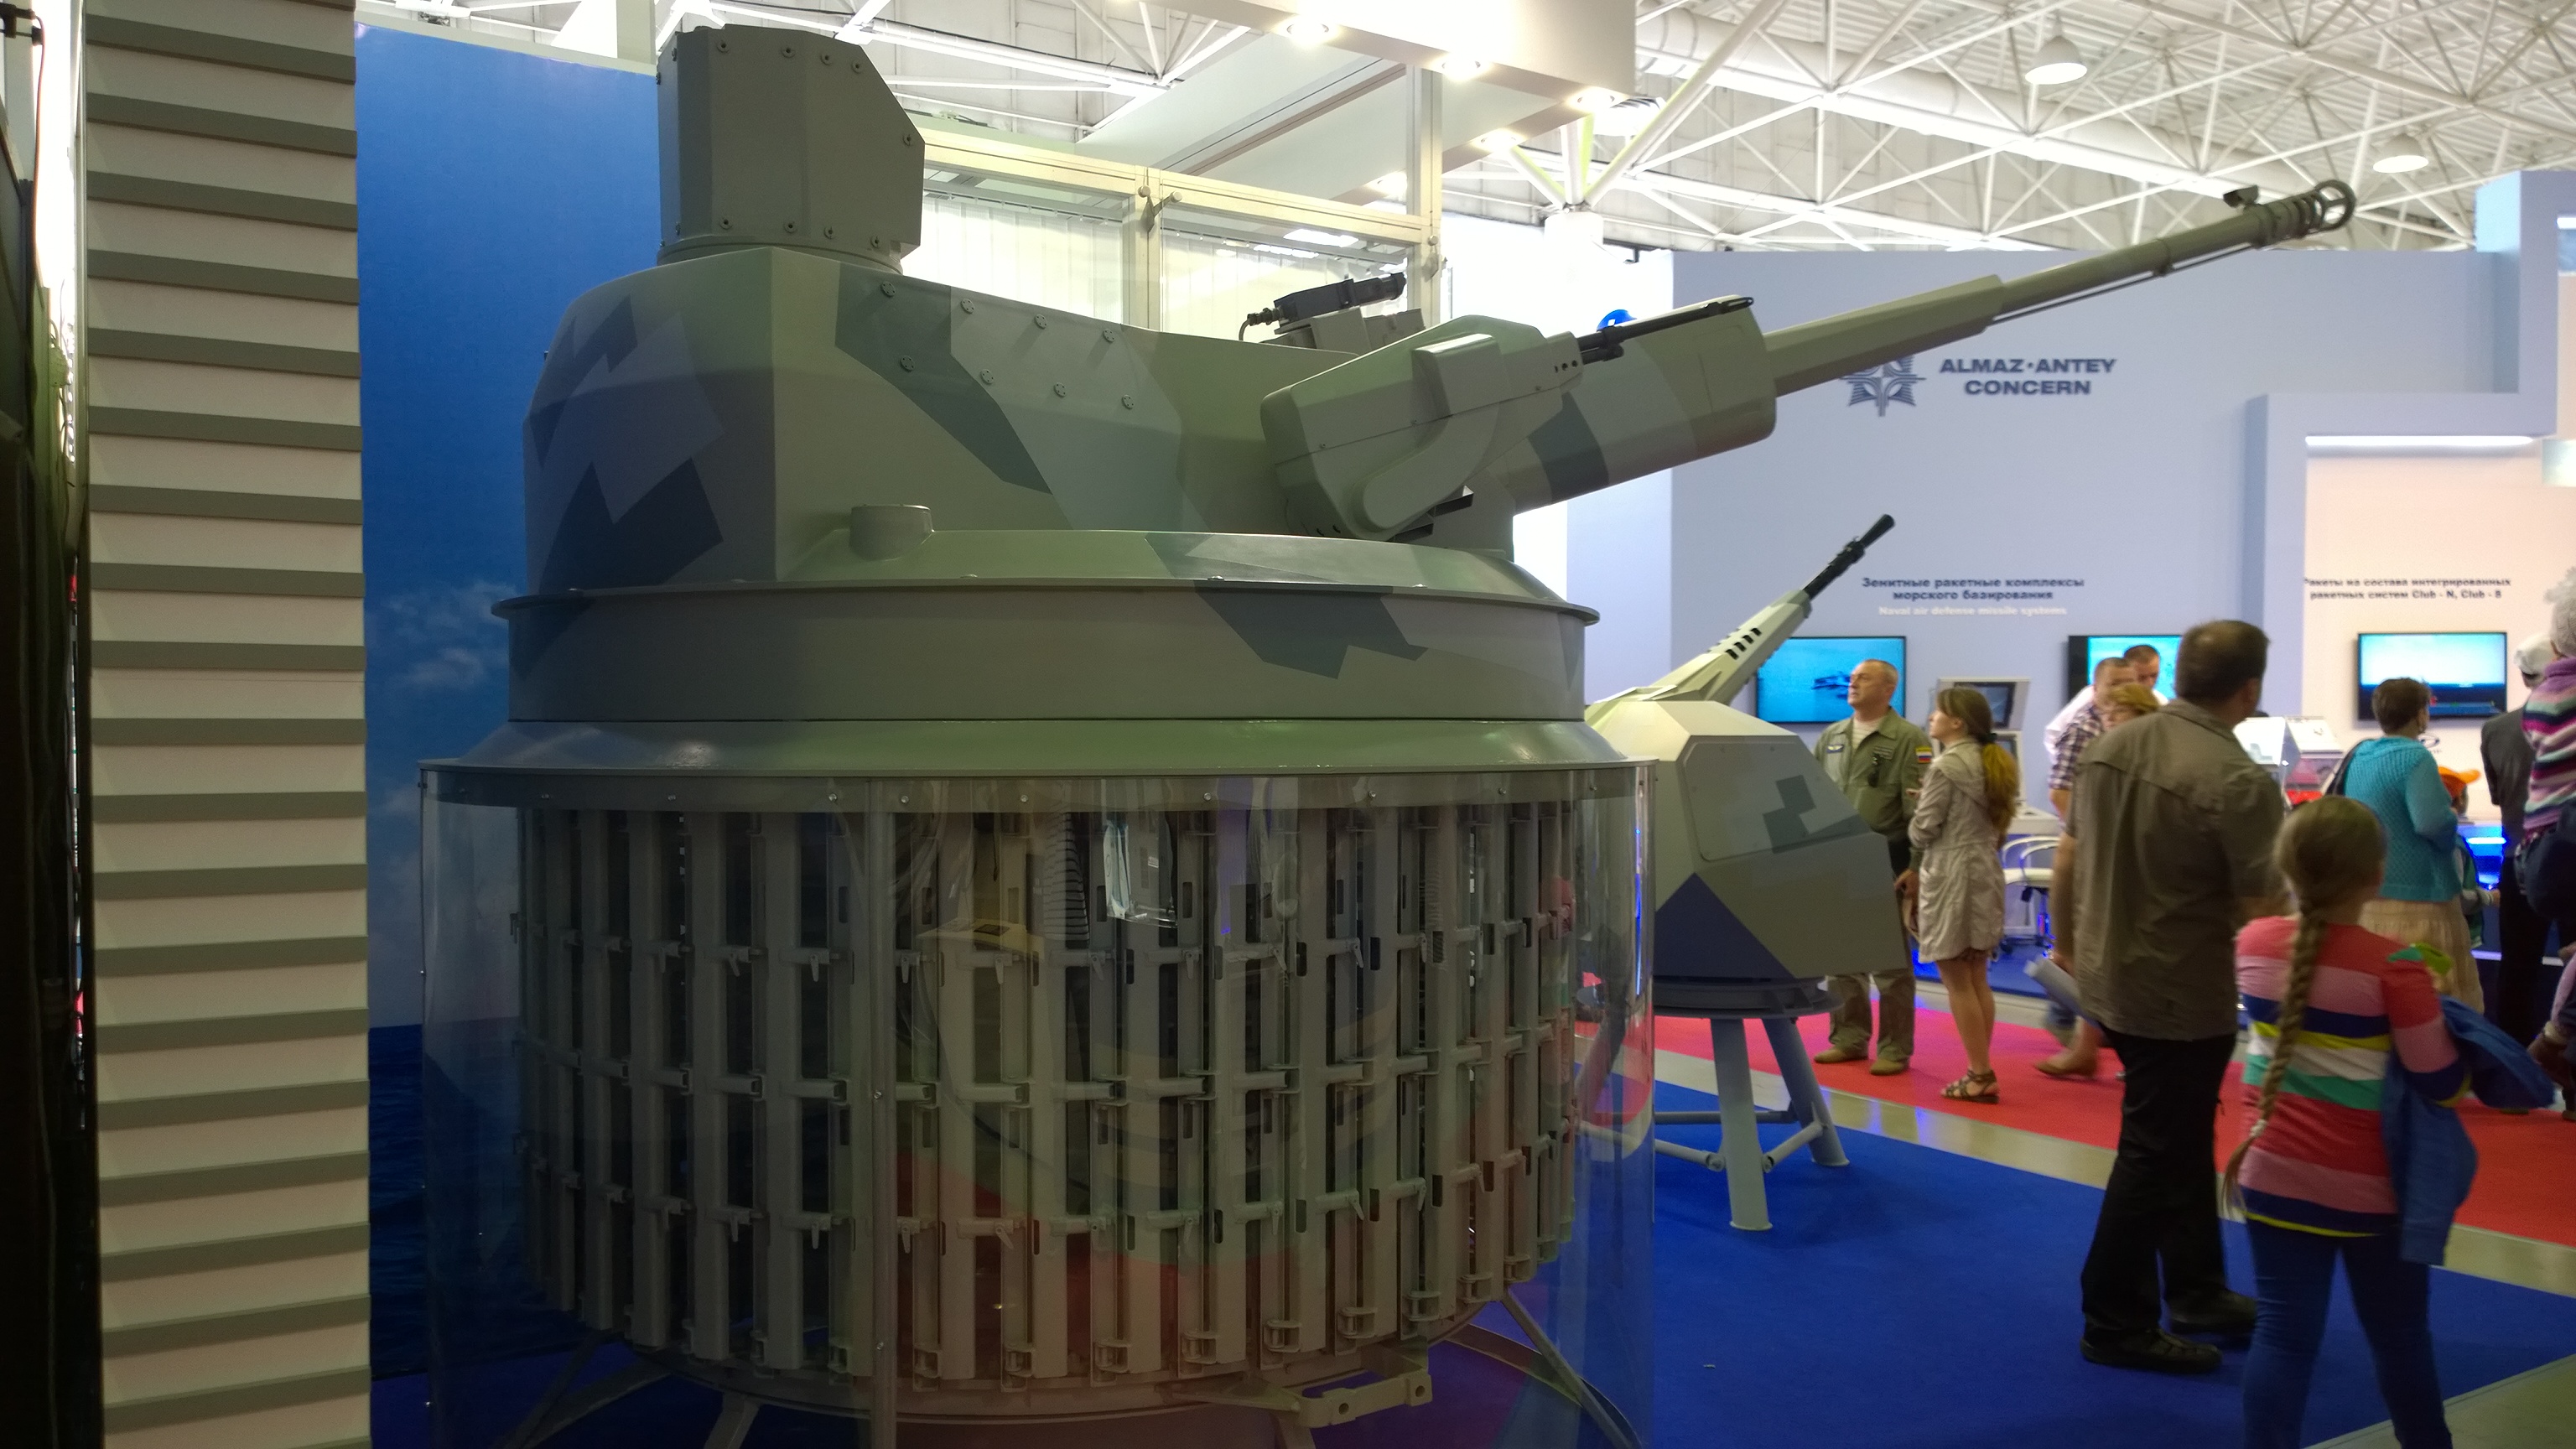
At IDEX-2015, Russia unveiled the AU-220M, a turret for a 57mm gun, designed for IFV mounting. Let’s take a look:

AU-220M

It’s unmanned, holds 200 rounds of 57mm, and has a coax 7.62mm gun with 2,000 rounds of ammunition. It’s been mounted on a couple BMP-3 prototypes, and demoed at some Russian trade shows.

I don’t like it and neither does Fishbreath. Congratulations, you’ve built an IFV-destroyer. It’s like an old tank destroyer, but the gun is too small to threaten a tank from the front. It can threaten an MBT from the side, but 30mm is generally enough to do that as well, especially since supplemental armor packages are focused on shaped-charge threats. The Russians are also usually very good about adding modern ATGMs to their IFVs.

On the BMP-3 in particular, this is both an annoying design challenge and a firepower lateral move. I’m not convinced that this is an appreciable firepower improvement over the 100mm low velocity gun and 30mm autocannon that’s already mounted. The 100mm gun can already fire missiles that will be problematic for IFVs but will have trouble killing tanks, and that’s a bigger HE option.

The AU-220M is also problematic from a vehicle engineering perspective. It has a large turret basket that eats internal volume, just like a manned turret. But it’s unmanned. You have to relocate the vehicle commander and gunner somewhere else in the crew compartment. As if it wasn’t cramped in there already.

So there you have it folks. We’re not a fan. And I haven’t seen it on any production vehicles either. I’m certainly not going to lose any sleep over it.

Fitting Out a Fantastic Burke

The Arleigh Burke class guided missile destroyers are the best exemplar of the type currently at sea. They are among the few truly multirole ship classes, able to perform any duty one might reasonably ask of them. Despite the design approaching its thirtieth birthday, the US Navy is continuing to build them, and they’re reasonably popular on the export market. With such a long life comes plenty of upgrades and options, so let’s see how we’d fit one out. DDGs, nicely equipped. One small note before we dig into this: I’m going to limit myself to features proposed or actually fitted to Arleigh Burkes, not hypotheticals like putting the SPY-3 radar on one.

Hull Variations
First, we have some decisions to make about the hull form. We’re going to take what I’ll term the “large form” hull, which was originally designed in the early 90s as the “Flight III” variation.1 This version was cancelled, but the design got used in the South Korean variation of the Arleigh Burke, the Sejong the Great class. This means an increase in length of 32 feet 4 inches, an increase in beam of 4 feet 3 inches, and 32 additional VLS tubes, for a total of 128.

Radar Systems
The radar is a critical system on a DDG. A long range radar allows for the tracking and engagement of multiple targets, which is important for the survival of the ship, plus any others she’s escorting. Radar is key, so we’re going to get the best and latest: AN/SPY-6. SPY-6 is an actively scanned phased array, unlike the passively-scanned SPY-1D fitted to most Burkes. The SPY-6 is more sensitive, can track many more targets, is more resistant to ECM, and might have the possibility of being a jammer in its own right. Super cool. It also provides solid ballistic missile defense capabilities.

But that’s not enough. While the big SPY-1/SPY-6 radar is the most prominent, there are other radars that complement it to provide better capabilities for the Aegis Combat System. A new and fancy radar is in the pipeline to compliment the SPY-6, but development hasn’t been completed yet, and the initial Flight III ships will start with integrating only the new SPY-6. Currently, the standard companion radar is the AN/SPQ-9B. It’s an X-Band suite optimized for tracking ships and low flying aircraft2 in littoral regions. It can also provide terminal guidance. I would like to see a more advanced system replace the SPQ-9B, but I’m very happy the US Navy is upgrading one system at a time.

CIWS
Burkes have been fitted with most western CIWS. Phalanx, Goalkeeper, RAM, and SeaRAM. We’re going to focus on the missile-based systems, since I’m a huge fan of the RIM-116. The choice comes down to launcher. The Mk. 49 GMLS has a 21-tube system, but requires external fire control information for cueing. The SeaRAM system has a capacity of 11 missiles, but comes with the radar and IR sensors used in Phalanx Block 1B, so it’s completely autonomous. Personally, I think I prefer the Mk 49, given that we already have an excellent radar suite. However, I could be swayed if the data exists showing that a separate radar on the CIWS is the better bet.

Funnel Structure
No option is too small for us to consider. There are a few different funnel designs on the various Burke flights. We’re going to go with the newer design that extends the external funnel structure up to the level of the exhaust tops. This reduces signature a little, and every little bit helps. This particular design element was first introduced on USS Mustin (DDG-89).

RMS
The AN/WLD-1 Remote Minehunting System (RMS) is an unmanned underwater vehicle that allows minesweeping operations without putting the mothership at risk. Mines are a huge and underappreciated threat, and this is a welcome addition. Fitting the RMS requires some amidships structural changes to accommodate the launching, recovery, and storage of the UUV. Part of these are moving the triple 325mm torpedo tubes from the main deck amidships to the missile deck aft. These modifications can be seen on some of the US Navy’s newer Burkes including USS Momsen (DDG-92).

Hangar
Unsurprisingly, we’re selecting the aft helicopter hangars. Helicopters are good. I’m really not sure why early Burkes didn’t come with actual aviation facilities, but that was the decision someone in the Navy made. This puts in hangars with space for a pair of Blackhawks aft.

Sonar Systems
For our towed array, we’ll opt for the SQR-20 MFTA. It has both active and passive sonar systems, and offers improved reliability, coverage, and detection capability over the previous standard SQR-19. Bow sonar will be the SQS-53C.

Gun
I really don’t care much about the naval gun. It is not a key capability of the ship. My choices are all 5″ guns, given my constraint that I can only select from existing options. If I could put a 76mm up front to save cost and space, I would. But I can’t. So we’ll take the Mk 45 Mod 4 gun. Good enough.

That covers our standard options for our Burke. They should do well.


  1. I’m not sure if this will be used on the upcoming-production flight III ships or not. 
  2. Aircraft meant in the loosest possible sense of the word, so airplanes, helicopters, uavs cruise missiles, antiship missiles, et cetera.