As the annual treachery of daylight saving’s close casts its pall over Many Words HQ here in Western Pennsylvania, we turn our attention to another hilly part of the world of somewhat greater interest to wargamers and the broader defense affairs community: the Fulda Gap.
Flashpoint Campaigns: Red Storm is my current recommendation for the definitive Cold War armored combat command experience. Can Armored Brigade unseat it? Read on to find out!
The Game
Armored Brigade is an older project than its release date indicates—formerly freeware, its creators turned to Matrix to monetize it, in the process vastly expanding its scope. Once fixed to a 1983 scenario, it now covers 1965 to 1991, and comes with modding tools sufficient to expand that with relative ease, back to the dawn of mechanized warfare1 and forward to the modern day.
It has a strong resemblance to the Close Combat games in style: it’s a top-down, 2D take on your favorite hypothetical East/West German battlefields, with sprites representing the opposing forces. Battles play out on maps of up to 15km by 15km, chosen from ‘theaters’ (for lack of a better term) of about 60km by 60km. This is plenty big for the kind of scenarios which Armored Brigade can handle.
Those scenarios, or at least the scenarios it’s best suited to, run from small skirmishes, on the platoon or company level, up to the brigade size (with companies being the likely subunit in the latter case, against platoons or single units for the smaller scenarios). The typical battle seems to me to run twenty minutes to an hour or two, tops, and can be played in real time or sped up by up to ten times. (You can also issue orders while paused.)
The Shooty Bits
The combat engine seems pretty good. Infantry holed up in defensive positions is hard to dislodge, AFVs are modeled well beyond a binary alive/not alive state2, artillery and air support are properly scary. An armored vehicle gets armor ratings for KE, chemical energy penetrators, and tandem warheads for all four sides, its turret (if present), and its top and turret top.
No complaints on the modeling, really. The detail is good, and the results are broadly in line with what I would expect.
I do have some complaints regarding mechanized infantry. Dismounts are fiddly and difficult to handle, and timing an attack with them is quite hard. That said, infantry can hide quite readily from vehicles (I drove tanks past an invisible but thankfully AT-weapon-free squad in a building just now), and can easily hold fortified positions if they have the weapons to do so, which is an advance over Flashpoint Campaigns.
Victory points are handled in a way which is, if not entirely novel, then at least original. You start with a fixed stock. Controlling victory locations prevents your stock from counting down. Losing units depletes it. This seems like a reasonable approach to me.
Command, Control, and Communications
Armored Brigade is a smaller-scale game than Flashpoint Campaigns, which comes into its own in larger battles. Still, it doesn’t have nearly as advanced a C3 model.
Flashpoint Campaigns has game systems which model an OODA loop, complete with the ability to disrupt your opponent or have your own disrupted, which is its main selling point. This being an Armored Brigade review and not a Flashpoint Campaigns review, I won’t go into more detail on the latter and say instead that the former is rather more rudimentary.
You have on-map headquarters units, which are better artillery spotters and improve the reaction times of nearby units. Units have an order delay. NATO units, generally, have a short delay which stacks for the first few queued orders, while Warsaw Pact units have a larger delay for the first order but no stacking penalty, which very roughly simulates the NATO fondness for on-the-spot reactions and the Pact fondness for sweeping plans.
That’s about the extent of it. You can slow down an enemy by destroying a headquarters unit, but reaction times are pretty well hardcoded, and the effect is much less pronounced than in Flashpoint Campaigns.
And now, a few minor gripes about the orders system! The advance to contact order isn’t especially useful because its definition of ‘contact’ is much more distant than I would consider useful; a unit which takes any fire at all is considered ‘in contact’ and hunkers down. On the other hand, the advance order is perhaps too bold, in that units won’t stop and take cover (or remain in cover) when being fired upon, requiring a bit of babysitting. (Units without stabilizers will stop to shoot, but that’s not quite the same thing.) Finally, there doesn’t seem to be a way to queue a formation change in with a string of orders. If you want to go from road march to combat formation, you’ll have to handle that yourself.
Intelligence is well-handled, with some interesting systems for infiltrating scouts pre-battle and markers on the map for muzzle flashes and possibly incoming artillery fire3.
Interlude: An After-Action Report
The scenario: me, the stout Americans, holding the line between Schenklengsfeld and Großentaft 20 miles north-northeast of Fulda, against a Soviet tank regiment. The starting vehicle count, according to the after-battle summary, was about 30 on my side and about 130 on the Soviet side.
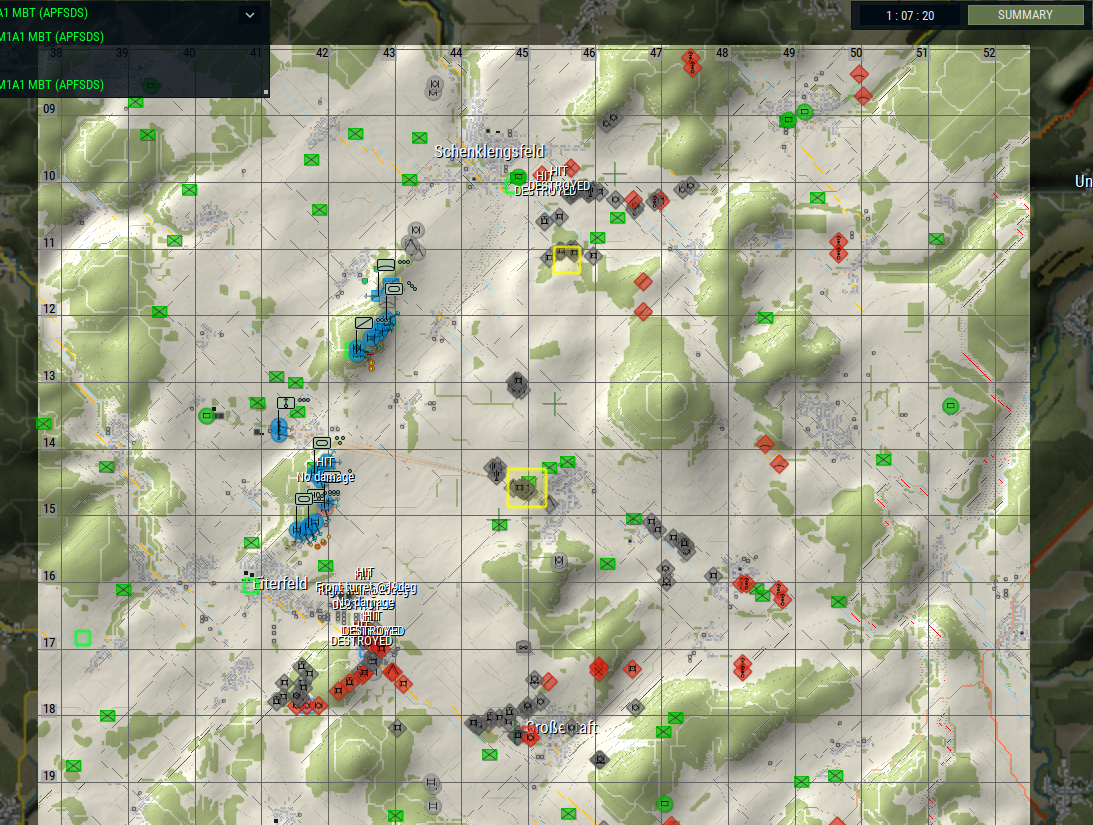
The scenario started an hour before dawn, so the Amercan vehicles, uniformly equipped with thermal viewers, had a massive edge over the Russians. Originally, I had positions on the mountain just south of Ufhausen (the unlabeled town midway between Schenklengsfeld and Großentaft), and on the heights northwest and southwest of Schenklengsfeld.
The Ufhausen position, a pair of scout Bradleys, accounted for all the tanks east of Ufhausen, but didn’t survive until dawn—eventually, return fire got them, even though the Soviet night vision systems were badly inferior.
The Schenklengsfeld position, also held by Bradleys, fell as day broke, along with the pair of M901s on the very northeast of the northern surviving position. I suspect it was the tanks coming through the forest to their direct east, which only revealed themselves to me near the end of the scenario.
Most of the fighting took place to the south, however, between Großentaft and Eiterfeld, where the Russians made their main effort. You can see the remnant of my first position on the mountains west and southwest of Großentaft. Even before dawn, the Russians were close enough to make sticking around an iffy prospect. The preplanned artillery target just west of Großentaft helped to cover the retreat northwest, to the next peak up in line. That held until dawn, at which point the Russian return fire got to be too accurate to hold any longer, at which point I retreated to the positions shown. In total, I lost four Abramses on that flank, along with a pair of M3s who failed to make the final dash quite fast enough.
The Abrams platoons did the heaviest lifting, but the Bradleys were value players—although I lost almost all of them, but for the two at the observation point victory location on the northern half of my final position, they punched well above their weight. In the end, I lost about half my force, while the Russians lost about 110 vehicles. Repeated retreating to new defensive positions around Großentaft won the day for me, and I think that’s the key insight. Yielding ground and making the Russians find you again costs them heavily in vehicles, and they can’t keep that up forever.
I lost a very similar scenario in Flashpoint Campaigns by trying to be too static. I’d like to revisit that one now that I’ve succeeded here.
What’s Included?
I bought the nation pack DLCs at the same time as the base game, so I might be wrong on the division here, but.
In the base game, you get a selection of Cold War-appropriate maps: the Fulda Gap, the North German Plain, Southeast Finland, and the less-thrilling Fort Irwin Training Center4. To play on these fields, you get the US and USSR, East and West Germany, the UK, Poland, and Finland.
The Italy and Yugoslavia nation pack adds those nations and a Northeast Italy map, which starts at Trieste in the East and goes about sixty kilometers west. The France and Belgium nation pack has the given nations plus an Ardennes map.
The DLC nations may be less important to a Cold War-era game than the base nations, but they’re certainly not under-baked, either. Their unit lists are only less extensive than the major players insofar as their actual tables of equipment were less extensive. The Ardennes map in particular is a great addition, lending a delightful history-repeats-itself flavor to proceedings.
Miscellaneous Thoughts and Final Verdict
Miscellaneous thought the first: it runs on Linux perfectly with Steam’s latest version of Proton, which is a little unusual for a sprite-based 2D game.
Miscellaneous thought the second: to help you get a feel for the contour of the landscape, typically a difficult task, it provides a zoomable isometric view with an adjustable terrain elevation scale. (I recommend 2x or 3x.) Especially for a modern (well, modern-ish) setting, this is an important tool for player—little undulations in the terrain play a crucial role in setting up an attack or a defense, and the line of sight tool (which is admittedly a pretty good implementation thereof) is not always enough5.
Miscellaneous thought the third: the available documentation (a manual, a guide to the campaign engine, an in-game help system) does not fully describe the game. The white circle map markers I mentioned earlier? I’m assuming they’re enemy artillery indicators, but I don’t actually know that for sure, because I can’t find any indication of what they mean anywhere in the manuals. I’m willing to let that slide for non-wargames, but in this case, I’m not.
Miscellaneous thought the fourth: Armored Brigade is admittedly clunky in places. In particular, the order system is not half as expressive as the one in Command Ops, and that bothers me. On the flip side, the scale is much smaller, so you can actually babysit a bit, and the orders delays are not so prohibitive as to require an orders system where you can accurately specify your entire plan ahead of time (like Command Ops does). Helicopter air support is also a little tricky to use, which I didn’t really touch on herein, but did certainly notice.
And now, the verdict: Armored Brigade doesn’t supplant Flashpoint Campaigns: Red Storm, but it does supplement it nicely. Flashpoint Campaigns is laser-focused on the issue of command structure, and does so within a very particular Cold War timeframe. Some of its rules suffer from that focus (tanks outrunning helicopters, say, or infantry being relatively easy to root out even for a tank).
Armored Brigade fills in those gaps. Defensive infantry are extremely powerful, and its real-time, non-hex nature6 requires no tinkering to make units scale correctly with respect to one another.
Finally, it’s much easier to pick up and play. Its simplicity relative to Flashpoint Campaigns is its greatest asset—I’ve already played a few scenarios, because an hour isn’t all that big an ask.
So, despite its occasional frustrations, I say Armored Brigade is worth your time7.
- Although its handling of infantry is relatively clunky, so it isn’t a great fit for the Second World War. ↩
- This is one of its biggest edges over Flashpoint Campaigns, unless I’m misremembering Flashpoint Campaigns, and is a benefit of Armored Brigade’s smaller scale. ↩
- It isn’t well documented. ↩
- The problem with Fort Irwin is that there’s very little cover beyond buildings. ↩
- I consider this a particular flaw in Command Ops. ↩
- It isn’t hex-based, but it does take place on a grid of 30-meter squares, with some unit stacking allowed. ↩
- Speaking of time, this article, according to the WordPress editor, has 1986 words. Appropriate. ↩